Advertisement
Advertisement

Subscribe to Our Youtube Channel
Related Manuals for Ampeak CGUFB2008


Summary of Contents for Ampeak CGUFB2008
- Page 1 OWNER'S MANUAL 6V/12V 2A/8A Smart Battery Charger...
-
Page 2: Table Of Contents
WARNING: Read carefully and understand all ASSEMBLY AND OPERATION INSTRUCTIONS before operating. Failure to follow the safety rules and other basic safety precautions may result in serious personal injury. Should you have any questions or need any support, please contact us at support.us@ampeak.com... -
Page 3: Intended Use
Intended Use The Ampeak 6V/12V 2A/8A Smart Battery Charger is suitable for all types of lead-acid batteries, including Gel, AGM and STD. The charger will quickly and easily charge the vehicle battery and keep the battery performing optimally. The charger has a digital display to keep track of voltage, current and charging progression. -
Page 4: Important Safety Information
Overcharging Protection - If the battery cannot be fully charged within 24 hours, the charger will stop charging automatically. Short Circuit Protection - If the cables connected suffer from short circuit when the charger working, charger will stop charging automatically. Important Safety Information •... - Page 5 • Do not charge a frozen battery. • Use of an attachment not recommended or sold by the battery charger manufacturer may result in a risk of fire, electric shock, or injury to persons. • Do not operate charger if it has received a sharp blow, been dropped, or otherwise damaged in any way;...
- Page 6 • Do not charge a frozen battery. • Use of an attachment not recommended or sold by the battery charger manufacturer may result in a risk of fire, electric shock, or injury to persons. • Do not operate charger if it has received a sharp blow, been dropped, or otherwise damaged in any way;...
- Page 7 PERSONAL SAFETY • Make sure that someone is within range of your voice to come to your aid if needed while you work with or are near a lead-acid battery. • Wear complete eye and clothing protection when working with lead-acid batteries.
- Page 8 • Do not operate charger with damaged cord/plug - replace the cord/plug immediately. • “Warning: Changes or modifications to this unit not expressly approved by the party responsible for compliance could void the user’s authority to operate the equipment.” • “NOTE: This equipment has been tested and found to comply with the limits for a Class B digital device, pursuant to Part 15 of the FCC Rules.
- Page 9 • NOTE: If using this battery charger/maintainer for a marine battery, the battery must be removed and charged on shore unless you have purchased special equipment designed for marine use to allow for onboard charging. • Check the polarity of the battery posts. Note: The positive (+) post is usually larger in diameter than the negative (-) post.
-
Page 10: Main Parts Of Product
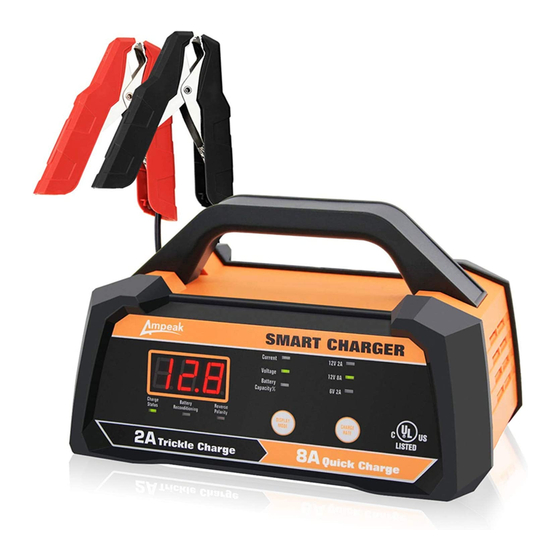
Main Parts of Product Subassembly Digital Display Window - Shows charging current, voltage, and battery capacity % and error codes. Charging Status LED Indicator - When battery is charging, green light will flash. When battery is fully charged, green light will be solid. Current / Voltage / Battery Capacity% LEDs - When chosen to display current, voltage, or battery capacity % on the digital display, the respective LED will emit a green... -
Page 11: Before Each Use
Subassembly Charging Rate Selection Button - Press the button to interchange between the charging rates 6V 2A, 12V 2A, and 12V 8A. Charging Rate Indicators - The corresponding LED will light up to indicate the charging rate selected. Battery Reconditioning Indicator - The LED will light up while the charger turns into battery reconditioning. -
Page 12: Operating Instructions
If it is necessary to remove the battery prior to charging, always remove the grounded terminal first. Ensure all electrical accessories are off prior to charging. It is best to clean the battery terminals prior to charging. Using a battery terminal brush is a good way to remove corrosion. When charging a lead-acid battery that is not sealed, it may be necessary to add distilled water into battery so the battery acid solution reaches the level as specified by manufacturer. - Page 13 Note: If you want your battery to sustain a longer life, slow charges it. Slow charging will take longer but will charge your battery more thoroughly. If your battery needs to charge in a short amount of time, use the rapid charge setting. Battery Reconditioning When your battery has been unused for long periods of time, the battery will be in a deep discharged state.
- Page 14 Charging Display The digital display has three modes of content. By pressing the button, you can toggle between the modes. • Current – the charging current (A) will be displayed. • Voltage – the charging voltage (V) will be displayed. Note: The voltage displayed is the charging voltage and usually will be higher than the battery’s resting voltage.
- Page 15 1. Desulfation: Pulse charges the battery to break down the buildup of lead sulphate crystals. Lead sulphate crystals can occur when a battery has been discharged or left unused for a period of time, seriously affecting the performance and lifetime of the battery.
- Page 16 If charging with 6V gear, it will be 3-STAGE CHARGING 3-STAGE CHARGING 1-Bulk charge 2-Absorption 3-Float 1-Desulfation 2-Soft Start 3-Bulk Charge 4-Absorption 5-Battery Test 6-Recondition 7-Float First Stage - Bulk Charge: Delivers maximum charging amperage to "wake up" any serviceable 6 volt battery. When battery reaches a maximum safe predetermined voltage, the charger will automatically move into Stage 2 of the charging process.
-
Page 17: Maintenance
Maintenance Always unplug and disconnect the charger before performing maintenance on the unit. After each use, use a dry, lint-free cloth to clean battery corrosion and other dirt from the clips, cords and charger. Ensure that all components are in good working order. Never open the charger as there are no serviceable parts inside the unit.
Need help?
Do you have a question about the CGUFB2008 and is the answer not in the manual?
Questions and answers
Hooked up to battery display reads 8 going from one read out to next