Advertisement
Quick Links
Using Instructions
These instructions relate ONLY to this product and contain important
information for using the product for the first time. Please keep these
instructions for later reference and should always accompany the
product in the event of transference to a new user.
1. Introduction
Dear Costumer,
Thank you for purchasing the solar light. With this solar light you purcha-
sed a product manufactured according to the current state of technology.
This product fulfils all requirements of the valid European and natio-
nal regulations. The conformity was proved. The relevant declarati-
ons and documentation are deposited with the manufacturer.
To maintain this state and guarantee a safe operation, you as the user will
have to follow this operating manual!
!
2. Safety Instructions
- In case of damages caused by not
following this operating manual, the
warranty rights will expire! We exclude
liability for any consequential damages!
- We exclude liability for property or
personal damages caused by inappropriate
handling or not following the safety instructions.
- In these cases any guarantee rights will expire.
Due to safety and admission reasons (CE) it is not allowed to arbitrarily
reconstruct and/or change the solar light.
Therefore, please keep to the operating manual.
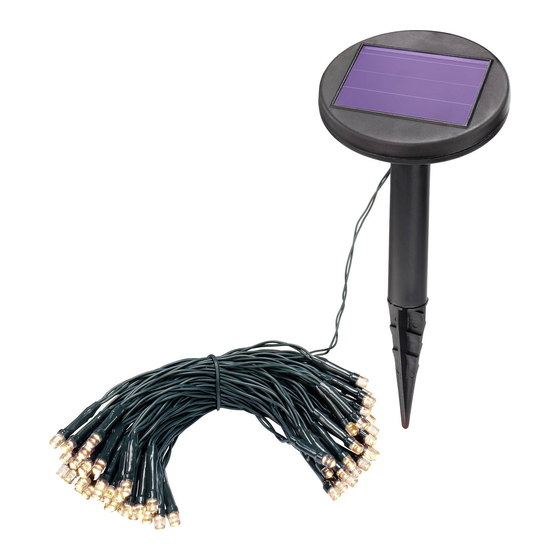
3. Usage in Accordance with Requirements
The light is automatically switched on at darkness and switched out in the
morning light. The maximum illumination duration with a full accumulator
and without charging is approximately 8 hours. The solar module installed
in the upper part of the housing charges the integrated accumulator.
Switch1 (the main switch) is used to switch on and off the whole set. In the
position of "off", the battery cannot be charged. Switch 2 is used to switch
on and off the illumination and in the position of "A", the battery can be
charged and the illumination is off. In the position of "C", the battery is char-
ged and the illumination on. The LED rope is suitable for outdoor usage.
This LED net cannot be sunk into water. The solar module may be instal-
led on a pole, inserted into the ground or screwed to the wall. The product
is designed for the application in a private environment.
Note: Please make sure that the solar module is preferably directed to the
South and that shadows are avoided. When directing the module to the
North it is not possible to use the product. The solar module shall always
be free of snow in the winter.
4. Installation and Initiation
1. Please carefully take all parts out of the package and lay out the net.
2. Please fix down the LED net on the wall, the fence or the pavilion etc.
please pay attention to the "marginal" net with the cables cannot be pla-
ced too near from one another. If the voltage is too large, you can remo-
ve the cable or demolish the solder joints of LEDs. It is just designed for
the use in the outdoor areas but please notice that the net can not be
permanently submerged into water (pond, etc). For the convenience of
the installation, the light is preferably removed from the module.
3. Now choose an appropriate site for the assembly of the solar module
within the reach of the
cable. Please note
that the site shall be
directed to the south
and that no shadow
falls
on
the
solar
module.
The
solar
module can be instal-
led on a pole, inserted
into the ground or
screwed to the wall by
means of a pole brak-
ket. Via the ball-and-
socket joint, it is possi-
ble to fix the solar
module direct to the
sun.
wall mounted
pole mounted
GB
Note: During the winter months the duration of illumination will generally be
shorter. If the lamp should not shine on the first evening, please wait for a sunny
day.
4. Now push the switch 1 (main
switch) on the back side of the solar
module to the position "ON". The
LED net is now activated. Via a
switch on the back of the module,
the LED light of the net in different
light modes (different blinking light,
continuous light) is controlled.
5. Switch 2 (power switch): in the position "A" the LED net can be turned off. In
the day the battery is charged but at night the net is not lighted. In this way
for several days you can continuously store energy from the sun in the bat-
tery. Then set the switch to the position "B", the illumination is on.
Note: During the winter month the duration of illumination will generally be
shorter. If the lamp should not shine on the first evening, please use Switch
2 to store energy for several days.
5. light modes (smart program)
The smart programmer allows our product to the automatically change light
modes so that the power of the batteries can be saved.
There are a total of 8 light modes as following:
1. Circuit of the light mode 2-8
2. Continuous light
3. Wavy light (alternating with two speeds)
4. Sequential light (alternating with four speeds)
5. With only one lamp from light to weak in the circulation (alternating with
three speeds)
6. Light modes 4 plus 8
7. Four lamps are lit progressively from light to weak in the circulation
8. Blinking light (starry sky)
5.1. Automatic Mode
If you do not press the mode button, light the lamp with the Smart Program
for 8 hours after the following sequence:
1. the first hour: light mode 1
2. 2nd-4th hours: light mode 1, and reduce the electricity consumption
3. 5th-6th hour: light mode 5, 6, 8
4. 7th-8th hour: light mode 5, 6, 8, and reduce the electricity consumption
5.2. Manual Mode
If you press this button, the lamp goes into the manual mode. That means
you can use every keystroke between 8 different Light modes selected.
After chosen the light mode is activated for one hour, and then the lamp
goes back to the automatic mode.
5.3 Continuous light
Press the button for longer than 3 seconds and the light goes to the state
of static light.
6. Exchange of batteries
After one or two years, the capacity of the battery is down and must be
exchanged. The batteries are commercially available from the manufactu-
rer.
1. Unscrew the 4 screws on the back
side of the solar module and remove
the cover.
2. Remove the battery from the holder.
3. Insert the new battery with correct
polarity and close the housing in
reverse order.
Note: Used batteries must be dispo-
sed of in a non-polluting way and do
not belong into the domestic waste.
ground
Your dealer is legally obliged to take back the old batteries.
stake
ground
stake
switch 2
switch 1
mode
button
Advertisement

Related Manuals for esotec 102168


Summary of Contents for esotec 102168
- Page 1 Using Instructions Note: During the winter months the duration of illumination will generally be shorter. If the lamp should not shine on the first evening, please wait for a sunny day. These instructions relate ONLY to this product and contain important information for using the product for the first time.
- Page 2 GmbH, Gewerbegebiet Weberschlag 9, D-92729 Weiherhammer Tel.-Nr: 09605-92206-28, Fax.-Nr: 09605-92206-10, e-mail:info@esotec.de Internet:www.esotec.de LED net with 200 warmwhite LED´s Product Art.-Nr: 102168 LED net with 200 color LED´s Product Art.-Nr: 102170 Disposal: Dear customer, please cooperate in avoiding waste. When you intend to dispose of the product in future, please consider that it contains valuable raw materials suited for recycling.
Need help?
Do you have a question about the 102168 and is the answer not in the manual?
Questions and answers