Table of Contents
Advertisement
Advertisement
Table of Contents

Subscribe to Our Youtube Channel
Summary of Contents for Razberi MP Series
- Page 1 MP Series User Manual...
-
Page 2: Safety Warning
© 2012 razberi™ Technologies; v3.02.12 All rights reserved. razberi™ Technologies makes no warranty of any kind with regard to this material, including but not limited to the documentation, function, and performance of these programs and their suitability for any purpose. -
Page 3: Table Of Contents
..............................6 NITIAL NSTALLATION ™I ™ ............7 ONNECTING A AMERAS TO THE RAZBERI NSTALLING A RAZBERI ™ ............................. 8 NSTALLING A RAZBERI RAZBERI™ SOFTWARE INTRODUCTION ....................... 11 ................................11 LIENT OGIN ..............................12 REATING A ROFILE ..............................12 SELECTING ORTS .............................. - Page 4 Camera Default Login ......................... 30 3.14.4.3 Custom Scheduler ..........................31 3.14.5 NVR Logs ..............................32 3.15 ..................................32 3.15.1 About ................................32 3.15.2 Server Information ............................. 32 3.15.3 Online Help ..............................32 3.15.4 Technical Support ............................32 FAQ ....................................33 razberi™ Technologies...
-
Page 5: Introduction
PoE) and IP addresses, configures cameras for motion detection, and automatically begins recording. For smaller systems, there is no need for installers to source switches, routers, software, and servers. Installers can use multiple razberi™ units within a network to build large systems over long distances with fiber optics using the built-in SFP Combo Uplink Ports. -
Page 6: Preparations & Initial Setup
Connect the power cord to an available outlet. Use the wall mounts and mount kit to mount the razberi™. Use the following steps to mount the razberi™ to the desired location. Along with basic installation tools, a #1 Phillips Head screwdriver is required for mounting the razberi™. -
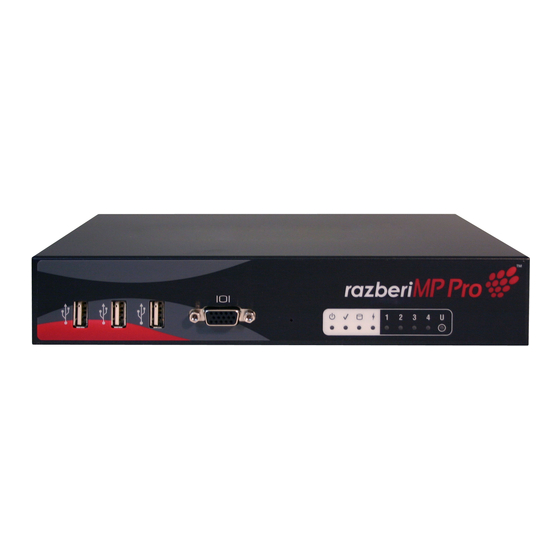
Page 7: Connecting Apc And Cameras To The Razberi
Connecting a PC and Cameras to the razberi™ NOTE: Provide the razberi™ 3-5 minutes of start-up time prior to connecting a PC or cameras. Front Panel Figure 1 Connect the client PC or the network connection to the Uplink port. Connect cameras to the LAN ports 1H through 4 on a razberi™... -
Page 8: Installing A Razberi
Server automatically. Installing the razberi™ into a network where a DHCP server does not exist. (See figure 3) The razberi™ can either serve as the DHCP Server in a dedicated network, or it can just be assigned a static address. - Page 9 Connect the uplink port on the razberi™ to the existing network. Power up the unit. Connect the cameras to the LAN ports on the razberi™. (Either 1-4 or 1-16) By default the razberi™ and connected cameras acquire addresses from the existing DHCP server/router automatically.
- Page 10 Insert the razberi™ power cable into an available power outlet following the safety guidelines. Allow 3-5 minutes. Use the razberi™ Utilities CD (included in the razberi™ package) to install the client software. To install the client software without the Utilities CD, access http://192.168.9.1/razbericlient...
-
Page 11: Razberi™ Software Introduction
Client Login Connect the cameras to the LAN ports on the razberi™ (see section 2.2 for information on connecting a PC and cameras to the razberi™). NOTE: Provide the razberi™ 3-5 minutes of start-up time prior to connecting a PC or cameras. -
Page 12: Creating A Profile
Connection: The connection should be either LAN or Remote. Server HTTP port: If the razberi™ server is using a different HTTP port (other than the standard 80), then the user must change the Client to reflect the same port value. -
Page 13: Tool Bar
Refresh - Refreshes the video displays on the Live View window Log Off - Logs off the application Mute - Mutes all available sound Exit – Closes the application Help System - Offers a dropdown of help options that provide more information about the application razberi™ Technologies... -
Page 14: Camera Tree
To refresh the videos displaying from a particular site, access the Camera Tree. Right-click the name of the site and select Refresh Site from the list of available options. The system may take a few seconds to refresh the video displays. razberi™ Technologies... -
Page 15: Adding Sites
To disconnect a site, select the site from the Camera Tree and right-click the site name. (See figure 13) Select Disconnect Site from the list of available options. When a user disconnects a site, all of the cameras disappear and the icon displays in red. Figure 13 razberi™ Technologies... -
Page 16: Renaming Sites
In the Add View Group dialog box, enter the Group Name and a Description of the views and layouts included in the Group. After creating the Group, a new folder with the Group name appears in the Camera Tree. Figure 15 razberi™ Technologies... -
Page 17: Camera Tours
Double-click on a camera name from the Camera Tree and the video will display in an open area. Right-click on the camera name from the Camera Tree, select View Camera from the list of available options, and the live video from that camera plays in an open area. razberi™ Technologies... -
Page 18: Live Video Layout
3 x 2 - Shows a vertical six video display 3 x 3 - Shows a nine video display of three rows and three columns 4 x 4 - Shows a sixteen video display of four rows and four columns razberi™ Technologies... -
Page 19: Zoom Control
The features of PTZ-enabled cameras may vary. Possible features include pan, tilt, iris, and focus. The application offers preset positions using the PTZ controls. Select any preset position and the PTZ-enabled camera moves to the corresponding preset position. razberi™ Technologies... -
Page 20: Alarm Window
Alarm Window The Alarm window displays at the bottom of the Live View screen. This window can be used to monitor all the alarm events being received by the razberi unit. Figure 21 Use the Alarm window to monitor video. Use the icons on the right side of the Alarm window to hide or close To add cameras for monitoring, click the Cameras button and select the necessary cameras. -
Page 21: Playback Zoom Control
To digitally zoom in or out of playback video, select the Digital option. Use the controls to navigate the zoom area while viewing the camera's playback video. Use the mouse to click and drag the zoom boundary box and move to the desired zoom area. razberi™ Technologies... -
Page 22: Slider Window
Click the icon to the far right of the playback controls to synchronize or desynchronize the video playback. NOTE: This option is best effort. Due to variable frame rate of recording and differing resolutions, this might not synchronize exactly. (See Figure 26) Figure 26 razberi™ Technologies... -
Page 23: The Export Feature
Event Window Click on the Event window to view the events corresponding to the available cameras. Select a camera to view its events, and use the playback controls in the Slider window to manage the video. Figure 28 razberi™ Technologies... -
Page 24: Administration Window
Click Refresh to reload and update the Camera List. Click Save Changes in NVR to save any changes made to the Camera List within the Administration window. Click Exit Administration to exit the window without saving any changes. razberi™ Technologies... -
Page 25: Editing Camera Information
Custom Schedule: Select this option to choose a custom schedule from the list or to create a custom schedule. Click New to create a new schedule. For more information on customizing a schedule, see the Custom Schedule topic. razberi™ Technologies... -
Page 26: Adding Cameras
Right-click on the camera row in the Camera List table or click the Enable Camera button on the bottom of the window. Select Enable Camera from the list of options. Click Yes on the confirmation prompt to enable the camera. This feature is available for multiple cameras. razberi™ Technologies... -
Page 27: Disabling Cameras
Network Configuration tab, open the Administration window. Select the NVR Management tab and click on the Network Configuration tab. Note: Changes to the network configuration can only be performed in LAN mode. The Server IP Configuration section displays the settings of the server. (See figure 32) razberi™ Technologies... -
Page 28: Date And Time Settings
Re-log in to the system. The DHCP Server section contains two available radio button options. (See figure 32) Click the On radio button to turn on the DHCP server. With the DHCP server on, the razberi™ gives out IP addresses. -
Page 29: Service Status
3.14.2.3 Service Status Use the Service Status tab to view the statuses of the razberi's services. A green status icon means the service is functioning properly. A red status icon means the service is not functioning properly. To access the Service Status tab, open the Administration window, select the NVR Management tab and click the Service Status tab. -
Page 30: Adding Users
To access the tab, open the Administration window, select the System Preferences tab, and click the Camera Default Login tab. To customize the information, double-click on the Username and Password fields in the available table. Click Save Changes to NVR to save any changes. razberi™ Technologies... -
Page 31: Custom Scheduler
To remove a customized schedule, select the specified schedule and click Remove on the Custom Scheduler tab. Click Yes in the prompt to confirm the schedule removal. Click Save Changes to NVR before exiting the Administration window. Note: Deleting a custom schedule also deletes the schedule from all associated cameras. razberi™ Technologies... -
Page 32: Nvr Logs
If the Online Help System does not fully address a question or issue within the application, click on the Help icon in the Tool Bar and select Technical Support. The Technical Support dialog box provides information on contacting a technical support specialist. razberi™ Technologies... -
Page 33: Faq
(i.e., local/remote), and communication port settings. See Creating a Profile for more information. c. How do I edit profiles? Edit profiles by selecting New/Edit Profile from the dropdown option within the Login screen. See Creating a Profile for more information. razberi™ Technologies... - Page 34 Within the Search window, the user has many specifications to use in order to narrow the search for a particular event. Users must complete the necessary search criteria using a dropdown under Events. See Event Window for more information. For more information on the razberi™ MP Series, access the razberi™ Technologies web site at www.razberi.net. razberi™ Technologies...
Need help?
Do you have a question about the MP Series and is the answer not in the manual?
Questions and answers