Table of Contents
Advertisement
Quick Links
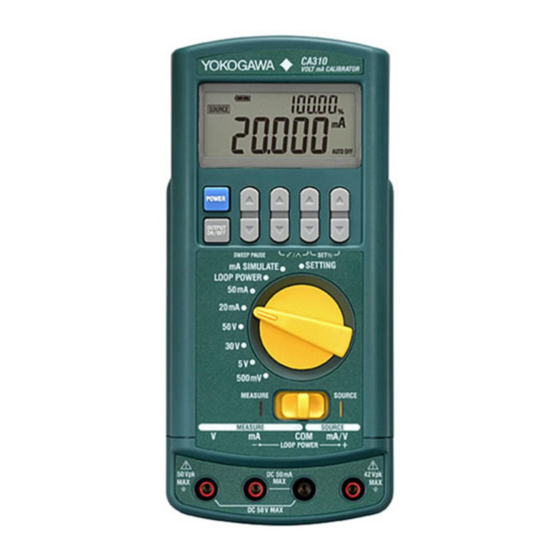
CA310
User's
Volt mA Calibrator
Manual
User's Manual
This manual explains how to use the Volt mA Calibrator.
Keep this manual in a safe place for quick reference in the event that a question arises.
1st Edition: November 2015 (YMI)
All Rights Reserved, Copyright © 2015, Yokogawa Meters & Instruments Corporation
Printed in Japan
Safety Precautions
The handling precautions, component names, and specifications are covered in the separate Getting
Started Guide (IM CA310-02EN).
Be sure to read the Getting Started Guide before using this instrument.
Basic Setup
1.
Turn the instrument on, and set the rotary switch to
2.
Use the left-most up and down keys to select the setting and the right-most up and down keys to
switch the options.
3.
Press OUTPUT ON/OFF to confirm the setting.
Selects the setting Selects an option
▲
▲
▲
▲
POWER
OUTPUT
ON/OFF
Confirms the settings
Auto power-off
If this is set to ON when the instrument is running on batteries, the power automatically turns off
if you do not operate the instrument for approx. 20 minutes. This is invalid when the instrument is
running off of the AC adapter.
Backlight
Turns the backlight on and off. If set to Timer, the backlight turns on for approx. 2 minutes every
time you operate a key.
Sweep time
When sweeping in steps, set the output duration of each step. When sweeping linearly, set the
output duration for the value to change from 0% to 100%.
HART/BRAIN communication resistance
If you want to connect the 250 Ω communication load resistance to a HART or BRAIN
communication system, turn this on.
Initialization of Span Settings
Initializes the span settings.
Initialization of Settings
Initializes settings.
Measurement
• Always turn off the power of the device under measurement before connecting
it. Connecting or disconnecting lead cables without turning off the device under
measurement is extremely dangerous.
• Do not connect current circuits to the voltage input terminals. Likewise, do not
connect voltage circuits to the current input terminals. Improper connection may
cause electric shock or burns or may damage the device under measurement
or the instrument.
French
Avant de brancher l'appareil à mesurer, mettez-le hors tension. Il peut être très dangereux de
brancher/débrancher les câbles de mesure sans mettre l'appareil à mesurer hors tension.
Évitez en particulier de brancher un circuit de courant sur les bornes d'entrée de tension ou
un circuit de tension sur les bornes d'entrée de courant. Un branchement inadéquat risquerait
non seulement d'endommager le circuit ou l'appareil à mesurer ainsi que l'équipement, mais il
pourrait également représenter un risque pour les personnes.
1.
Set the CA310's measure/source switch to
2.
Follow the instructions in the Getting Started Guide to connect the CA310 to the device to be
measured using the included lead cable.
3.
Use the rotary switch to set the range. In measurement mode, mA SIMULATE is invalid.
4.
Turn on the device to be measured. The measurement appears on the CA310.
IM CA310-01Z2
SETTING
.
Display
Setting
Options
Auto power-off
ON
ON/OFF
Backlight
Sweep time
15s
HART/BRAIN
ON/OFF
Communication
resistance
Initialization of
—
span settings
Initialization of
—
settings
*: Default value
WARNING
AVERTISSEMENT
MEASURE
.
LOOP POWER
Apply a constant 24 VDC voltage to the transmitter to perform a loop test. The displayed value is
current.
Set the rotary switch to
OUTPUT ON/OFF
Press
the application.
Two-wire transmitter
Sourcing
1.
Set the CA310's measure/source switch to
2.
Follow the instructions in the Getting Started Guide to connect the CA310 to the target device
using the included lead cable.
3.
Use the rotary switch to set the range. In source mode, LOOP POWER, 50 mA, and 50 V are
invalid.
4.
Follow the instructions for common operations in the Getting Started Guide, and set the output
1st Edition
value with the ▼ and ▲ keys.
5.
OUTPUT ON/OFF
Press
Press
OUTPUT ON/OFF
If you change the range, the output turns off.
Note
•
If the load current in a voltage range or load voltage in a current range exceeds the maximum
value in the specifications, the protection limiter is activated, and the output is turned off.
To restore, set the load back to a normal condition, and press OUTPUT ON/OFF again.
•
The CA310 is calibrated excluding the voltage dip in the lead cable.
Load current readings include an error resulting from the lead cable resistance.
mA SIMULATE
If the range is set to mA SIMULATE, the CA310 operates as a two-wire transmitter simulator and
sinks current applied to the Hi terminal from an external voltage source (distributor).
/OFF
*
/TIMER
*
/30s/45s/60s
*
*
Two-wire transmitter
Changing the Output Mode
1.
Refer to "Keys" in the Getting Started Guide, and set the output mode.
Normal output (no display): The set value is output. The output value can be varied using the ▼
and ▲ keys.
Span check (
span.
Step sweep(
Linear sweep (
▲
▲
Press simultaneously to set the output mode.
Pauses or resumes sweeping
Pressing this when sweeping is
stopped or paused sets the output
to the span 0% value.
Sweeping
The output value is varied automatically between 0% and 100% of the specified span. There are
two sweep modes: step and linear.
Step sweep
Sweep time
100%
0%
1.
Set the 0% and 100% of the span, which is the sweep range.
Set the span 0% value using the ▼ and ▲ keys and then press simultaneously the first and the
second ▼ keys from the right. SET is displayed, and 0% is set.
Likewise, set the span 100% value using the ▼ and ▲ keys and then press simultaneously the
first and the second ▼ keys from the right.
For details on key operation, see "Keys" in the Getting Started Guide.
2.
Set the output mode to step sweep or linear sweep.
3.
OUTPUT ON/OFF
Press
OUTPUT ON/OFF
Pressing
OUTPUT ON/OFF
Pressing
Pressing the left-most ▼ key while sweeping pauses sweeping. The displayed value continues
to be output while sweeping is paused. Pressing the ▼ key again resumes sweeping.
When sweeping is stopped or paused, pressing the left-most ▲ key sets the output to the span
0% value.
LOOP POWER
and take measurements.
. 24 VDC voltage is applied. Press
Distributor
+
HART Communicator
4-20mA
—
SOURCE
.
. ON appears on the screen, and the output is turned on.
again to turn off the output.
Distributor
+
4-20mA
—
+
—
): In addition to normal output, the output can be varied in units of 25% of the
): The output is varied automatically in steps of 25% of the span.
): The output is varied linearly from 0% to 100%.
Output setting for span check
Set to 100% of
▲
▲
▲
span
Set to 0% of
span
Linear sweep
100%
0%
Time
. Sweeping will start.
again stops sweeping and also the output.
yet again resumes sweeping from the last output value.
OUTPUT ON/OFF
again to stop
+
—
▲
▲
▲
Increase or
decrease by
1 count
Increase or decrease
by 100 counts
Increase or decrease in
25% steps of span
Sweep time
Time
IM CA310-01Z2
Advertisement
Table of Contents

Subscribe to Our Youtube Channel
Related Manuals for YOKOGAWA CA300 Series


Summary of Contents for YOKOGAWA CA300 Series
- Page 1 Set the CA310’s measure/source switch to Follow the instructions in the Getting Started Guide to connect the CA310 to the target device 1st Edition: November 2015 (YMI) using the included lead cable. All Rights Reserved, Copyright © 2015, Yokogawa Meters & Instruments Corporation Use the rotary switch to set the range. In source mode, LOOP POWER, 50 mA, and 50 V are Printed in Japan invalid. IM CA310-01Z2...
- Page 2 出力中にレンジを変更すると、出力が OFF になります。 Note ・ 電圧レンジでの負荷電流または電流レンジでの負荷電圧が仕様の最大値を超えて、過大な値に なると、保護用のリミッターが作動し、出力が OFF になります。 復帰する場合は、負荷を正常な状態に戻し、再度、OUTPUT ON/OFF を押してください。 ・ 本機器はリードケーブルの電圧降下分を除いて校正されています。 負荷電流をとる場合は、リードケーブルの抵抗が誤差になります。 1st Edition: November 2015 (YMI) All Rights Reserved, Copyright © 2015, Yokogawa Meters & Instruments Corporation Printed in Japan IM CA310-01Z2 mA SIMULATE 初版 レンジを mA SIMULATE に設定すると、2 線式伝送器のシミュレーターとして、外部電 圧発生器 ( ディストリビューター ) から Hi 端子の方向に設定した電流を吸い込みます 本機器を安全にご使用いただくために...
Need help?
Do you have a question about the CA300 Series and is the answer not in the manual?
Questions and answers