Table of Contents
Advertisement
Quick Links
Model: T129
The second generation wireless tour guide transmitter.........1PC
The second generation wireless tour guide receiver.............NPC
3.5 headset or col lar microphone........................................1PC
3.5 earphone headset or headset........................................NPC
SMA antennas....................................................................NPC
Products
To users
Thank you for choosing T129 high-fidel ity digital wireless products that produced .
T129 is an anti-interference digital wireless mini - tour guide system produced by using
T129 which is digital wireless audio transceiver modules. The core module use our high
qual ity 2.4GHz audio transmit module which already own the property right, using the
best sample rate in industry, good sound effect, strong anti-interference capability. The
modules's work frequency is 2.4G ISM international free band, which serve global market.
Before using, please checking the attachment whether is complete according to the
instructions on page of packing list first, to avoid unnecessary trouble. For best perfor-
mance, and give full play to all the features of this unit, please read these instructions
carefully and correctly set. Please save this for future shows that at any time.
Special Declaration
1. Intel lectual property rights statement: The hardware and software of the product is
protected by copyright law and the International Convention. Without any written auth-
orization of our company , any copy of the product and of the specifications, part or all,
will bear the corresponding legal responsibility. The brochures are copyright based on
our company. without the consent of our Company, not a part or all of the Manual may
be externally released.
2. The manual is only for reference and ultimate practical features are depending on
whichever is actually ordered and whatever features are actually received and realized.
Part name
2
3
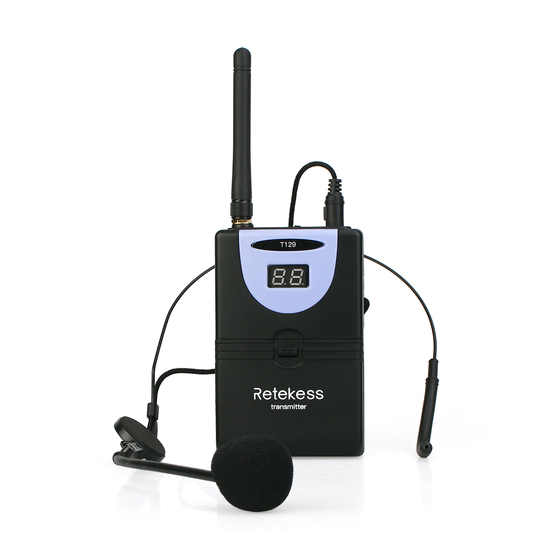
1.Antenna
1
2.Power switch
3.Microphone interface
T129
4.Channel/Volume display
4
5.External power interface
8
6.Status indicator LED
5
7.Channel up button
vol-
vol+
CH
status
9
6
+
8.Volume up button
-
10
7
9.Volume down button
+
-
10.Battery box
Wireless tour guide transmitter
2
3
1.Antenna
2.Power switch
1
3.Microphone interface
T129
4.Channel/Volume display
4
5.External power interface
6.Status indicator LED
8
5
7.Channel up button
9
vol-
vol+
CH
status
6
8.Volume up button
+
-
9.Volume down button
10
7
+
10.Battery box
-
Wireless tour guide receiver
Using preparation
Antenna
Microphone
interface
T129
Follow the instrucions shown installed
battery, natenna, microphone,
headphones and other accessories.
vol-
vol+
CH
status
+
• • • •
-
Antenna installation
+
-
• • • •
T129
vol-
vol+
CH
status
+
• • • •
-
Were installed
transmitter and
+
-
receiver batteries
• • • •
Operation Guide
1. Pairing way of frequency: Press the channel button, to adjust the same channel of
transmitter and the receiver (If the mode is auto pairing, need not this operation), when
the transmitter and receiver been adjust same channel, LED off on receiver. After
pairing finish, the system enter into normal situation.
Notice: Press Channel button and loose (In three seconds)then channel change once,
Total ly can change 20 channel; after the channel of transmitter that been adjust, if the
mode of receiver that is manual pair then need adjust simultaneous, If pairing is Auto
mode that receiver needn't any operation, pairing can finish automatically.
2. Channel adjustment: When you meet interference, you should change channel on
adjust channel.
3. Adujsting default setting: Press the channel button (CH+) of transmitter continuously
for about 20 seconds, Unti l Status indicate LED fl ickers faster, Loose the channel
button (CH+), restart machine that Recovery default setting finish.
4. Pairing way of code: Press the channel keys of both the transmitter and the receiver
simultaneously for more than 3s (Mean while LED remains off for 3s), till LED is on.
Stop pressing, and it gets into the state of 5s peer to peer pairing (Mean while LED
flickers). After receiver receiving ID paired signals, the LED flickers 3 times, indicating
that it gets into the state of receiving, waiting for the signals from the transmitter.
Normally, led goes out when pairing work is successfully done. If the key shouldn't be
released during Led blinking, which indicates that the transmitter has got into the mode
of point to mass pairing. and point to mass pairing work of one transmitter to multi
receiver that is over. (Note: This feature is used with caution)
5. Special Note: Please check the transmitter's double-digit display LED which locate
belong bottom right corner of display window when using the microphone, that should
show a small dot (Microphone switch), if it does not display a smal l dot, it should be
the audio switch, which can press the volume keys of plus or minus to convert it.
Install headset
Advertisement
Table of Contents

Subscribe to Our Youtube Channel
Related Manuals for Retekess T129


Summary of Contents for Retekess T129
- Page 1 Thank you for choosing T129 high-fidel ity digital wireless products that produced . Microphone T129 is an anti-interference digital wireless mini - tour guide system produced by using interface T129 which is digital wireless audio transceiver modules. The core module use our high qual ity 2.4GHz audio transmit module which already own the property right, using the...
- Page 2 •During transmissions, your radio generates RF energy that can possibly cause interference to specific user awareness information. Your Retekess radio has a RF Exposure Product Label. with other devices or systems. To avoid such interference, turn off the radio in areas where Also, your Retekess user manual, or separate safety booklet includes information and operating signs are posted to do so.
Need help?
Do you have a question about the T129 and is the answer not in the manual?
Questions and answers