Table of Contents
Advertisement
Quick Links
Advertisement
Table of Contents

Related Manuals for CAB ER4/210


Summary of Contents for CAB ER4/210
- Page 1 Operator's Manual External Rewinder ER4/210...
- Page 2 The replication, conversion, duplication or divulgement of the whole manual or parts of it for other intentions than its original intended purpose - in particular the procurement of spare parts for products sold by cab - demand the previous written authori- zation by cab.
-
Page 3: Table Of Contents
Contents Introduction ............................4 Instructions ............................... 4 Intended Use ............................4 Safety Instructions ............................ 5 Environment ............................. 5 Product Description ..........................6 Function ..............................6 Technical Specification ..........................6 Device Overview ............................7 Start-Up ..............................8 Contents of Delivery ..........................8 Mount the Connecting Set ........................ -
Page 4: Introduction
Introduction Instructions Important information and instructions in this documentation are designated as follows: Danger! Draws your attention to an exceptionally grave, impending danger to your health or life. Warning! Indicates a hazardous situation that could lead to injuries or material damage. Attention! Draws attention to possible dangers, material damage or loss of quality. -
Page 5: Safety Instructions
Introduction Safety Instructions • The device may only be used in a dry environment, do not expose it to moisture (sprays of water, mists, etc.). Warning! During operation, the rotating parts of the device are freely accessible. When working on the device wear tightly fitting clothes and tie up long hair. Loosely hanging pieces or long hair can get caught in parts of the device. -
Page 6: Product Description
An adjustable guide axle ensures that the label strip is led horizontally from the printer into the rewinder. For a correct alignment of the external rewinder with the printer use the included connecting set. Technical Specification ER4/210 Max. Material Width 120 mm (4.7 in) Max. -
Page 7: Device Overview
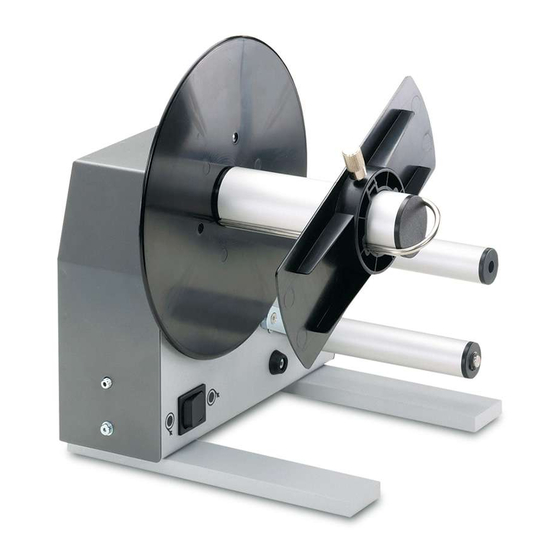
Product Description Device Overview Figure 1 Device overview Switch Rotating Direction Clamp Rewind Axle Power Switch Roll Power Input Module Guide Axle Knurled Nut Rewind Adapter Connection Plate Plate Adapter Plate... -
Page 8: Start-Up
Retain packing material for later use ! Mount the Connecting Set The connecting set is essential to get a defined and fixed position of the external rewinder ER4/210 to the printer MACH4. 1. Put the two guidings (4) into the suitable holes (5) on the bottom side of the printer. -
Page 9: Connecting To Power Supply
Start-Up Connecting to Power Supply The rewinder is equipped with a wide range power unit (100-240V~), so it is possible to use the printer both with a voltage of 230V~/50 Hz and with a voltage of 115V~/60 Hz without making changes to the printer. Warning! Risk of injury by rotating engine parts. -
Page 10: Selection Of The Rewind Direction
Alignment Selection of the Rewind Direction The selection of the rewind direction is depend of using an inside or outside wound label. Figure 5 Direction of rewinding Turn off the rewinder and set the switch (1) to the required direction of rewinding: Rewinding with labels inside Rewinding with labels outside Alignment the Guide Axle... -
Page 11: Operation
Operation Rewinding Directly onto the Rewind Axle Notice! First remove the spring (2) from the rewind axle! Warning! Risk of injury by rotating engine parts. When switching on the Rewinder starts immediately and winds to the material is tightened. 1. Loosen the screws (1) and remove the spring (2). Notice! Consider the required direction of rewinding : - The broken line is valid for inside wound labels. -
Page 12: Rewinding Onto 40 Mm (1.6 In) Cardboard Core
Operation Rewinding onto 40 mm (1.6 in) Cardboard Core Notice! Make sure that the spring (1) is mounted on the rewind axle (2)! Consider that the cardboard core (3) should be about 1 mm (0.04 in) broader than the label strip Warning! Risk of injury by rotating engine parts. -
Page 13: Rewinding Onto 76 Mm (3 In) Cardboard Core
Operation Rewinding onto 76 mm (3 in) Cardboard Core Notice! First remove the spring from the rewind axle! Consider that the cardboard core (3) should be about 1 mm (0.04 in) broader than the label strip. Warning! Risk of injury by rotating engine parts. When switching on the Rewinder starts immediately and winds to the material is tightened. -
Page 14: Ec - Declaration Of Conformity
Person authorised to compile the technical file :: Erwin Fascher Am Unterwege 18/20 99610 Sömmerda Signed for, and on behalf of the Manufacturer : Sömmerda, 23.08.2010 cab Produkttechnik Sömmerda Gesellschaft für Computer- und Automationsbausteine mbH Erwin Fascher 99610 Sömmerda Managing Director...
Need help?
Do you have a question about the ER4/210 and is the answer not in the manual?
Questions and answers