Table of Contents
Advertisement
Quick Links
Advertisement
Table of Contents

Related Manuals for impact SF-ABRL180

Summary of Contents for impact SF-ABRL180
- Page 1 SF-ABRL180 Monolight Flash 180 Ws with LED Modeling Light INSTRUCTIONS...
- Page 2 Introduction Thank you for choosing Impact. The lightweight SF-ABRL180 Monolight is ideal for applications such as portraits, headshots, and photo booths. Whether you’re shooting products, pets, or portraits, this monolight offers surprising brightness, versatility, and color accuracy to capture eye-catching exposures. The 180 Ws strobe has a variable output range of five f-stops, and the fixture features a long- lasting 60 LED modeling light that runs cool, so you don’t have to...
- Page 3 Precautions ⚠⚡ • Please read and follow these • Make sure that all connections are instructions, and keep this manual secure and that the equipment is in a safe place. properly weighted and balanced before proceeding. • Keep this unit away from water and any flammable gases or liquids.
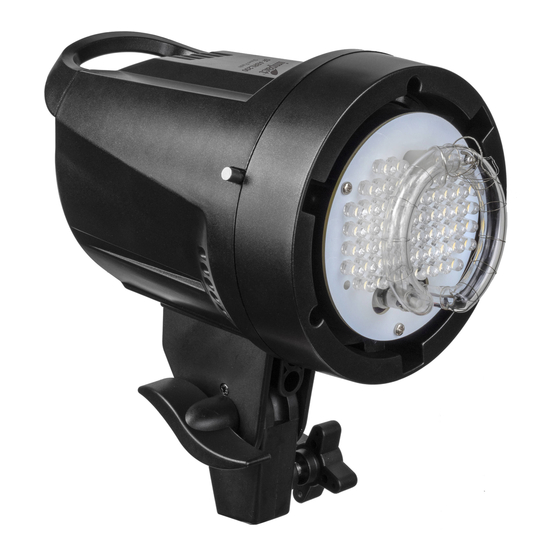
- Page 4 Overview Front 1. Bowens mount 2. Bowens release button 3. Flash tube 4. Modeling lamp LEDs 5. Tilt knob 6. Locking knob 7. 5/8 in. receiver Back 8. Optical sensor 9. Handle 10. Recycle indicator 11. Sync socket 12. Power switch 13.
- Page 5 Setup Preparing the Monolight for Use To begin using the SF-ABRL180, first remove the protective cap by turning it counterclockwise and pulling it off the flash head. Mounting on a Light Stand Loosen the locking knob and place the receiver over the light stand’s 5/8-inch stud.
- Page 6 Mounting an Umbrella The monolight’s handle is equipped with an umbrella mount. To mount an umbrella, fit the umbrella shaft through the umbrella hole, and tighten the locking knob. To use the umbrella with a reflector, first attach the reflector to the monolight. Then fit the umbrella shaft through the reflector’s umbrella hole before you insert it through the handle’s umbrella hole.
-
Page 7: Operation
Sync Connection Use the sync jack on the back of the SF-ABRL180 to connect the monolight to your camera. Triggering the camera will fire the flash. The sync jack can also be used to attach a wirelesss receiver for remote flash... -
Page 8: Audio Alert
Optical Slave The SF-ABRL180 is equipped with an optical sensor which allows the unit to be triggered by another flash. To activate optical slave mode, press the Slave button, and the optical slave indicator will turn on. To deactivate this function, press the Slave button again, and the indicator will turn off. - Page 9 3. After 30 minutes, remove the reflector or softbox from the Bowens mount. 4. Use needle-nose pliers to carefully unhook the retention spring wrapped around the top of the flashtube. Make sure it’s disengaged from the flash tube. 5. Once it’s unhooked, wear a pair of white cotton gloves or hold a soft, dry cloth to grip the base of the flashtube on each side, and carefully pull the flashtube from the flash unit.
-
Page 10: Changing The Fuse
Changing the Fuse A 6A fuse is mounted in the rear panel and protects the circuitry of the flash. A spare 6A fuse is fitted with the fuse holder. Always use a fuse with the same type and rating. 1. Turn off the monolight, and disconnect the power supply. 2. -
Page 11: Specifications
Specifications Maximum Power 180 Ws Power Control Full to 1/16 Guide Number Flash Duration 1/800 sec. AC Input Voltage 110 V, 60 Hz, 5 A Circuit Protection Fuse Recycle Time 0.5 to 2.0 seconds Flash Ready Indicator Visual Audio Accessory Type Bowens Type Modeling Light Type Modeling Light LED Count... -
Page 12: One-Year Limited Warranty
One-Year Limited Warranty This Impact product is warranted to the original purchaser to be free from defects in materials and workmanship under normal consumer use for a period of one (1) year from the original purchase date or thirty (30) days after replacement, whichever occurs later. The warranty provider’s responsibility with respect to this limited warranty shall be limited solely to repair...
Need help?
Do you have a question about the SF-ABRL180 and is the answer not in the manual?
Questions and answers