Table of Contents
Advertisement
Quick Links
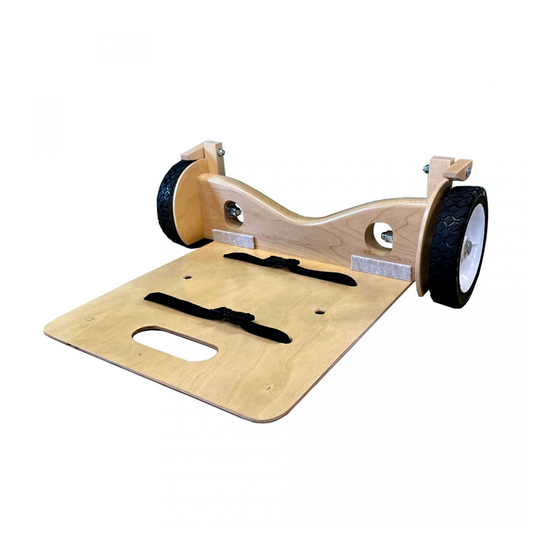
Wood Parts:
a) Wheel Paddle
b) Axle for Wheels
c) 2 Fenders for Axle
d) 2 Brake Main Parts
e) 2 Cams for Brakes
Musicmakers
14525 61st ST CT N
Stillwater, MN 55082
HARP WHEELS KIT
Assembly Instructions
Updated August 2020
A
B
Hardware Parts:
f) 2 Bolts for Wheels 1/2" - 13x5"
g) 2 Washers for Bolts, 1/2"
h) 2 Square Neck Carriage Bolts, 1/4"-20x2-1/2"
i) 6 Washers, #12
j) 2 Spring Washers
k) 2 Lock Nuts, 1/2"
l) 2 Lock Nuts, 1/4"
m) 9 Wood Screws, 1" (not pictured)
n) 4 Wood Screws, 1-1/4" (not pictured)
o) 7/64" Drill Bit (not pictured)
p) 2 Nylon Straps w/ Buckles
q) 2 Wheels, 7"
r) felt pads (not pictured)
D
C
E
F
H
P&Q
I
K
L
J
G
Advertisement
Table of Contents

Subscribe to Our Youtube Channel
Related Manuals for Musicmakers HARP WHEELS KIT


Summary of Contents for Musicmakers HARP WHEELS KIT
- Page 1 HARP WHEELS KIT Assembly Instructions Updated August 2020 P&Q Wood Parts: Hardware Parts: a) Wheel Paddle f) 2 Bolts for Wheels 1/2” - 13x5” b) Axle for Wheels g) 2 Washers for Bolts, 1/2” c) 2 Fenders for Axle h) 2 Square Neck Carriage Bolts, 1/4”-20x2-1/2”...
- Page 2 BEFORE YOU BEGIN _____A. Inventory and inspect all your parts carefully. If anything is 651-439-9120 missing or defective, please call us right away. _____B. It is a good idea to read through the entire assembly instructions before you start, just to get an overview of the project.
- Page 3 FIG. 3A ____3. Apply wood glue to the end of the axle. (fig. 3A) Once again, use the 1/2” bolt to line up the fender and the axle. Partially thread the 1” wood screws into the pilot holes. Use a drill to drive the screws in until they are snug the glue squeezes out.
- Page 4 ____5. Apply glue to axle and screw the paddle to the axle using FIG. 5A 1” wood screws. (figs 5A and 5B) Tighten the screws until the glue squeezes out. Be sure to clean up any glue squeeze out with a wet rag. FIG.
- Page 5 FINAL ASSEMBLY FIG. 10 ____10. Make sure the bolt will spin freely in the hole. If it’s a little tight, ream it out a little with a rat tail file or drill bit. (fig. 10) ____11. Place the bolt through the wheel with the flat side of the wheel on the outside.
- Page 6 FIG. 13B Insert the carriage bolt into the main brake part. Put the remain- ing 1/4” washer between the main brake part and the 1/4” lock nut. (fig. 13B) Use a 1/2” socket or wrench to tighten the FIG. 13C lock nut.
- Page 7 Make sure the brakes are off. Tilt the harp case back and away you go. (fig. C) USING WHEELS WITH OTHER CASES If you don’t have a Gig Bag from Musicmakers FIG. C with the pocket on the bottom, you can still use the wheels with your gig bag.
- Page 8 FIG I Once the harp is secured to the wheels, make sure the brakes are off, tilt your harp back, and you are off to the races. (fig. I) Musicmakers 14525 61st ST CT N Stillwater, MN 55082...
Need help?
Do you have a question about the HARP WHEELS KIT and is the answer not in the manual?
Questions and answers