Advertisement
Quick Links
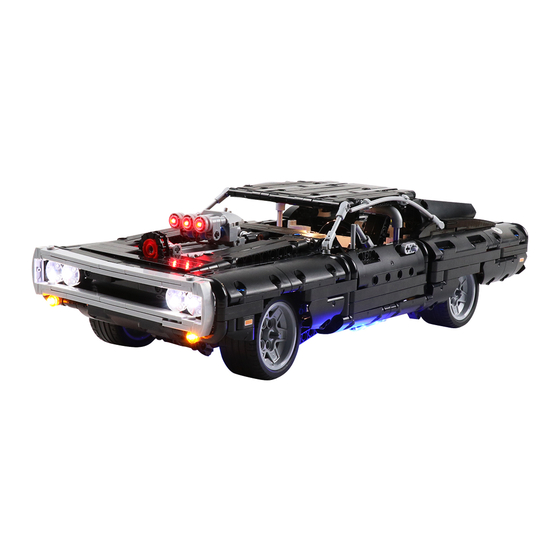
Dom's Dodge Charger # Light Kit for 42111 Basic Version Lighting Kit
Package contents:
10 x 15cm Warm White Dot Lights
2 x 15cm Red Dot Lights
4 x 15cm Head lights
1 x Warm White Strip Light
3 x 8-Expansion Boards
2 x 5cm Connecting Cables
1 x 30cm Connecting Cable
1 x 50cm Connecting Cable
1 x Flicker Effects Board
1 x AAA Battery Pack
Extra pieces
Important things to note:
When installing dot lights
Make sure they are correctly placed (Yellow LED package is exposed). You can put they either
on the top of the studs or between studs.
Place wires on the surface or under the building blocks.
The wire can be place between the building blocks or under the block, but they should be
placed between the studs correctly.
Advertisement

Subscribe to Our Youtube Channel
Related Manuals for vonado 42111


Summary of Contents for vonado 42111
- Page 1 Dom's Dodge Charger # Light Kit for 42111 Basic Version Lighting Kit Package contents: 10 x 15cm Warm White Dot Lights 2 x 15cm Red Dot Lights 4 x 15cm Head lights 1 x Warm White Strip Light 3 x 8-Expansion Boards ...
- Page 2 Be careful when insering the micro connector to the micro expansion board. With connecting cable side facing down, conenct the connector to the board as per below. In case of damaging the pieces, do ont force to connect the pieces. Insert the connectors to the ports.
- Page 3 Connecting cable connectors to Strip Lights Take extra care when inserting connectors to ports on the Strip Lights. Connectors can be inserted only one way. With the Strip Light facing up, ensure the side of the connector with the wires exposed is facing down. If a plug won’t fit easily into a port connector, don’t force it.
- Page 5 Instructions for installing this kit: OK, Let’s Begin! Start from installing the headlights. Remove the following gray piece. Remove the orange light, and disassemble it.
- Page 6 Take a 15cm warm white dot light, a trans orange 1x1 round plate, thread the cable through the gray pin, pull the cable out till the light is placed inside. Secure the light with the trans orange plate.
- Page 7 Thread the cable through the following hole, reconnect the light. Turn the car over to its side, thread the cable through the following space. Open the lid, pull the cable out.
- Page 8 Take an 8-port expansion board, connect the cable to it. Tuck excess cable, stick the expansion board to the following place with adhesive squares. Continue to install the 2 headlights. Remove the lights and disassemble them as per below.
- Page 9 Take two 15cm headlights, take one light, place it to the following blue cross piece as per below. Secure the light with trans 2x2 round plate, pull the cable out from the back.
- Page 10 Repeat the steps above to install the other headlight. Group the 2 cables together, reconnect the headlights. Tuck excess cables around the expansion board before connect the cables to the expansion board.
- Page 11 Take a warm white 15cm dot light, two 15cm headlights, a trans orange 1x1 round plate, repeat the previous steps to install the other 2 headlights. Take a 50cm connecting cable, connect it to the expansion board. Thread the connecting cable to the bottom, thread the cable through the following space. Pull the cable backward.
- Page 12 Tuck excess cable around the following piece. Wind the cable around the following piece at the back of the tire.
- Page 13 Remove the tire, thread the cable trough the following space. Open the lid of the trunk. Thread the cable trough the following space, pull the cable out from the trunk.
- Page 14 Take an 8-port expansion board, connect the connecting cable to it. Stick the expansion board to the following place with adhesive squares, reconnect the tire, and the gray piece we removed before.
- Page 15 Take a warm white strip light, a 30cm connecting cable connect the connecting cable to the strip light. Stick the strip light to the roof of the control room. Thread the cable from the strip light through the following space, pull it out from the back.
- Page 16 Thread the cable through the following space to the bottom of the car. Thread the cable through the following space to the expansion board at the back. Tuck excess cable before connect the connecting cable to the expansion board.
- Page 17 Move onto installing lights for the red taillights, remove the left part and disassemble it as per below. Take 4 warm white 15cm dot lights, a trans red 1x1 plate.
- Page 18 Place one of the lights to the following place, secure the light with the 1x2 trans red plate. Repeat the steps above to install the next 2 lights. Place the last light on the stud, secure the light with the trans red 1x1 plate.
- Page 19 Group the cables together before reconnect the lights. Connect the cables of the lights to the expansion board. Take an 8-port expansion board, a 5cm connecting cable, connect the connecting cable to the expansion board.
- Page 20 Connect the other end of the connecting cable to another expansion board, stick the expansion board to the following place with adhesive squares. Remove the right part of the taillights. Take 4 more warm white 15cm dot lights, a trans red 1x1 plate, repeat the steps above to install the lights for the right part.
- Page 21 Now, we’ll install lights for the pipes. Turn the car over to its side. Remove one of the pipes. Take a red 15cm dot light, place the light on the blue pin, reconnect the gray pipe.
- Page 22 Take the Flicker Effects Board, connect the cable of the light to the Flicker Effects Board (note: do not connect it to the power port), as per below. Take a red 15cm dot light, repeat the previous steps to install light for the other pipe, also connect the cable of the light to the Flicker Effects Board.
- Page 23 Pull the Flicker Effects Board out, tuck excess cable. Take a 5cm connecting cable, connect it to the power port on the Flicker Effects Board. Stick the Flicker Effects Board to the following place, connect the cables on the Flicker Effects Board to the expansion board.
- Page 24 Take the battery pack. Thread the cable of the battery pack through the following space, stick the battery pack to the following place with adhesive squares. Connect the cable of the battery pack to the expansion board, close the lid of the trunk.
- Page 25 This completes installation of this LED Lighting Kit. There’s enough space inside the car, you can place the cables as you wish. ENJOY!
Need help?
Do you have a question about the 42111 and is the answer not in the manual?
Questions and answers