Advertisement
Quick Links
Advertisement

Related Manuals for HoverCam Nillo 100


Summary of Contents for HoverCam Nillo 100
- Page 1 Nillo 100 Quick Start Guide...
- Page 2 Welcome The Nillo 100 is the world’s first truly-intelligent, Android- powered document camera that allows you to: • Record lessons and view documents in full-motion HD • Stream and upload lessons instantly to the cloud • Connect wirelessly to Chromebook, iPad, Android tablet, PC and Mac •...
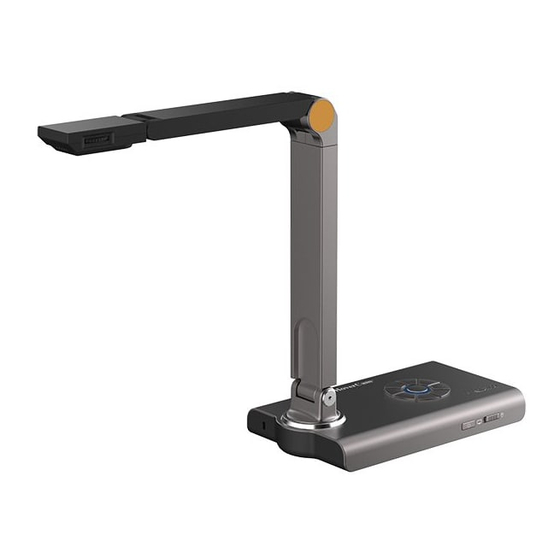
- Page 3 Getting to know the Nillo 100 Post Camera Camera Controls Sensor LED Switch Mirco-SD Base HDMI Switcher DC-In HDMI-Out HDMI-In...
- Page 4 1. Powering On To power on the Nillo 100, first plug the included DC power adapter into an available power outlet, and plug the the cord into the Nillo’s DC power in. to power outlet Next, press and hold the power button for five seconds.
-
Page 5: Connecting To A Display
To connect your Nillo 100 unit with HDMI, simply insert an HDMI cable to the HDMI-Out port on your Nillo 100 and the display you wish to use. Make sure the HDMI Switch is set to “OUT” You can also connect your Nillo 100 to a VGA... - Page 6 3. Navigating the Nillo 100 The Nillo 100 can be operated with a wired USB mouse (included), a bluetooth mouse, or a USB Touch-enabled display. Simply insert your wired mouse, wireless dongle, or touch USB cable into the USB port to navigate your device.
-
Page 7: Operating The Software
4. Operating the Software *Before operating the Nillo 100, make sure you have the most up-to-date software (Step 7)* The main document camera application provides access to the Nillo 100’s camera features and controls: Lesson Recording Annotation Wheel Control Dock Magnifies... - Page 8 5. Annotating The software also includes a pull-out Annotation Wheel (located on the right side of the screen) with the several functions. To adjust color, thickness and transparency of annotations, simply double click on the function’s icon. creates freehand creates select and lines...
- Page 9 6. Controlling Camera Functions For added convenience, the following camera controls can also be accessed via the control wheel located on the base of the Nillo 100: Snapshot of the current camera view Rotate Screenshot the image 90 degrees...
-
Page 10: Wireless Connectivity
Once you have successfully connected to WiFi, be sure you update your Nillo 100 to the latest software by selecting Update App* To use the Lesson Recording feature to upload lessons to the cloud, you’ll first need to... - Page 11 8. Screen Sharing and Wireless Control The Nillo 100 features DashTop, an application that allows uses to remotely view, annotate, and control the Nillo 100’s document camera application from a mobile device application or a computer’s internet browser. To get started, first make sure both...
- Page 12 HoverCam Nillo 100, or you can select a previous device. Device IP Need assistance? Visit our website at www.thehovercam.com the complete Nillo 100 user manual, or contact us: HoverCam Technical Support support@thehovercam.com / (866)-201-2056...
Need help?
Do you have a question about the Nillo 100 and is the answer not in the manual?
Questions and answers