Table of Contents
Advertisement
Quick Links
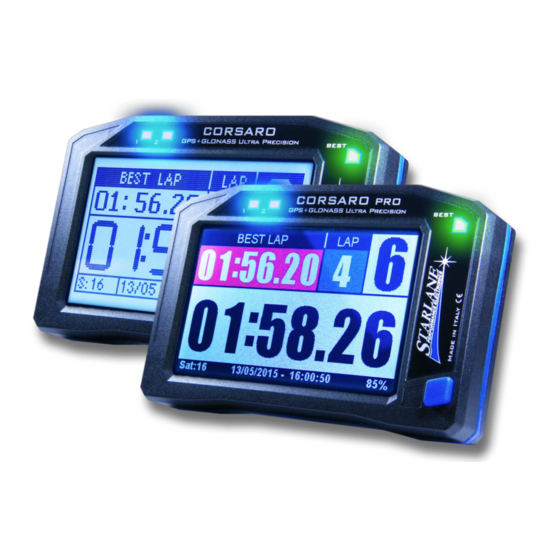
CORSARO
Installation and operation manual.
Manuale d'installazione e uso.
CORSARO is an automatic lap timer
CORSARO è un cronometro automatico
developed with double satellite
basato su doppia tecnologia satellitare
GPS+GLONASS technology and process
GPS+GLONASS e algoritmi di calcolo
algorithms used in the most advanced
utilizzati nei più moderni sistemi
airborne systems. Its features make it
dell'aviazione. Le sue caratteristiche lo
the most advanced, complete and easy
rendono lo strumento più avanzato,
instrument for all the drivers of:
completo e semplice per tutti i piloti di:
Go Karts - Cars – Motorbikes - Scooters.
Go Kart - Auto - Moto - Scooter.
Advertisement
Table of Contents

Subscribe to Our Youtube Channel
Related Manuals for STARLANE CORSARO


Summary of Contents for STARLANE CORSARO
- Page 1 CORSARO Installation and operation manual. Manuale d’installazione e uso. CORSARO is an automatic lap timer CORSARO è un cronometro automatico developed with double satellite basato su doppia tecnologia satellitare GPS+GLONASS technology and process GPS+GLONASS e algoritmi di calcolo algorithms used in the most advanced utilizzati nei più...
- Page 3 http://www.starlane.com/downloads.htm...
-
Page 4: Table Of Contents
Selezione delle unità di misura ........18 Energy saving and Auto Power Off ........ 18 Risparmio energetico e autospegnimento ....18 How to set the lap triggers on Starlane devices ..19 Come impostare i traguardi sui dispositivi Starlane ..19 STARLANE Track library ..........19 Libreria circuiti STARLANE .......... - Page 5 Temperatura acqua ............. 53 Gear learning ..............57 Allarme Temperatura Acqua ..........53 Setting the speed reading parameters ......58 Impostazione dei parametri di lettura regime motore 53 Acquisition channels managed by CORSARO ....59 Programmazione delle marce ..........55...
- Page 6 Define an Analog Channel ..........61 Impostazione dei parametri di lettura della velocità... 58 Calibration of analog sensors ..........62 Canali acquisizione gestiti da CORSARO ......59 Calibration of the throttle position sensor (TPS) ..63 Distinzione tra canali Analogici e Digitali ...... 61 Calibration of linear potentiometers (e.g.
-
Page 7: Introduction
Introduction Introduzione Functions Funzioni CORSARO carries out the following basic CORSARO svolge le seguenti funzioni base: functions: Cronometro GPS. GPS Lap timer. Doppio Contaore. Double Hour Meter. Tachimetro GPS. GPS Tachometer. Orologio. Clock. -
Page 8: Front Panel
Go Kart, or on the te di un Go Kart, o sul cruscotto di un’auto. dashboard of a Car. Fissare CORSARO con il sistema Dual Lock a Fix CORSARO with supplied adhesive Dual strappo fornito o con il kit di supporti Lock System or the elastic support kit. -
Page 9: Position And Orientation
Position and Orientation Posizione e Orientamento The GPS antenna of CORSARO is positioned L’antenna GPS di CORSARO è posizionata in the middle of the upper side. nella zona alta centrale. In order to allow the most rapid Per consentire la più rapida acquisizione dei... -
Page 11: Important
IMPORTANT: To protect CORSARO IMPORTANTE: Per proteggere against vibrations, never fix it rigidly to CORSARO dalle vibrazioni, non the vehicle and make sure it will never fissarlo mai in modo rigido al veicolo e be in contact with any rigid part thereof. -
Page 12: Important For Go Kart, Mini Moto, Pit Bike And Other 2 Stroke Vehicle Users
Power supply Alimentazione CORSARO is equipped with an internal CORSARO è dotato di batteria al litio interna lithium battery but you can also ma è possibile alimentarlo/ricaricarlo supply/recharge it by means of a 12V tramite batteria a 12V del veicolo utilizzan- battery of the vehicle using the specific do lo specifico cavo in dotazione. -
Page 13: Updating The Corsaro Firmware
The Firmware version installed is displayed on the right corner at the bottom of the ini- Nell’angolo in basso a destra della scherma- tial screen of your CORSARO. ta di avvio del vostro CORSARO è indicata la versione di Firmware installata. FIRMWARE VERSION VERSIONE FIRMWARE You can check the exact model, the È... -
Page 14: Downloading The Update
Check on the technical support page of the Verificare sulla pagina di supporto tecnico www.starlane.com web site whether more del sito www.starlane.com la disponibilità di up-to-date Firmware or DigiRace-MMX ver- versioni più aggiornate (numero di versione sions (the version number is higher) are più... -
Page 15: Access Screen
Access screen Schermata di accesso Once the device is turned on press once the Dopo aver acceso lo strumento premere power key to unlock the Touch Screen and una volta il tasto di accensione per show the access screen. After 8 seconds sbloccare il touch screen e visualizzare la without action on the display the touch schermata di accesso. -
Page 16: Press Menu Button To Access The Multipage Menu
Options). Ogni volta che viene premuto il bottone Each time you press the REC button, REC, CORSARO inizierà a registrare i dati CORSARO will start recording data until finché REC non sarà premuto una secon- REC is pressed a second time to stop da volta per fermare la registrazione. -
Page 17: Gps Signal Acquisition
GPS signal acquisition Acquisizione del segnale GPS The first time the system is switched on af- La prima volta che il sistema viene acceso ter a long time or at a considerable distance dopo un lungo periodo o a distanza conside- from the previous place of operation it revole dal luogo di utilizzo precedente po- might require some minutes to find out the... -
Page 18: Configuration
Configuration Configurazione Selecting the language Selezione della lingua CORSARO menu supports up to 5 languages Il menu di CORSARO supporta 5 lingue (Inglese, Italiano, Tedesco, Francese e (English, Italian, German, French and Spagnolo). Spanish). Per selezionare la lingua desiderata : To select the desired language: Menu: OPTIONS >... -
Page 19: Freezing Peaks On Finish Line
If the value is set to Zero the backlight will Impostando il valore a Zero la retroillumina- be always on. zione resterà sempre accesa. It’s also possible to set CORSARO to auto power-off after a predefined time (in È anche possibile impostare minutes) of inactivity. -
Page 20: How To Set The Lap Triggers On Starlane Devices
Starlane devices dispositivi Starlane CORSARO è un cronometro basato sul CORSARO is a lap timer based on the GPS sistema GPS, pertanto è necessario fornirgli System so it's necessary to let it know the l’esatta posizione del Traguardo e degli exact position of the Finish Line and the Intermedi desiderati. - Page 21 A - Activating the automatic finish line po- A - Attivando la funzione di sitioning function: SAFD-2 (Starlane Auto- posizionamento automatico del traguardo: matic Finish line Detection). SAFD-2 (Starlane Automatic Finish line De- See page 22. tection). Vedi pag. 22. B - Sending the device the coordinates...
-
Page 22: Safd-2 Automatic Positioning Function
SAFD-2 automatic positioning function Funzione di posizionamento automatico SAFD-2 On Starlane last-generation devices you can Sui dispositivi Starlane di ultima generazione activate the SAFD-2 function (Starlane è possibile attivare la funzione SAFD-2 Automatic Finish line Detection) which (Starlane Automatic Finish line Detection) - Page 23 Carry out the following operations to Eseguire le seguenti operazioni per attivare activate the SAFD-2 function: la funzione SAFD-2: After the SAFD-2 procedure the active Al termine della procedura SAFD-2 verrà track name will be automatically created automaticamente creato il nome del and will consist of the date and time circuito attivo che sarà...
-
Page 24: Track Management
Track management Gestione circuiti Learning the Finish Line and Intermediate Apprendimento della linea di traguardo e positions degli intermedi Carry out the operations here below before Eseguite le operazioni indicate di seguito entering a new track and set the positions prima di entrare in un nuovo circuito e im- during the first lap. -
Page 25: Storing The Coordinates Of The Finish Line And Intermediate Positions
The coordinates will be kept active till you Le coordinate saranno mantenute attive set new positions for a different track. finché non saranno impostate nuove posizioni per un circuito differente. After the procedure the active track Al termine della procedura verrà name will be automatically created and automaticamente creato il nome del will consist of the date and time when... -
Page 26: Loading The Track Coordinates
Menu: CIRCUITI > AZZERA LISTA CIRCUITI This command will not clear the Starlane Questo comando non cancellerà la lista cir- track list which can’t be removed. cuiti STARLANE che non può mai essere ri- mossa. Resetting the active track Annullare il circuito attivo... -
Page 27: Analysis Of The Stored Times
Analysis of the stored times Analisi dei tempi memorizzati CORSARO stores the times of 999 laps di- CORSARO memorizza i tempi di 999 giri vided into 99 sessions whenever you power suddivisi in 99 sessioni. Ogni volta che il the lap timer off and on, a new session is cronometro viene spento e riattivato viene automatically created. -
Page 28: Minimum And Maximum Values Of The Session
CORSARO consente di visualizzare diretta- mente sul display un report con i picchi dei CORSARO shows on the display a report valori minimi e massimi dei canali di: RPM, with the peaks of the minimum and maxi- Velocità, Temperatura Acqua e mum values of the following channels: Temperatura Gas di Scarico. - Page 29 When a specific lap is displayed, Quando viene visualizzato un giro CORSARO alternates the minimum specifico, CORSARO alterna i valori and maximum minimi e massimi di tale giro e li values of this lap and highlights them evidenzia con fondo nero se...
-
Page 30: Funzionalità Di Circuito Aperto E Performance Test
Open Circuit and Performance Funzionalità di Circuito Aperto e Test Functionality Performance Test Dalla versione di firmware 1.93 sono state By firmware release 1.93 onward new introdotte nuove funzionalità che functionalities have been added for use consentono l'utilizzo del dispositivo anche even on open circuits and in acceleration su circuiti aperti e nelle prove di tests. -
Page 31: Mode Selection
Mode selection Selezione della modalità You can select the mode you wish: E' possibile selezionare la modalità desiderata: Menu: MODALITA’ > TIPO CIRCUITO Menu: MODE > CIRCUIT TYPE Learn the finish lines and intermediates Apprendimento dei traguardi e degli in the OPEN LAUNCHED mode intermedi nella modalità... -
Page 32: Learn The Finish Lines And Intermediates In The Open Still Mode
Learn the finish lines and intermediates Apprendimento dei traguardi e degli in the OPEN STILL mode intermedi nella modalità CIRCUITO APERTO DA FERMO Once selected the OPEN S mode perform the following procedure for the 3 points Dopo aver selezionato la modalità CIRCUITO you have indicated (Intermediate1, Inter- APERTO DA FERMO eseguire la seguente mediate2, Intermediate3, Finish Line) while... -
Page 33: Accelerometer Sensitivity Set-Up
Accelerometer sensitivity set-up Impostazione della sensibilità dell'accelerometro A seconda del tipo di veicolo può essere According to the type of vehicle, you may necessario impostare diverse soglie di be required to set up various accelerometer sensibilità dell'accelerometro per il sensitivity thresholds for detection at the rilevamento della partenza. -
Page 34: Acceleration Test In The Performance Test Mode
To abort the test Per fermare il test press the blue button. prematuramente premere il bottone blu. Acceleration test in the Performance Test di accelerazione con la modalità Test mode Test di Prestazione After calibrating the accelerometer accord- Una volta effettuata la calibrazione ing to the previous paragraph, you can car- dell'accelerometro, come da paragrafo ry out an acceleration test on 4 speed and... -
Page 35: Activation From Remote Button
Activation from remote button Attivazione da pulsante remoto In car applications in which CORSARO is In applicazioni su auto in cui CORSARO fosse mounted on the windshield and can’t be posizionato sul parabrezza e non raggiungi- hand operated, you can set the analog bile con la mano, è... -
Page 36: Analysis Of Acquired Data
Analysis of acquired data Analisi dei dati acquisiti If you access the analysis mode, the ses- Entrando nella modalità di analisi, le sessio- sions made on the open track will be shown ni effettuate su circuito aperto saranno in the Best column and marked as OC, indicate nella colonna Best con la sigla OC, whereas Performance Test ones are mentre quelle di Performance Test con la... - Page 37 PERFORMANCE TEST ANALYSIS...
-
Page 38: Managing The Hour Meters
Managing the Hour Meters Gestione dei Contaore In order to allow an easy and sharp engine Per consentire una semplice e puntuale ma- maintenance, CORSARO also integrates two nutenzione del motore, CORSARO integra separate Hour Meters. anche due Contaore separati. - Page 39 While CORSARO is recording the REC label Mentre CORSARO è in registrazione la blinks at the bottom of the screen. scritta REC lampeggia alla base del display. NOTE: in order to void the memorization NOTA: per evitare che vengano memo-...
-
Page 40: Checking The Memory In Use
CLEAR DOWNLOADED comando CANCELLA SESSIONI SCARICATE. SESSIONS. Device name Nome del dispositivo You can rename your CORSARO by using a E' possibile rinominare il vostro name of your choice: CORSARO con un nome a vostra scelta: 1-Start the DigiRace-MMX software. -
Page 41: Track Export
1-Start the Digirace-MMX software. 1-Lanciare il software Digirace-MMX. 2-Follow the instructions you can find in the 2-Seguire le indicazioni di gestione dei DigiRace-MMX software manual for the circuiti nel manuale del software management of tracks. DigiRace-MMX. From now on, you can select the track you Da questo momento sarà... -
Page 42: Computer Connections
Bluetooth functionality or buy a USB- chiavetta USB-Bluetooth. Bluetooth dongle. 2. Accendere CORSARO e posizionarlo en- 2. Power on CORSARO and keep it not tro 2 metri dal PC. more than 2 metres from the PC. 3. Se il vostro CORSARO ha versione 3. - Page 43 Se il dispositivo non viene rilevato, pro- If no device is found out, try powering vare a spegnere e riaccendere CORSARO off and on CORSARO and click on the e cliccare sul pulsante "Nuova Ricerca". button "Search Again". 7. Selezionare il dispositivo e cliccare sul 7.
- Page 44 Therefore the port that you’ll have to La porta che dovrete quindi impostare set in the Communication menu of nel menu Comunicazione del software DigiRace-MMX software is the one DigiRace-MMX è named "Outgoing COM port" quella denominata "Porta COM in uscita" (COM8 in the example represented by (COM8 nell'esempio rappresentato the figure).
-
Page 45: Pairing With Wid Modules
La prima operazione da svolgere per far si The first operation to be carried out to che CORSARO possa dialogare con i propri ensure that CORSARO can talk to its WID is WID è la procedura di abbinamento del the pairing of module to the device. -
Page 46: Pairing Wid-B And Wid-C Modules
1. Verificare che il modulo sia carico o alimentato. Power supplied. 2. Selezionare su CORSARO il 2. Select Menu: BLUETOOTH on CORSARO. Menu: BLUETOOTH. 3. Press once the button on the WID 3. Premere una volta il pulsante sul module that you want to pair. -
Page 47: Corsaro Advanced Functions
CORSARO Funzioni avanzate di Advanced functions CORSARO Only for users with WID Solo per i utenti con moduli expansion modules. di espansione WID. -
Page 48: Wid-A And Wid-D Modules Electrical Connections
WID-A and WID-D modules electrical Connessioni elettriche moduli WID-A e connections WID-D Black cable RPM: engine speed signal from Cavo nero RPM: segnale dei giri motore the tachometer or from the inductive read proveniente dal contagiri oppure dalla lettu- from the ignition coil. Follow directions for ra induttiva dalla bobina di accensione. - Page 49 Switching on WID-D modules: the button Accensione dei moduli WID-D: il pulsante on WID-D modules, as well as allowing it sui moduli WID-D, oltre a consentirne il the bluetooth detection, also have power rilevamento bluetooth, hanno anche la switch function. funzione di interruttore di accensione.
- Page 50 WID-D WID-A K / WID-A PRO...
- Page 51 WID-A XS...
-
Page 52: Connecting The Engine Rpm Reading Wire
Connecting the engine RPM reading Collegamento del filo di segnale regime wire motore (RPM) In the WID-A package you can find two Nella confezione del modulo WID-A sono different RPM extension cables: fornite due diverse prolunghe per il rilevamento degli RPM: ... - Page 53 the RPM reading parameters” in this aumentare il numero delle spire e manual. controllare le impostazioni nel paragrafo “Impostazione dei parametri di lettura If there are unexpected flashes of the shift regime motore” nel presente manuale . light or incorrect instantaneous values, check the Black wire to ensure that it does Se si riscontrano accensioni anomale del not receive any interference from the cables...
-
Page 54: Water Temperature
Water Temperature Temperatura acqua CORSARO is able to measure the cooling CORSARO permette il rilevamento della water temperature. temperatura del liquido di raffreddamento. You can connect the optional liquid tem- È possibile collegare al cavo con eguale con- perature sensor (code CH2OM10) with the... - Page 55 Setting the RPM sensitivity with WID-D Regolazione della sensibilità RPM con modules moduli WID-D CORSARO allows to adapt the RPM input CORSARO consente di adattare la sensibilità sensitivity (only with WID-D modules) in dell’ingresso RPM (solo con moduli WID-D) order to adapt to the various types of in modo da potersi adattare ai vari tipi di signals and vehicle ignition systems.
-
Page 56: Gear Programming
Gear programming Programmazione delle marce CORSARO can specify the gear you have CORSARO è in grado di indicare la marcia engaged by calculating the continuous ratio inserita calcolando il continuo rapporto tra il between the engine speed and the wheel regime motore e la velocità... - Page 57 motorbike on a stand keeping the rear sollevata la ruota posteriore (se il sensore wheel up (if the speed sensor is intended to velocità rileva la velocità della ruota detect the speed of the rear wheel) or while posteriore) o in strada (se il sensore velocità running it on the road (if the speed sensor is rileva la velocità...
-
Page 58: Setting Up The Number Of Gears Of The Vehicle
Setting up the number of gears of Impostazione del numero di marce the vehicle del veicolo -Per impostare il numero di marce del -To set the number of gears of the vehicle: veicolo: Menu: CHANNELS > RPM, SPEED AND GEAR Menu: CANALI >... -
Page 59: Setting The Speed Reading Parameters
Una volta impostata la corretta circonfe- by trying different values and comparing renza potete trovare il giusto numero di the speed shown by CORSARO with the impulsi provando differenti valori e speed shown by the original tachometer paragonando la velocità mostrata da at a well-defined speed rate. -
Page 60: Acquisition Channels Managed By Corsaro
Acquisition channels managed by Canali acquisizione gestiti da CORSARO CORSARO CORSARO can acquire the data from sen- CORSARO può acquisire i dati da sensori sors connected through WID optional collegati attraverso moduli di espansione expansion modules . WID opzionali. Note: when a WID-A or a WID-D module... - Page 61 the instrument. campionamento in Hz e l’abilitazione della registrazione dello stesso da parte dello strumento. -To set the acquisition parameters, select -Per impostare i parametri di acquisizione, the desired channel and press ENTER. selezionare il canale desiderato e premere INVIO. Click on the frequency box to select the de- Cliccare sulla casella della frequenza per sired one and on the name box to select...
-
Page 62: Distinction Between Analog And Digital Channels
Distinction between Analog and Digital Distinzione tra canali Analogici e Digitali channels Analog channels shall be understood as all Per canali Analogici si intendono tutti quelli those channels, the value of which will che hanno una variazione progressiva del progressively vary according to the quantity valore in funzione della grandezza acquisita, acquired. -
Page 63: Calibration Of Analog Sensors
Calibration of analog sensors Calibrazione dei sensori analogici The signal in millivolts of the analog chan- Il segnale in millivolt dei canali analogici nels is converted to digital points by the viene convertito in punti digitali dai moduli WID modules so, for example, a 0-5V signal WID quindi, per esempio, un segnale 0-5V will be represented with points increasing sarà... -
Page 64: Calibration Of The Throttle Position Sensor (Tps)
Calibrazione del sensore di apertura Calibration of the throttle position sensor acceleratore (TPS) (TPS) Entrare nella schermata di calibrazione del Access the TPS calibration screen: TPS: Since the throttle opening is expressed as a Poiché l’apertura dell’acceleratore viene percentage by using values between 0% espressa in percentuale con valori che and 100%, the RANGE shall be set to 100. - Page 65 Click on the SET button beneath the MIN Cliccare sul bottone IMPOSTA sotto la box to access the setting screen: casella MIN per accedere alla schermata di impostazione: Let the throttle closed and acquire the Lasciare l’acceleratore in posizione chiusa e minimum value clicking the GRAB button.
-
Page 66: Calibration Of Linear Potentiometers (E.g. Suspension Sensors)
Note: the GRAB button automatically Nota: il bottone RILEVA consente di inserts the value measured in real time inserire automaticamente il valore by the sensor. rilevato in tempo reale dal sensore. Se il sensore non è al momento collegato o If the sensor is currently not connected non può... - Page 67 3. Enter the value measured in the RANGE 3. Inserire il valore rilevato nel campo field: CAMPO: 4. While keeping the sensor extended, 4. Mantenendo il sensore in posizione acquire the minimum value pressing the estesa acquisire il valore minimo GRAB button.
- Page 68 5. Close the sensor completely so as to 5. Chiudere completamente il sensore fino move the Seeger to the stroke limit. a mandare in battuta il Seeger. 6. Acquire the maximum value pressing 6. Acquisire il valore massimo premendo il the GRAB button.
-
Page 69: Cleaning The Surfaces
Garanzia Warranty CORSARO è coperto da 24 mesi di garanzia CORSARO is covered by a 24-month sui difetti di fabbricazione. warranty for all manufacturing defects. Notes Note... - Page 70 NOTA: Eventuali aggiornamenti al presente manuale sono disponibili sul sito: manual please visit the web site: www.starlane.com www.starlane.com Versione Manuale: COR_004.00 User Guide Version: COR_004.00 Starlane s.r.l. Via Madonna delle Rose, 70 24061 - Albano S. Alessandro (BG) Italia e-mail: sales@starlane.com http://www.starlane.com...
Need help?
Do you have a question about the CORSARO and is the answer not in the manual?
Questions and answers