Table of Contents
Advertisement
Quick Links
Advertisement
Table of Contents

Subscribe to Our Youtube Channel
Related Manuals for Avenger B7047CS


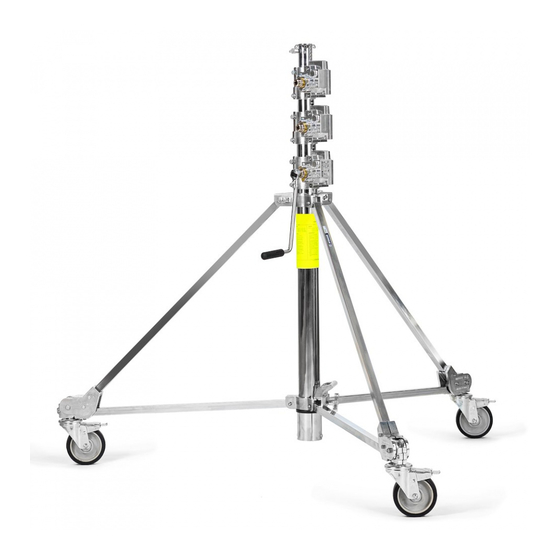
Summary of Contents for Avenger B7047CS
- Page 1 INSTRUCTIONS B7047CS...
-
Page 3: Table Of Contents
INDEX Operating envirOnment ........4 pOSiziOnamentO ..........4 Setting the Stand up ........4 inStaLLaziOne deLLO StativO ......4 LOading the Stand ..........6 caricamentO ............6 raiSing the cOLumnS Of the Stand ....6 SOLLevamentO .............6 LOwering the cOLumnS Of the Stand..8 diSceSa deLLe cOLOnne ........8 StOrage ..............10 StOccaggiO ............10 maintenance and Service tipS ......12... -
Page 4: Operating Environment
OPERaTING ENVIRONmENT POSIzIONamENTO 1.1 - the stand must only be used on 1.1 - prima di posizionare lo Strato-Safe horizontally level surfaces. Optional assicurarsi che la superficie d’appoggio sia il levelling jacks “a” (fig. 1) are available in più possibile orizzontale. place of wheels that compensate for marginal nell’eventualità... -
Page 5: Positionierung
POSITIONIERUNG INSTaLLaTION POSICIONaDO 1.1 - Beim aufstellen des Strato Safe Stativs 1.1 - Le pied doit être installé sur une surface 1.1 - al colocar el trípode Strato Safe (kurz SSS), ist es wichtig, daß Sie einen horizontale. (abreviado SSS) es importante que escoja un möglichst horizontalen untergrund aussuchen. -
Page 6: Loading The Stand
LOaDING ThE STaND & CaRICamENTO 3.1 - ensure the stand wheels or levelling 3.1 - dopo aver scelto il luogo più adatto per jacks are correctly locked as per 2.2. il posizionamento dello stativo assicurarsi che la base venga ben aperta e che la 3.2 - all riser columns on the stand should crociera sia bloccata sul punto più... -
Page 7: Beladen Des Stativs
BELaDEN DES STaTIVS POUR ChaRGER LE PIED CaRGaR EL TRÍPODE 3.1 - Bevor Sie Scheinwerfer auf das Stativ 3.1 - assurez vous que les roues de votre 3.1 - antes de montar los focos sobre el trípode montieren, versichern Sie sich, ob die pied ou les vérins soient parfaitement réglés et asegúrese que el sitio escogido corresponda a platzwahl den anforderungen in Kapitel 1. -
Page 8: Lowering The Columns Of The Stand
4.3 - fit the ratchet handle “j” (fig. 8) into the 4.3 - allentare la manopola “g” (fig. 8) del crank case and unlock the knob “g” (fig. 8) manicotto corrispondente alla colonna da of the column that is to be raised. the button sollevare. -
Page 9: Tieferstellen Des Strato Safe Stativs
4.3 - Lösen Sie die arretierschraube “g” 4.3 - fixez le levier à cliquet “j” (fig. 8) dans 4.3 - Suelte el tornillo “g” (fig. 8) de la columna (fig. 8) der Säule, die Sie höherstellen le boitier crémaillère de la section à monter et que quiere subir. -
Page 10: Storage
5.4 - if the safety lever “L” (fig. 11) is 5.4 - mantenendo la levetta “L” (fig. 11) released (the column automatically locks in premuta verso il basso invertire il senso place) before the stand has been lowered to di rotazione della manovella “j” (fig. 11) the required height, repeat actions 5.2 and commutando il deviatore “i”... -
Page 11: Lagerung
5.4 - halten Sie den Sicherungshebel “L” 5.3 - pendant que vous pressez vers le bas le 5.4 - mantenga la palanca “L” (fig. 11) apretada (fig. 11) nach unten gedrückt und schieben levier “L” (fig. 11), mettez le cliquet du levier en hacia abajo y empuje la tecla direccional “i”... -
Page 12: Maintenance And Service Tips
maINTENaNCE aND SERVICE TIPS maNUTENzIONE 7.1 - Operating in a SandY LOcatiOn 7.1 - zOne SaBBiOSe (BeacheS, deSert, etc.) nel caso lo stativo debba essere usato in remove lubricating grease from joints, zone particolarmente sabbiose (spiagge, threads and bearings to prevent sand mixing deserti etc.) é... -
Page 13: Wartung Und Unterhalt
waRTUNG UND UNTERhaLT maINTENaNCE ET CONSEILS ENTRETENImIENTO Y CONSERVaCION D’UTILISaTION 7.1 - Sandreiche gegenden 7.1 - regiOneS arenOSaS 7.1 - miSe en pLace du pied wird das SSS in sandreichen gegenden Sur SOL SaBLOnneux Si se utiliza el SSS en zonas arenosas (playa, eingesetzt (Strand, wüste), so ist es (pLageS, déSertS, etc..) desierto) será... - Page 14 7.4 - wheeLS contemporaneamente premere verso il and jacKS 17 18 19 20 & basso la levetta colorata “L” (fig. 15). - fatto questo premere più volte la levetta 7.41 - hard rubber wheels (fig. 17) are “L” verificandone così la funzionalità supplied as standard and are recommended nel caso la levetta “L”...
- Page 15 Säu le ve re ist sein, so versuche n Sie 7.4 - rOueS et Sólo cuando haya eliminado todos los puntos die eingefrorenen teile zu erwärmen. vérinS 17 18 19 20 helados y todos los dispositivos de seguridad vermeiden Sie aber das erwärmen mit funcionan perfectamente puede volver a einer offenen flamme oder den einsatz 7.41 - roues dures (fig. ...
- Page 16 7.42 - pneumatic wheels (fig. 18) are ideal 7.42 - ruote pneumatiche. when the stand is regularly used on stony, Le ruote pneumatiche (fig. 18) sono sandy or soft ground or wherever a narrow particolarmente indicate per l’uso dello wheel (as a hard rubber one is) could sink. stativo su terreni ghiaiosi, sabbiosi, su the wheels are braked to lock both the prati o comunque ove esista il pericolo che...
- Page 17 7.42 - pneumatische rollen. 7.42 - roues pneumatiques (fig. 18): 7.42 - ruedas neumáticas. die pneumatischen rollen (fig. 18) wurden für elles sont idéales pour toute utilisation du pied L a s r u e d a s n e u m á t i c a s ( f i g . 1 8 ) s e den einsatz des SSS auf steinigem, sandigen sur des surfaces telles que: graviers, sable, desarrollaron para utilizar el SSS sobre suelo...
- Page 18 7.7 - remOving 7.7 - rimOziOne the cranK caSe 22 23 & deLLa ScatOLa 22 23 Before removing a crank case make sure prima di iniziare la sostituzione della scatola all columns are fully retracted and that the verificare che: wheels are locked.
- Page 19 7.7 - entfernen deS 7.7 - pOur Ôter 7.7 - Quitar eL armazón 22 23 KurBeLgehÄuSeS 22 23 Le BOitier crémaiLLère 22 23 de La maniveLa 22 23 - Bevor Sie das Kurbelgehäuse entfernen, tout d’abord, assurez vous que toutes les - antes de quitar el armazón, asegúrese versichern Sie sich, daß...
- Page 20 cod. 101,958 - 07/11 copyright © 2004 manfrotto Bassano italy...
Need help?
Do you have a question about the B7047CS and is the answer not in the manual?
Questions and answers