Table of Contents
Advertisement
Thank you, and congratulations on your choice of BOSS OC-20G GK Effect.
Before using this unit, carefully read the sections entitled: "USING THE UNIT SAFELY"
and "IMPORTANT NOTES" (p. 18; p. 21).
These sections provide important information concerning the proper operation of the unit.
Additionally, in order to feel assured that you have gained a good grasp of every feature
provided by your new unit, Owner's manual should be read in its entirety. The manual should
be saved and kept on hand as a convenient reference.
Main Features
New kind of effect for use with GK pickups and GK-Ready guitars.
Six independent selectable octave processors: on for each string.
Built-in distortion for ultra-heavy sound.
Send and return for direct guitar signal.
The controls and pedals provide simple and intuitive operation.
Can run on battery power (six AA type).
Copyright © 2001 BOSS CORPORATION
All rights reserved. No part of this publication may
be reproduced in any form without the written
permission of BOSS CORPORATION.
Advertisement
Table of Contents

Related Manuals for Boss Poly Octave OC-20G


Summary of Contents for Boss Poly Octave OC-20G
-
Page 1: Main Features
Thank you, and congratulations on your choice of BOSS OC-20G GK Effect. Before using this unit, carefully read the sections entitled: “USING THE UNIT SAFELY” and “IMPORTANT NOTES” (p. 18; p. 21). These sections provide important information concerning the proper operation of the unit. -
Page 2: Installing Batteries
Installing Batteries Insert the included batteries as shown in figure, being careful to orient the batteries correctly. fig.02 • When turning the unit upside-down, get a bunch of newspapers or magazines, and place them under the four corners or at both ends to prevent damage to controls. -
Page 3: Making The Connections
Making the Connections About the GK-2A To use the OC-20G with a guitar equipped with the GK-2A (or other GK- compatible guitar), you will need an optional GK cable. Refer to the GK-2A Owner’s Manual for instructions on installing the GK-2A. -
Page 4: Turning On The Power
Making the Connections • To get the best performance from the instrument, set your amp to “Clean” (no distortion). • When connecting the instrument to a guitar amp, make the necessary adjustments to get the most suitable tone. When recording direct, use this with a COSM amp (GT-3, GP-20 etc.). -
Page 5: Operating Instructions
Operating Instructions Using the Pedals “MASTER: ON” and “DISTORTION: OFF” are selected when the power is turned on. fig.04 When at “ON” Illuminated Master is toggled on and off by stepping on the MASTER On/Off pedal. When switched on, the GK effect sound is output. - Page 6 Operating Instructions Panel Operations In order to follow along with the instructions given here, you should start out by having Master switched ON (depress the MASTER On/Off pedal and confirm that the MASTER ON/OFF indicator has lighted). Also, step on the Distortion On/Off pedal to switch OFF distortion (DISTORTION ON/OFF indicator extinguished).
-
Page 7: Part Names And Functions
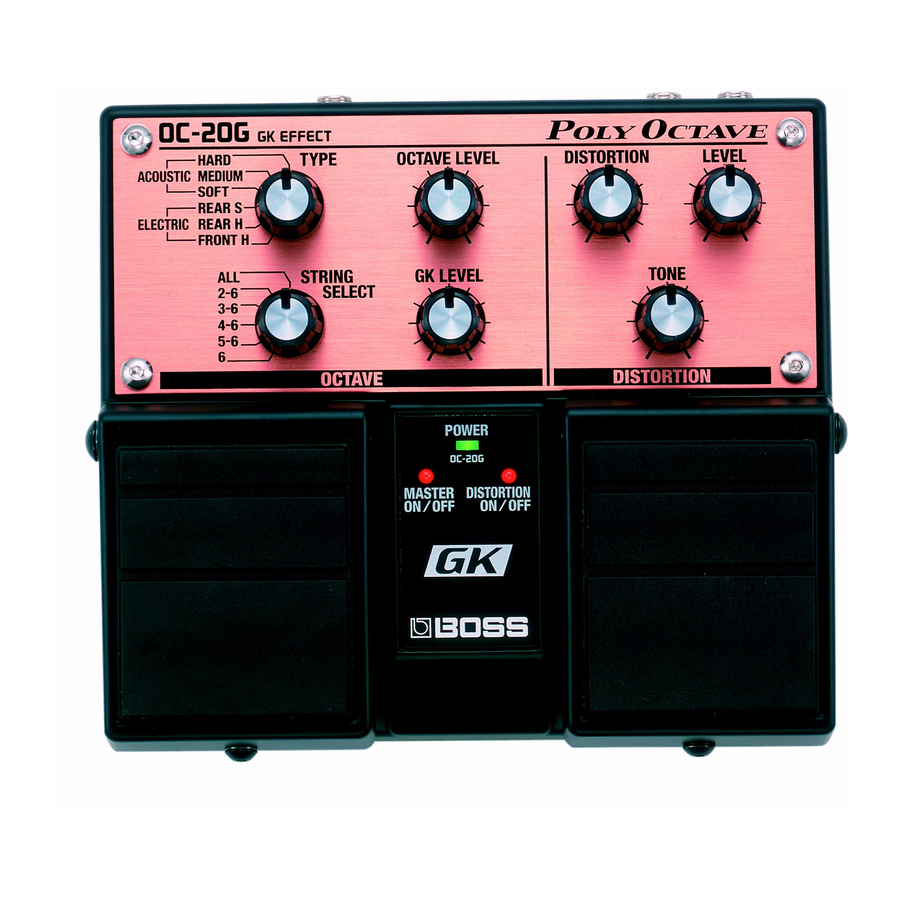
Part Names and Functions Front Panel OCTAVE fig.06 TYPE Knob Select the tone for the GK Direct sound (the sound at the original pitch). ACOUSTIC HARD: Bright and lively acoustic guitar ACOUSTIC MEDIUM: Acoustic guitar sound between ACOUSTIC SOFT: Richly resonant acoustic guitar ELECTRIC REAR S: Rear single coil pickup tone. - Page 8 Part Names and Functions DISTORTION fig.07 DISTORTION Knob Adjusts the amount of distortion. LEVEL Knob Adjusts the distortion volume. TONE Knob Adjusts the tone quality of the distortion sound.
-
Page 9: Power Indicator
fig.08 POWER Indicator This lights up when the power is on. If this gets dim or fails to light up when the unit is running on battery power, it means that the batteries are depleted. Replace promptly with fresh batteries. “Installing Batteries”... -
Page 10: Rear Panel
Part Names and Functions Rear Panel fig.9 NORMAL PU MIX Switch When Master is on, this switch determines whether or not the normal pickup sounds (or the sounds input to the GUITAR RETURN) are mixed. GK IN Connector This connector is for connecting your guitar with a GK cable. -
Page 11: Application Examples
Application Examples Using in Combination with Other Effect Devices fig.10 GK-compatible guitar OUTPUT INPUT External Effector Guitar with GK-2A or other Guitar Amp AC Adaptor PSA-series (sold separately) - Page 12 Application Examples Using in Combination with Another GK EFFECT (WP-20G) fig.11 Guitar with GK-2A or other GK-compatible guitar OC-20G WP-20G GK IN US-20 AC Adaptor PSA-series (sold separately) AC Adaptor PSA-series (sold separately) Guitar Amp...
- Page 13 Application Examples Using in Combination with the GR-33 fig.12 Guitar with GK-2A or other GK-compatible guitar AC Adaptor PSA-series (sold separately) RETURN GK IN MIX OUT guitar amp simulator: ON US-20 GR-33 Power Amp + Speaker...
-
Page 14: Troubleshooting
Troubleshooting The power doesn’t come on. Is the external device connected correctly to the OUTPUT jack? Check the connections again. * When running off batteries, the unit won’t switch on unless there’s something plugged into the OUTPUT jack. This helps conserve the batteries. Have the batteries run down? Replace with fresh batteries (p. - Page 15 No effects are being applied. Is the GK-2A’s selection switch set to “MIX?” When set to “GUITAR” or “SYNTH,” the necessary signals may not be input to the unit, which may prevent effects from being applied. No effects are applied to sounds input to GUITAR RETURN and normal pickup sounds.
-
Page 16: Sample Settings
Sample Settings Warm Octave Sound fig.13 Acoustic Sound (String 5, 6: Bass) fig.14 Heavy Distortion Sound fig.15... -
Page 17: Specifications
Specifications OC-20G: GK EFFECT Controls Master On/Off Pedal Distortion On/Off Pedal TYPE Knob STRING SELECT Knob OCTAVE LEVEL Knob GK LEVEL Knob DISTORTION Knob TONE Knob LEVEL Knob NORMAL PU MIX Switch Indicator POWER Indicator (serves also as battery check indicator) - Page 18 USING THE UNIT SAFELY Used for instructions intended to alert the user to the risk of death or severe injury should the unit be used improperly. Used for instructions intended to alert the user to the risk of injury or material damage should the unit be used improperly.
- Page 19 008b • Use only the specified AC adaptor, and make sure the line voltage at the installation matches the input voltage specified on the AC adaptor’s body. Other AC adaptors may use a different polarity, or be designed for a different voltage, so their use could result in damage, malfunction, or electric shock.
- Page 20 • Batteries must never be recharged, heated, taken apart, or thrown into fire or water. 101b • The unit and the AC adaptor should be located so their location or position does not interfere with their proper ventilation. 102d • Always grasp only the plug or the body of the AC adaptor when plugging into, or unplugging from, an outlet or this unit.
-
Page 21: Important Notes
IMPORTANT NOTES 291a In addition to the items listed under “USING THE UNIT SAFELY” on page 18–20, please read and observe the following: Power Supply: Use of Batteries • Do not use this unit on the same power circuit with any device that will generate line noise (such as an electric motor or variable lighting system). - Page 22 IMPORTANT NOTES Maintenance 401a • For everyday cleaning wipe the unit with a soft, dry cloth or one that has been slightly dampened with water. To remove stubborn dirt, use a cloth impregnated with a mild, non- abrasive detergent. Afterwards, be sure to wipe the unit thoroughly with a soft, dry cloth. •...
- Page 23 This product complies with the requirements of European Directive 89/336/EEC. FEDERAL COMMUNICATIONS COMMISSION RADIO FREQUENCY INTERFERENCE STATEMENT This equipment has been tested and found to comply with the limits for a Class B digital device, pursuant to Part 15 of the FCC Rules.
- Page 24 G6017291...