Table of Contents
Advertisement
Quick Links
Advertisement
Table of Contents

Subscribe to Our Youtube Channel
Related Manuals for GEOSOFT DENT ENDOEST-3D


Summary of Contents for GEOSOFT DENT ENDOEST-3D
- Page 1 USER’S GUIDE APEX-LOCATOR «ENDOEST-3D» CJSC «Geosoft Dent»...
- Page 2 ! Please, thoroughly read the user’s guide before using the device. Keep the User’s guide for future use. ! Please, address to the manufacturer if you have some questions when using the device. Hotline: +7(495)663-22-11 (extension 170), E-mail: hotline @ geosoft.ru CJSC GEOSOFT DENT (Russia) www.geosoft.ru/en...
-
Page 3: Table Of Contents
ENDOEST-3D CONTENTS 1. General information..........………………... 2. Delivery set........……………...………………. 3. Accessories…………………………..………………………… 4. Specifications…………………......……………….. 5. The device outward appearance.......…………...…… 6. The fundamental operating instructions of the apex-locator ….. 7. Make ready and using…………........………. АPEX-LOCATOR mode……………………………………… PULP TESTER mode …..…………………………………….. DENTIN METER mode………………………………………. -
Page 4: General Information
USER’S GUIDE 1. GENERAL INFORMATION 1.1. The device designation: The dental device “EndoEst-3D” is designed for: - localization of the root canal apical constriction (APEX-LOCATOR mode); - determination of the tooth pulp clinical state - electro-odonto- diagnostic (PULP TESTER mode);... - Page 5 ENDOEST-3D ! Avoid any liquid ingress into the device case. ! Do not use the device close to inflammables. The device is not operational in the presence of inflammable anesthetic mixtures with air, oxygen or nitrogen oxides. ! Use only sterile and disinfected device components. The device...
-
Page 6: Delivery Set
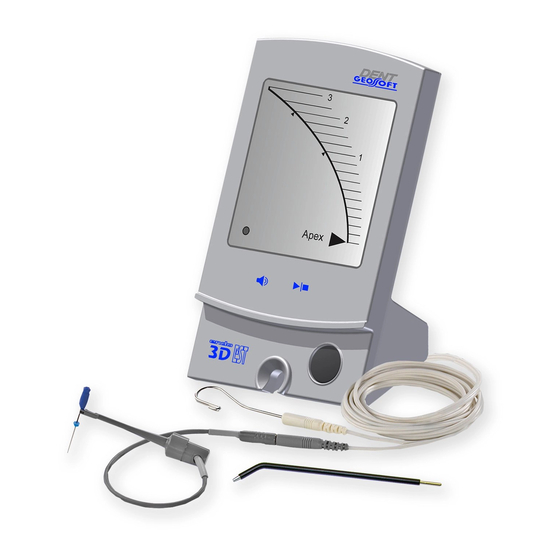
USER’S GUIDE contained in this manual must be strictly adhered to during installation and operation. It is especially important not to use the device near fluorescent lamps, radio transmitters or remote controls, portable or mobile radio frequency communications equipment. ! The device malfunction is possible when using it in the area of strong electromagnetic interference (EMC). - Page 7 ENDOEST-3D Figure 1. Delivery set 6 - Cable USB (A)-USB (B) for the battery charging (1 pc); 7 - Charger (USB-socket) (1 pc); 8 - Tester apex-locator (1 pc); - User’s guide (1 pc) hotline @ geosoft.ru...
-
Page 8: Accessories
USER’S GUIDE 3. ACCESSORIES 1. File clip “Probe Princh” (3 pcs/1 pc) GЕ99.047.000 / GЕ99.121.000 File clip for working file. It is used as a clutch of the active electrode (file) during apex location. 2. EOD probe (Ø2,0 mm) (3 pcs/1 pc) GE99.059.000/ GE99.122.000 It is used as an active electrode during EOD and dentometry procedures. -
Page 9: Specifications
Applied part BF type Protection from dust and moisture : (level) IP41; The device life time - 5 years 4.1. Control unit «EndoEst-3D»: Power source……………………..Li-Ро battery (3,7V; 700 mAh) Monochrome LCD display ……………………………..66*66 mm «АРЕХ-LOCATOR» mode: ... -
Page 10: The Device Outward Appearance
Overall dimensions …….…………………..…(126*85*75) ±5 mm Weight….…………………….…………………………...280±50 g 4.2. Charger: Input/ Output voltage …………(100-240) V, ~50/60Hz / 5V; 1А 5. THE DEVICE OUTWARD APPEARANCE Outward appearance of the device “EndoEst-3D” is represented in the figure 2. Fig. 2 www.geosoft.ru/en... - Page 11 ENDOEST-3D where: 1 - case; 2 - LCD display (see fig. 3); 3 - three-color LED indicator «STATUS»; 4 - button «POWER / MODE» : the device switch on/off, choosing of the operation mode; 5 - touch button «START / STOP» : start / stop "diagnostic" current in the PULP TESTER mode;...
-
Page 12: The Fundamental Operating Instructions Of The Apex-Locator
USER’S GUIDE 6. THE FUNDAMENTAL OPERATING INSTRUCTIONS OF THE APEX-LOCATOR For more accurate apex-locator measurement results, please, follow these rules: 1. Carefully isolate the studied tooth and working file from saliva. We recommend to use cofferdam, cotton swabs, saliva ejectors; 2. - Page 13 ENDOEST-3D 2. Root canal with blood, saliva or a chemical solution overflowing from the opening If blood, saliva, or a chemical solution overflows from the opening Fig.5 of the root canal and contacts gums, this will result in electrical leakage and an accurate measurement can not be obtained.
- Page 14 USER’S GUIDE 5. Retreatment of a root canal, filled with gutta-percha The gutta-percha must be completely Fig.8 removed to eliminate its insulating effect. After removing the gutta- percha, pass a small file all the way through apical constriction and then put a little saline in the canal, but do not let it overflow the canal opening.
- Page 15 ENDOEST-3D 8. Caries contacts with gum In this case, electrical leakage through the caries infected area to the gums will make it impossible to obtain an accurate measurement. Fig.11 9. Blocked canal Fig.12 The meter will not move if the canal is blocked.
-
Page 16: Make Ready And Using
The battery should be charged in the following way: - Connect the cable for battery charging (6-fig.1) to the device “EndoEst-3D”. Insert the USB (B) cable plug to the «APEX/ CHARGE” socket (7-fig.2) on the device. Variant 1. Charging from the mains:... - Page 17 ENDOEST-3D - Connect the open plug of the cable for the battery charging to the PC USB-port . Red light (8-fig.2) indicates that battery is being charged. When the battery is fully charged, indicator changes to yellow-green. Note: Standard time for the battery charging is about 2,5 hours, however, it depends on the battery current charge, level of its wear, temperature.
- Page 18 USER’S GUIDE Otherwise, when the battery charge falls to the critic level (<10%), the indicator starts blinking and in some time the device switches off automatically. You will see indicator “Battery is discharged” on the display when trying to switch on the device again. Attention! When discharged, charge the device power supply in time .
- Page 19 ENDOEST-3D 7.4. Checking of apex-locator - Switch on the device in APEX-LOCATOR mode (see. p.7.3) - Connect the tester apex-locator (8-fig. 1) to the control unit, for which insert the tester into the socket “APEX / CHARGE”, located on the rear side of the device (7-fig. 2), until it stops.
- Page 20 USER’S GUIDE fig.18 For the output cable on the front side of the device will place a wire working cable in the rubber sleeve on the bottom of the device (fig.18). - Connect the electrodes to the cable sockets. cable Connect the active electrode ((file clip (3 - fig.1) or EOD probe (4 - rubber...
-
Page 21: Аpex-Locator Mode
ENDOEST-3D Close the device measuring circuit "control unit- Fig.20 cable - probe – lip clip", for which connect the p r o b e a n d l i p c l i p t o g e t h e r . - Page 22 USER’S GUIDE Depending on the distance between the file tip and the canal apical constriction, the corresponding graphic and numerical information will appear on the device display. Additionally, measuring process will be accompanied with sound and light indication (see fig.21 and table 1) Fig.21 Аpex Periodontal...
-
Page 23: Pulp Tester Mode
ENDOEST-3D 7.8. Operating in the «PULP TESTER» mode 1. Switch on the device in PULP TESTER mode (see p.7.3) 2. Place the passive electrode (lip clip (5-fig.1)) on patient’s lip, and touch the sensitive point of the studied tooth by the tip of active electrode (EOD probe (4–... -
Page 24: Dentin Meter Mode
USER’S GUIDE Herewith the “diagnostic” current measured value will be fixed on the display. Interpretation of results of measurements is presented in table 2 Table 2 Color of the indicator Current value, Diagnosis (3 - fig.2) Intact tooth GREEN 9-14 Caries lesions ORANGE 15-24... - Page 25 ENDOEST-3D 2. Place the electrodes in patient’s oral cavity, moistening the tip of EOD probe in physiological solution beforehand: - the passive electrode (lip clip (5-fig.1)) is placed on patient’s lip; - use active electrode (EOD probe (4 - fig.1)) to touch the dentin prepared surface of the studied tooth.
- Page 26 USER’S GUIDE Attention! The results of examination may only serve to be a guideline for dentist. Dentist takes final decision of the preparation depth on the basis of complex examination and doctor’s personal experience. 3. Remove the EOD probe from the studied tooth - When the repeated measurement is necessary, it is enough to touch the prepared dentin surface of the studied tooth with probe.
-
Page 27: The Device Sterilization And Disinfection
ENDOEST-3D 7.11. The device switching off The device switches off automatically in 40 minutes after the last time of device use. - Press and hold down the button «POWER/ MODE» (4– fig.2) for the device forced switching off. 8. THE DEVICE STERILIZATION AND DISINFECTOIN 8.1. -
Page 28: Maintenance
USER’S GUIDE Attention! Taking into account the conditions above, the sterilizable components can stand not more than 250 sterilizing cycles. Other sterilization methods in the regulatory documents are allowed to use. Attention! It is expressly prohibited to carry out any thermal treatment (in autoclave, dry-air sterilizer, glass-perlen sterilizers etc.) of any other device components not indicated in this point. -
Page 29: Troubleshooting
ENDOEST-3D Attention! It’s only specialists of authorized service departments who should replace the battery. Do not open the device to replace the battery yourself. It may be unsafe. Besides, in the case of device opening by user, warranty is considered to be invalid. - Page 30 USER’S GUIDE Continuation of the Table 4 Malfunction Reason What has to be done Problems with Sound signal volume See p. 7.10 sound level is improperly set There are no Electrical circuit C heck the electrical circuit indications on the continuity of the device continuity (see p.7.6);...
-
Page 31: Storage Conditions, Transportation And Use
ENDOEST-3D 11. STORAGE CONDITIONS, TRANSPORTATION AND USE The device should be stored in heated and ventilated locations at temperature from +5С to +40 С with relative air humidity of 80% (at +25 С) in the authentic package of the manufacturer. -
Page 32: Symbol Descriptions
USER’S GUIDE 14. SYMBOL DESCRIPTIONS Symbol Description Warning: Address to supporting documentation Type of protection against electric-shock hazard. Device of the II class Protection level from electrical shock: Applied part BF type Continuous current Do not throw away the device into system of daily rubbish The device serial number Date of the device manufacturing... -
Page 33: Appendix
APPENDIX Electromagnetic Emissions and Immunity Table 1 The device “EndoEst-3D” is intended for use in the electromagnetic environment specified below. The customer ore the user of the device should assure that it is used in such an environment. Emission test... - Page 34 USER’S GUIDE Table 2 The device “EndoEst-3D” is intended for use in the electromagnetic environment specified below. The customer ore the user of the device should assure that it is used in such an environment. Immunity test Test level Compliance...
- Page 35 ENDOEST-3D Continuation of Table 2 Immunity test Test level Compliance Electromagnetic EN 60601-1-2 Level environment - guidance Voltage dips, Voltage dips: Voltage dips: Mains power short quality should be interruptions 0% U for 0.5 0% U for 0.5 that of a typical and voltage cycle (at 0°, 45°,...
- Page 36 USER’S GUIDE Table 3 The device “EndoEst-3D” is intended for use in the electromagnetic environment specified below. The customer ore the user of the device should assure that it is used in such an environment. Immunity Test level Complianc Electromagnetic environment -...
- Page 37 Recommended working clearances between portable and mobile RF communication devices and the device “EndoEst-3D” The device “EndoEst-3D” is intended for use in an electromagnetic environment in which radiated RF disturbances are controlled. The customer or the user of the device can help prevent electromagnetic interference by...
- Page 38 Directive amendments 2007/47/EC of the European Parliament) transposed in Italy by Dlgs. n. 46 of 24/2/1997 and by Dlgs. n. 37 of 25/1/2010, Annex II excluded point 3.4 Equipment: Apex locator Model names: EndoEst-3D Quality System: ISO 13485/2003 Classification: Class IIa GMDN code: 16355 The compliance with the 93/42/EEC and 2007/47/ЕС...
- Page 39 ENDOEST-3D Manufactured by CJSC GEOSOFT DENT Bld. 5, h. 6A, 2-oy Troitskiy per., Moscow, Russia, 129090 PHONE / FAX: +7(495) 663-22-11, E-mail: mail@geosoft.ru Web: www.geosoft.ru Hot line: PHONE: +7(495) 663-22-11 (ext.170), E-mail: hotline @ geosoft.ru Representative in Europe: DENTAL WORLD SRL Via Antichi Pastifici, 15-70056 Molfetta (BA).
- Page 40 THE GEOSOFT DENT EQUIPMENT ENDOEST-MOTOR ENDOEST MOTOR-MINI ENDOEST-APEX ENDOEST-3D ENDOEST NANOEST LUMIEST PULPEST OBTUREST ESTUS LED-ALLADIN ESTUS LED-ALLADIN MC GUTTAFILL TERMOEST-CERAMIC GUTTAEST-V/M GUTTAEST TERMOEST ULTRAEST ULTRAEST-FSM ULTRAEST-М FOTEST-LED...
Need help?
Do you have a question about the ENDOEST-3D and is the answer not in the manual?
Questions and answers