Table of Contents
Advertisement
Quick Links
Advertisement
Table of Contents

Related Manuals for LT HYDRA Plus

Summary of Contents for LT HYDRA Plus
- Page 1 HYDRA Plus www.lt-light.com THE SHOW CONTROL MANUAL Version 1.3...
-
Page 3: Table Of Contents
1 .- HYDRA PLUS AND CONNECTIONS HYDRA PLUS ..................................1-1 TECHNICAL CHARACTERISTICS ...........................1-3 GENERAL.................................1-3 MULTI -PROCESSOR SYSTEM ..........................1-3 INPUTS - OUTPUTS ..............................1-4 ELECTRIC CHARACTERISTICS ........................1-4 AMBIENT .................................1-4 SIZE....................................1-4 TECHNICAL SERVICE .................................1-4 INSTALLATION & START UP............................1-5 CONNECTIONS ..................................1-6 2 .- ABOUT THIS MANUAL 3 .- SYSTEM CONFIGURATION... - Page 4 SELECTING AND EDITING PARAMETERS.......................5-10 EDITING A PARAMETER ..............................5-11 NUMERIC EDITION ............................5-11 EDITION IN THE CONTROL W HEELS......................5-12 WHEEL KEY .................................5-13 FUNCTIONAL EDITION - PALETTES ...........................5-13 PALETTES ................................5-14 THE HOME VALUES ................................5-16 LIBRARIES.....................................5-17 THE PARAMETER OF CONTROL..........................5-17 INVERT ....................................5-18 RELEASING ITEMS OF THE EDITOR...........................5-18 THE TRACKBALL 5-19 THE STATUS LINE...
- Page 5 RESUME ...................................7-8 8 .- MASTERS AND PAGES MASTERS ....................................8-1 LOADING GROUPS IN MASTERS........................8-1 LOADING MEMORIES IN MASTERS......................8-2 LOADING CHANNELS IN MASTERS......................8-3 MODES ..................................8-4 MASTER IN MONITOR............................8-5 EMPTYING MASTERS............................8-6 EXAMINING MASTERS ............................8-6 MASTERS EDITION TABLE...............................8-6 MASTERS IN SCENE ................................8-8 CONTROLLING A MASTER ...............................8-8 MANUAL CONTROL............................8-8 AUTOMATIC CONTROL.............................8-9 FLASH CONTROL ...............................8-10...
- Page 6 AUTOMATIC CONTROL ..........................10-5 PRIORITY CONTROL (MASTERS)........................10-7 CONFIGURATION OF THE CROSSFADERS ......................10-7 THE ORDER OF THE MEMORIES..........................10-8 PROGRAMMED JUMP............................10-8 MANUAL DISPLACEMENT..........................10-8 RATE CONTROL..................................10-9 LEVEL CONTROL ................................10-10 THE COMMANDS AND THE CROSSFADERS ......................10-10 THE MDFY MDFY FUNCTION in CROSSFADERS....................10-11 THE OUTPUT of CROSSFADERS ..........................10-11 LEARN TIME in CROSSFADERS..........................10-12 RESUME................................10-14 11 .- MACROS...
- Page 7 LOAD SOME ITEMS OF A SHOW........................14-4 DELETE A SHOW ..............................14-5 THE SHOW FILE FORMATS..........................14-5 SELECT THE FORMAT & DISK........................14-6 UPDATE THE SHOWS DIRECTORY......................14-6 ORGANIZE SHOWS IN FOLDERS (HARD DISK)..................14-7 FORMAT A FLOPPY DISK ..........................14-8 MENU 11 – PRINT THE CONSOLE SHOW ........................14-9 SETUP CONFIGURATION...............................14-11 30: EDITOR &...
- Page 8 17 .- SPOTS DEFINITION 17-1 THE SPOT DEFINITIONS ..............................17-1 IDENTIFICATION DATA ..........................17-1 PARAMETERS DEFINITION ...........................17-2 STEPS DEFINITION IN A PARAMETER......................17-4 EXAM & TYPE EDITION..............................17-5 EDITING A NEW TYPE..............................17-6 SAVE TO DISK ..................................17-6 CONCEPTUAL ..................................17-7 THE TYPES FILES ................................17-8 18 .- SERIAL PORTS 18-1 PORTS CONFIGURATION ..............................18-2 CACHE CONFIGURATION ...............................18-2...
- Page 9 OLE demo ................................23-5 24 .- ETHERNET 24-1 CONNECTIONS BETWEEN HYDRA PLUS SYSTEMS....................24-1 ETHERNET CONFIGURATION............................24-2 SELECT ING THE WORKING NET .........................24-2 ACTIVATE THE ETHERNET COMMUNICATION ...................24-3 START A NEW SESSION ...........................24-3 DMX CONFIGURATION ...........................24-5 EXAMINATION OF THE NET .........................24-6 WORKING IN MASTER & FULL SLAVE MODE ..................24-6...
-
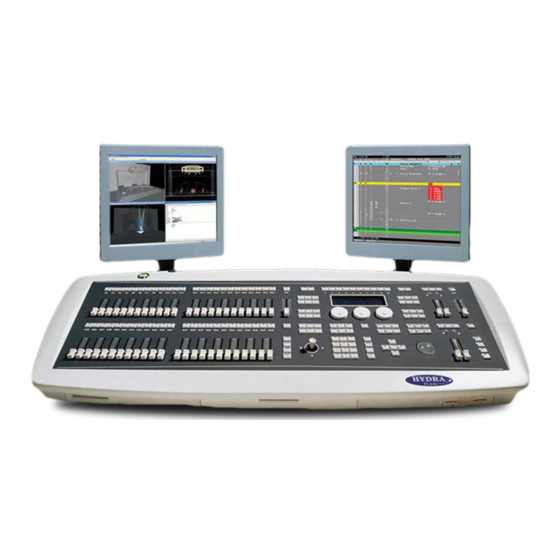
Page 11: Hydra Plus And Connections
The hard disk makes access to all stored data very quick. Its playbacks: 48/24 masters & 2 crossfaders, makes Hydra Plus a good console for live shows and theatre. - Page 12 (SMPTE, MTC). But, the more important is that Hydra Plus is a easy to use lighting system, with powerfull functions; the layout on the monitors is very clear and comprehensive, this allows you to get a quick and clear status of the show at any moment.
- Page 13 Pages Macros Crossfaders Faders with Flash/Assignation key 48 - Hydra Plus 24 - Hydra Plus Compact Master to masters control Master to DMX input control Gran Master and Black Out key Joy Stick (2 directions) Track Ball (with light in several colors) Encoders (to control parameters, libraries, speeds…)
-
Page 14: Inputs - Outputs
Humidity: 80% without condensation. SIZE Hydra Plus (48 masters): 1155 x 442 x 70..130 mm, 22 Kg. Hydra Plus Compact (24 masters): 920 x 442 x 73..126 mm, 17 Kg. TECHNICAL SERVICE MADRID: BEN-RI Electrónica S.A. Matilde Hernández 31, 3ºC. Edificio JAEN. 28019 Tel: 91 472 06 66 HYDRA PLUS –... -
Page 15: Installation & Start Up
If these directors are not followed no guarantee for the safety of the equipment is granted. Note: The shout down process maintains the power supply some seconds before total disconnection. This is a normal process. HYDRA PLUS – LT LIGHT... -
Page 16: Connections
Use the 120 ohms terminal load, between the pins 2 & 3 of the last DMX THRU connector. Use DMX Splitters to connect more DMX loads or large cables. Note: The Hydra Plus DMX signal is defined with these Parameters: PARAMETER HYDRA-PLUS DMX... - Page 17 Pin 1: 0 Vdc Pin 2: 15 Vdc Pin 3: 0 Vdc REMOTE Input. Mini-RC female connector of 4 pins. Code: Pin 1.- GND Pin 2.- RXTX- Pin 3.- RXTX + Pin 4.- 12 Vdc HYDRA PLUS – LT LIGHT...
- Page 18 1 RS-485 port 2 VGA - standar & TFT monitors. KDB - alphanumeric keyboard. MOUSE PRINTER 3 ½ Diskette MIDI ETHERNET 2 USB NOTE: ALWAYS CONNECT THE MOUSE OR THE EXTERNAL KEYBOARD WITH THE HYDRA TURNNED OFF. HYDRA PLUS – LT LIGHT...
-
Page 19: About This Manual
When the key is optional, it is written as: (SELECT) The flags of the status line, and the text of the command line are written as: Hydra Plus The menu functions, and the editon cells of the editon-tables, are named with its names and written as: Jump HYDRA PLUS –... - Page 20 The external mouse can be used, with a simple click, to: Select any cell of the edition tables (memories-list, patches, etc) • Select a numeric option of the options red-windows (parameters, libraries, palettes, banks, • etc) • Select the desired menu from the menus-list. HYDRA PLUS – LT LIGHT...
-
Page 21: System Configuration
3 .- SYSTEM CONFIGURATION Hydra Plus is a configurable system. You can select the number of masters, channels, scrollers and spot parameters. You can select the number of monitors connected to the console (1 or 2). Independently to the number of physical faders, the system can be configured to work with 24 or 48 masters. -
Page 22: The Monitor Screens
3-2 & SYSTEM CONFIGURATION THE MONITOR SCREENS In the monitors of Hydra Plus (1 or 2) you can see: Base screen, with information and status about playbacks. • Auxiliary screens, with information and status about editors and scene. • All monitors and screen (base & auxiliary) have: Status line, for the general status of the system (blue area). -
Page 23: The Auxiliary Screens
NEW PAGE: Option that permits us to force that the channels, scrollers or spots, begins in a new screen (YES) or follow from the end of the previous item (NO). MOVING THE SCREENS The current screens are dependent of the monitors number (1 or 2) and the system configuration. HYDRA PLUS – LT LIGHT... - Page 24 Working with 1 monitor: To select the desired screen press: á & â To page the spots information, press ß à, or select the parameters type in the screen, pressing: POS, COL, GOB, BEAM or XTRA. HYDRA PLUS – LT LIGHT...
-
Page 25: The Screens Background
In this screen you can see the number of the stored items (libraries, memories, groups, effects, pages & macros), and the number of channels, scrollers & spots used. When a new show is loaded from the disk, Hydra Plus, always presents this general exam screen. Press any key to close this general exam screen. -
Page 26: Resume
In menu Aux Screen: MENU 61 Paging screens: In auxiliary screens: á , â , ß & à Search spot parameters: POS, COL, GOB, BEAM, XTRA Help on-line: MENU 69 Current show exam: EXAM EXAM HYDRA PLUS – LT LIGHT... -
Page 27: Spots Patch
Spot Definition, that presents the spot definition that it is selected in the Cache or Patch list. Patch, that has the spots configuration, and include the type of each spot number, its Dmx direction, etc... HYDRA PLUS – LT LIGHT... -
Page 28: Editing The Patch
To edit the desired type for this spot, enter its index number that appears in the Cache list. Example. To edit a XSPOT type, enter the number 12 To delete the configured spot, completely, press DELETE here. HYDRA PLUS – LT LIGHT... - Page 29 The spot types has been charged from the Cache list, where: The Stage Zoom type is the number 6 - STAGZ (19 channels) & the Mac 500 type is the number 1 - MC500 (16 channels). HYDRA PLUS – LT LIGHT...
-
Page 30: Loading A New Spot Definition
There is a search function by manufactures. This function is available in any Manuf cell; here, enter the index number of the desired manufacture to access to this part of the types-library. HYDRA PLUS – LT LIGHT... -
Page 31: The Spot Definition Information
2: Load is not active. THE SPOT DEFINITION INFORMATION Spot Definition is an interactive window. It is synchronized with the selected type (in Patch or Cache) and presets us the definition of each parameter of the spot type. HYDRA PLUS – LT LIGHT... - Page 32 4-6 & SPOTS PATCH More information in Chapter 17-Spots Definition. HYDRA PLUS – LT LIGHT...
-
Page 33: Editor
In memories and groups only are stored the editor contents. The pictures can be edited in stage or in blind, because Hydra Plus has 2 editors: The Stage editor works in live controlling totally the scene (including the playbacks outputs). -
Page 34: Channels & Scrollers
In the previous example, the scrollers 1 to 5 are at frame 05, the scrollers 12 to 15 at frame 17, and the rest of the scrollers are at frame 00 in Tracking mode. HYDRA PLUS – LT LIGHT... -
Page 35: Ltp & Tracking
CHANNEL 1 THRU 45 CHANNEL 50 THRU 52 CHANNEL 1 THRU 45 SELECT 50 THRU 52 Select the channels 1, 45, and 58 CHANNEL 1 CHANNEL 45 CHANNEL 58 CHANNEL 1 SELECT 45 SELECT 58 HYDRA PLUS – LT LIGHT... -
Page 36: Excluding Channels Or Scrollers
Decrease the level a 5% (press this key as many times as necessary) {Channels} -% {Channels} @ • Assignation of the last level used from the numerical keyboard. While the channels are selected, it’s possible to edit it as many times as necessary. HYDRA PLUS – LT LIGHT... - Page 37 When these editions are done in the Stage editor, they are actives in scene and take control over any other playbacks output. Note: Selected & pre-selected channels/scrollers are ready for edition. At the beginning of a new selection, the previous selected channels/scrollers are as presents HYDRA PLUS – LT LIGHT...
-
Page 38: Selecting All The Items In The Editor
To select the channels 1 to 5 and 8 to edit them, press INVERT OTHERS SELECTIONS Select again the last selection of channels/scrollers: CHANNEL • SCROLLER • Select all the channels/scrollers in editor and scene: CHANNEL THRU THRU SCROLLER THRU THRU HYDRA PLUS – LT LIGHT... -
Page 39: Releasing Items Of The Editor
The channels fade at 0% in 2 seconds The channels jump at 0% suddenly RST RST 2 Menus The default time editor (2 seconds) used in the RELEASE, CALL and RST functions, can be edited inside the menu 30: Editor & Times HYDRA PLUS – LT LIGHT... -
Page 40: The Spots
04: Spots (See chapter 4 – Spots Patch) Hydra Plus can be configured to control a maximum of 250 spots. The configured spots cannot exceed the maximum number of attributes. The maximum number of attributes is in accordance with the channels-number and the scrollers-number configured inside the menu 50: Console Configuration. -
Page 41: About The Spot Parameters
SELECTING SPOTS Basic selections: Select the spot # SPOT # Select a range from spot # to #’ SPOT # THRU #’ Select a range form spot # to the last spot SPOT # THRU HYDRA PLUS – LT LIGHT... -
Page 42: Selecting And Editing Parameters
ß or à In the auxiliary screen, the parameters names in the active bank (available in wheels) are showed in a yellow field. And the name of the selected parameters is marked with a * HYDRA PLUS – LT LIGHT... -
Page 43: Editing A Parameter
Dimmer and Position, then the of Color, then the of Gobo, then the of Beam and, in the last place the of X-tra. Besides of the direct edition, Hydra Plus has other edition possibilities, as the numeric edition, the edition with palettes, etc; as well as more functions of parameters search. -
Page 44: Edition In The Control Wheels
Press ß to access to the previous 3 parameters. • Press POS, COL, etc. to access to the first parameter of position, color, etc. respectively. • Select the parameter to control in pressing {spots} PARAM # SELECT • HYDRA PLUS – LT LIGHT... -
Page 45: Wheel Key
R1, the next parameter Beam BEAM in R2, and the next parameter in R3. X-tra X-TRA If BANKS is in AUTO mode, we have access to the palettes. • HYDRA PLUS – LT LIGHT... -
Page 46: Palettes
• WHEEL is pressed. Put the same active palette in all the selected • spots pressing WHEEL WHELL Remember that the active wheel is marked with a * in the monitor and in the display. HYDRA PLUS – LT LIGHT... - Page 47 GOB # In the previous command, when COL (or GOB) is pressed: The auxiliary screen shows the color parameters. • The keys 1 to 10 are configured as color palettes (if BANKS is Auto). • HYDRA PLUS – LT LIGHT...
-
Page 48: The Home Values
Home, all the parameters of the selected spots, or only some parameters. Set at Home all the parameters of the selected spots pressing: {spots} PARAM PARAM Set at Home only the position parameters (for example) of the selected spots, pressing: {spots} POS @ 1 SELECT HYDRA PLUS – LT LIGHT... -
Page 49: Libraries
LIBRARIES The libraries are exposed in the chapter 7. Hydra Plus has libraries of each one of the functionalities. The methods to apply libraries are similar as palettes. The most difference between libraries and palettes is that the library values are references and these values can be edited. -
Page 50: Invert
Dimmers & channels fade out editor in 2 seconds. Dimmers & channels jump to 0% suddenly RST RST 2 Menu The editor default time (2 seconds) used for RELEASE, CALL and RST, can be changed inside menu 30: Editor & Memories HYDRA PLUS – LT LIGHT... -
Page 51: The Trackball
The parameters X and Y of the selected spots change their values. {spots} FLIP Only the parameter X of the selected spots changes its value. {spots} PARAM 2 FLIP Only the parameter Y of the selected spots changes its value. {spots} PARAM 3 FLIP HYDRA PLUS – LT LIGHT... - Page 52 Fan-Out activated in symmetrical mode. X &/or Y edition (from or wheels) has a relative value, in symmetrical mode, between the first and last spots. Example: Increase of Y of the spots 1 to 8 HYDRA PLUS – LT LIGHT...
-
Page 53: The Status Line
& dimmers controlled by it. In this way, the joystick can apply a variation slow (zone 1), middle (zone 2) or fast (zone 3). REPOSE Jy1 SLOW Jy2 MIDDLE Jy3 QUICK HYDRA PLUS – LT LIGHT... -
Page 54: Resume
FINE, set the desired sensibility (normal, high, low) ORTO, set the TB behavior (normal, none, orthogonal) FLIP, search the same point with other values of x/y. FAN-OUT, Edition of values for x/y in relative mode (lineal and symmetric) HYDRA PLUS – LT LIGHT... -
Page 55: Memories & Groups
6 .- MEMORIES & GROUPS Hydra Plus stores, in memories and groups, the channels, scrollers and spot parameters actives in the editor (red or light red). The memories are used to playback them in effects, masters and crossfaders. The groups are used as help in the selections and can be to playback in the masters &... -
Page 56: Stage Editor And Blind Editor
STAGE EDITOR AND BLIND EDITOR Hydra Plus has 2 editors, Stage and Blind. To toggle between them press BLIND. Both editors are independents: When the Blind editor is activated, the Stage editor is deactivated but its contents are maintained (and vice versus). -
Page 57: Calling To The Editor Some Playbacks
The functionality and commands are the same for both editors. CALLING TO THE EDITOR SOME PLAYBACKS Hydra Plus only stores the editor contents, for this reason, there are commands to call into editor to some scene items (playbacks) that we want that they form part of editor. - Page 58 Call to the parameter 10 of the spot 8, as it is stored in the memory 1: MEM 1 SPOT 8 PARAM 10 CALL The editor controls a channel, scroller or spot called into the Stage editor. HYDRA PLUS – LT LIGHT...
-
Page 59: Storing The Scene In The Next Memory
For memories (2 options): For groups: MEM MDFY GROUP MDFY MEMLST Select the Text cell of the memory or group to edit, and type the desired text from the alphanumeric keyboard. Close this screen pressing EXIT HYDRA PLUS – LT LIGHT... -
Page 60: Delete Memories Or Groups
RST GROUP # MDFY {modifications} REC RST MDFY {modifications} REC COPY MEMORIES OR GROUPS It’s possible to copy a memory (or group) in other memory (or group), coping the contents, the text and in case of memories times & commands. HYDRA PLUS – LT LIGHT... -
Page 61: Exchange Memories Or Groups
If the memory 25 doesn’t is, will be created and the memory 1 will be deleted. Exchange the memories 1 to 10 with the memories 21 to 30. MEM 1 THRU 10 = = 21 REC The exchange of ranges keeps the original numbers. HYDRA PLUS – LT LIGHT... -
Page 62: Memory Times
30 or in MEMLIST · screen. The admitted times are 0.1 to 999.9 sec. When a time is greater than 100 seconds, the decimal point isn’t represented but is computed by the system. HYDRA PLUS – LT LIGHT... -
Page 63: Programming Times From The Memories List
Enter the memory number to edit, # And press ENTER or à to select the memory # 2 Menus The memories default times can be changed inside the menu 30: Editor & Times. See chapter HYDRA PLUS – LT LIGHT... -
Page 64: Timing
) that are forced to jump in scene at the end of the master travel (Beg=FF). They jump in scene because their End & Beg values are equals. Use T3 to avoid LTPs fade in scene, jumping to their target values at the end of the master travel. HYDRA PLUS – LT LIGHT... - Page 65 Permits that COL, BEAM, X & Y parameters fade in scene in accordance with the fade-in time or the fader movement. This timing is very used to divide a memory in these 6 basic types… HYDRA PLUS – LT LIGHT...
- Page 66 These options permit us to do a dynamic test of the T2 behavior. This test is 2: Test Slow showed dynamically in the Test window. The test can be Slow, Middle or 3: Test Middle 4: Test Fast Fast. The Test window, dynamically, it’s possible to observe: HYDRA PLUS – LT LIGHT...
- Page 67 An item, that isn’t included in the types, stays in the base memory and its fade-in time is the memory fade-in time. The base memory always is, including if it’s empty. If a memory hasn’t items of a type, the corresponding part will be not created. HYDRA PLUS – LT LIGHT...
-
Page 68: Set The Default Timing
A memory with timing hasn’t parts. Editing parts, the timing is overwritten. Editing a memory, it’s possible to convert its timing values to memory parts (editables), pressing: {to select the option 7:TO PART} PART PART 7 HYDRA PLUS – LT LIGHT... -
Page 69: Memory Parts
In both cases, the same method is used: To include channels, scrollers, or parameters in a part, select them and press: Where # is the part number (1 to 9). {Selection} PART # Repeat this step as many times as necessary. HYDRA PLUS – LT LIGHT... - Page 70 30 to 40, and the street lamp is the channel 25. Store all the channels of this scene (for example in the memory 2) at 100%, and the channel 25 at 1% in a memory part: CHANNEL 30 THRU 40 @ @ 25 @ 01 PART 1 MEM 2 REC HYDRA PLUS – LT LIGHT...
-
Page 71: Return A Item To The Base Memory
The times of each part are presented in one line (T↑ & T↑ ). To edit one of these times, select it · and enter its value. In this example, the memory 1 has 2 parts (+P1 & +P2). HYDRA PLUS – LT LIGHT... -
Page 72: Others Actions With Parts
Mode where the each channel level or parameter value that has been modified takes the editor value to be modified. 2: RELATIVE/BASE HTP=RELATIVE: Mode where each channel level or dimmer level that has been modified, takes the relative value of the edition to be modified. Example: If a channel HYDRA PLUS – LT LIGHT... - Page 73 Channel 1@60 2@30, Scroller 1@s10 Channel 1@30 Scroller 1@s05 Channel 1@30, Scroller 1@s03 The attribute options (# ) are: 0: Normal The modification of an item only is applied in the memories where this item exists. HYDRA PLUS – LT LIGHT...
- Page 74 Modified memory channel 1@ 50, channel 2 @ 30 channel 1@ 60, channel 2 @ 50 channel 1@ 60, channel 2 @ 30 channel 1@ 60, channel 2 @ 50 channel 1@ FF channel 1@ FF HYDRA PLUS – LT LIGHT...
-
Page 75: The Spots In Memories & Groups
1, pressing PARAM CALL REC. When this memory is executed from a master or crossfade, all the spot parameters are controlled. This mode is very interesting for the first memory of a crossfaders, o when the memory will be executed in a master to set a whole scene. HYDRA PLUS – LT LIGHT... - Page 76 Examples: Store the next memory without the Dimmer parameter, pressing: PARAM 1 RELEASE REC Store the next memory without the color parameters, pressing: COL RELEASE REC HYDRA PLUS – LT LIGHT...
- Page 77 MEM # CALL (CALL) // GROUP # CALL (CALL) A range: MEM # THRU #’ CALL (CALL) // GROUP # THRU #’ CALL (CALL) Several masters: CALL Mn // CALL Mn Mn Mn ... CALL Scene: CALL CALL HYDRA PLUS – LT LIGHT...
- Page 78 {editor} PART PART # Convert timing to Parts: {editor} PART PART 7 Commands that use parts: MEM # PART #’ SELECT MEM # PART #’ CALL (CALL) MEM # PART #’ LOAD Mn MEM # PART #’ RELEASE HYDRA PLUS – LT LIGHT...
-
Page 79: Libraries
7 .- LIBRARIES Hydra Plus has 5 library categories: 99 libraries of position - POS POS 99 libraries of color - COL COL 99 libraries of gobos - GOB GOB 99 libraries of beam - BEAM BEAM 99 libraries of x-tra - XTRA XTRA When memories and groups are edited using library values, the edition is more conceptual, and their modifications are easier. -
Page 80: Color, Gobo, Beam & X-Tra Libraries
COL COL MDFY {text} EXIT To modify on the these libraries, for example of color, (and with this update all the memories and groups where the library is used), press: RST COL COL # MDFY {modifications} REC HYDRA PLUS – LT LIGHT... -
Page 81: Copy & Exchange
The next commands can be applied to any library category (position, color, gobo, beam, x-tra or figures). To exam the list of all the libraries, for example of position, press: POS POS EXAM To exam one library, for example one position, press: POS POS # EXAM HYDRA PLUS – LT LIGHT... -
Page 82: Delete
POS POS # DELETE To delete the positions from # to #’ POS POS # THRU #’ DELETE To delete all the libraries of one category, for example of position, press: To confirm press DELETE POS POS DELETE HYDRA PLUS – LT LIGHT... -
Page 83: Editing With Libraries
To take control of the libraries with the control wheels, press EDT+ When EDT+ is pressed, the spots present their categories and no their parameters. This screen, more conceptual, is thought to edit directly with libraries & palettes. HYDRA PLUS – LT LIGHT... -
Page 84: Selection In Banks Keys
SELECTION IN BANKS KEYS The programmable keys 1 to 10 , BANKS keys, can be configured as direct access to palettes and libraries of any category, in a fix or dynamic mode. HYDRA PLUS – LT LIGHT... - Page 85 Example, to apply the position Piano to the spots 1 & 3: If BANKS is in POS mode SPOT 1 SPOT 3 1 If BANKS is in AUTO mode SPOT 1 SPOT 3 POS 1 HYDRA PLUS – LT LIGHT...
-
Page 86: Resume
Delete a library (or range): POS POS # (THRU #’) DELETE Delete all the libraries: POS POS DELETE Edition of palettes & libraries using the control wheels: EDIT+ Edition of palettes & libraries using BANKS keys: (POS) # HYDRA PLUS – LT LIGHT... -
Page 87: Masters
Example: load the group 5 in master 8 GROUP 5 LOA M8 To load a groups range, in several masters, there are 2 options: Option A: GROUP # LOAD Mn Mn ... LOAD Option B: GROUP # THRU #’ LOAD Mn HYDRA PLUS – LT LIGHT... -
Page 88: Loading Memories In Masters
If the last group of the range is omitted, Hydra Plus assumes that is the last stored. Example: Load from group 1 to last stored, in masters from 11: GROUP 1 THRU LOAD M11 If the first and last groups of the range are omitted, Hydra Plus assumes those are the first and last stored respectively. -
Page 89: Loading Channels In Masters
LOAD About option B: If the last memory of the range is omitted, Hydra Plus assumes that is the last stored. Example: Load from memory 1 to last stored, in masters from 11: MEM 1 THRU LOAD LOAD M11 If the first and last memories of the range are omitted, Hydra Plus assumes those are the first and last stored respectively. -
Page 90: Modes
The master controls the output to scene of its memory or group, while the rest of Absolute the masters output is forced to 0% progressively. To load a memory or group in one of these modes, use the next commands: HYDRA PLUS – LT LIGHT... -
Page 91: Master In Monitor
(Mn LED at 50%), and appears in yellow when the master is active in scene (Mn LED at 100% or blinking). Near the master number appears its output level (00 to FF) in black. HYDRA PLUS – LT LIGHT... -
Page 92: Emptying Masters
8-6 & MASTERS AND PAGES When the master output level isn’t the same that the fader level (physically), the master is locked and the flag < appears in red near the level. Group text or memory text: Under the master number, if proceed, the text of the loaded memory/group appears. - Page 93 The next options (in the lower line) permit us to set the masters range that will be controlled for this master. In the previous example, masters 1 to 24. To close this masters edition table press EXIT HYDRA PLUS – LT LIGHT...
-
Page 94: Masters In Scene
• Flash MANUAL CONTROL Manual control of a master is done moving its fader, Mn. The fader position controls the master output level (00-FF). is over its 0, active master, the Mn LED is at 100%. HYDRA PLUS – LT LIGHT... -
Page 95: Automatic Control
During these fades, the Mn LED blinks (the master is temporizing), and it’s possible: Press Mn (PAUSE) to pause the fade in progress. • Move the fader to arrive the master output level (50<) and take its control manually with • the fader. If a memory has wait-in time (↑... -
Page 96: Flash Control
In accordance with the LTP behavior, the last active master (manual or automatically) is the master that controls the LTPs parameters. MANUAL PRIORITY CONTROL To change this control priority, Hydra Plus has the PRIO function. Any active master takes priority again, over its LTPs, pressing: PRIO... -
Page 97: Modification Of The Masters Contents
The fader SM, by default, is the general master of the output of all the masters. can be configured as master of masters or as general master of the DMX input. This configuration is done inside menu 03: Dmx In or menu 31: Playbacks. See chapter 14. HYDRA PLUS – LT LIGHT... -
Page 98: Storing Of A Page
8-12 & MASTERS AND PAGES PAGES The Hydra Plus has 999 pages (1-999). These pages collect the contents of all the playbacks (masters and crossfaders). The information stored in the pages can be recovered at any moment, in a way quick and easy. -
Page 99: Loading Of A Page In Masters
PAGE # AssignY PAGE # AssignX AssignX Forced mode PAGE # AssignY AssignY In these commands is the same press AssignX that press AssignY Note: The page assigned in this way doesn’t affect to the masters. HYDRA PLUS – LT LIGHT... -
Page 100: Selecting A Page In Masters Y Crossfaders
To delete the page # press: PAGE # DELETE Confirm pressing DELETE To delete a pages range press: PAGE # THRU #’ DELETE Confirm pressing DELETE To delete all the pages press: Confirm pressing DELETE PAGE DELETE HYDRA PLUS – LT LIGHT... -
Page 101: Masters & Pages
Select a page in masters & crossfade, forced mode: PAGE # SELECT SELECT // PAGE # CALL CALL Exam A page: PAGE # EXAM The pages list: PAGE EXAM Pages modification: The page #: PAGE # MDFY The pages-list (text): PAGE MDFY HYDRA PLUS – LT LIGHT... - Page 102 Exchange: PAGE # (THRU #’) = = #’’ REC DELETE: A page: PAGE # DELETE A pages range: PAGE # THRU #’ DELETE All the pages: PAGE DELETE Force priority to Mn: PRIO Mn PRIO Set mode for Mn (GO/FLASH/SOLO): FLMT HYDRA PLUS – LT LIGHT...
-
Page 103: The Effects
9 .- THE EFFECTS Hydra Plus has 999 Effects (Chases) and can playback, at the same time, up to 48 effects (24 in the Compact model). An effect is created inserting memories, groups or channels. The effects are executed in masters. - Page 104 Some examples, about a effect of 4 steps, where a activated step is written as “ ”, and a ˜ deactivated step is written as “ ”, and in each example a complete lap is represented. ™ HYDRA PLUS – LT LIGHT...
- Page 105 THE EFFECTS & 9-3 Ascendant direction ( > ) Descendant direction ( < ) HYDRA PLUS – LT LIGHT...
-
Page 106: Recording A Effect
9-4 & THE EFFECTS Cyclic direction ( > < ) RECORDING A EFFECT An effect is recorded in the effect edition screen. Open this screen for a concrete effect, pressing: To open the edition screen of the effect # (1 to 999) - Page 107 To edit a range (of memories, groups or channels), access to the last step and press INSERT as many times as steps, or press and hold down pressed INSERT up to edit the desired steps. To close the effect edition screen press EXIT HYDRA PLUS – LT LIGHT...
-
Page 108: Modifying A Effect
It’s possible to exam the effect #, pressing: EFFECT # EXAM In all the screens of exam, it’s possible to use the arrow keys to page the information. The exam screens are closed pressing EXIT HYDRA PLUS – LT LIGHT... -
Page 109: Coping Effects
DELETING EFFECTS To delete the effect #, press: EFFECT # DELETE To delete a range, press: EFFECT # THRU #’ DELETE To delete all the effects, press: EFFECT DELETE Hydra Plus asks confirmation. Confirm pressing DELETE. HYDRA PLUS – LT LIGHT... -
Page 110: The Effects Playback
After the load, effect is deactivated, its rate control is at 100% or its level control is at full (100< or FF<). Mn LED is lit at 50%. In this mode, it’s not necessary to move to play the effect with the programmed values. -
Page 111: Activating A Effect
. Controls the speed of execution of the effect. When an effect is loaded this master is locked at 100%; to take its control the first time is needed to move it up to its middle position (-5-). HYDRA PLUS – LT LIGHT... - Page 112 The effect follows in step-to-step mode. The next step is activated and it stays active. Each time that STEP Mn is pressed the next step is activate. It’s possible to press Mn as many times as steps to advance, before to release STEP HYDRA PLUS – LT LIGHT...
-
Page 113: Learn Time Function - Lntm
2. Each time that a step is deactivated, its scrollers and parameters remain their values in scene (tracking). Only other step (or playback) can change this scene value. 3. The effect takes control of the LTPs in scene when it is activated (GO), but not with each new step. HYDRA PLUS – LT LIGHT... -
Page 114: Take Priority With A Active Effect
Red…Congo, White…And so on. TAKE PRIORITY WITH A ACTIVE EFFECT If any other playback takes control over the LTPs of a active effect, to take control again over these LTPs with the active effect, press: PRIO HYDRA PLUS – LT LIGHT... -
Page 115: Resume
EFFECT # (THRU #’) = = #’’ REC Playback: Nº-Lap GO: # Mn STEP: STEP Nº STEP: # STEP Learn Time - LNTM: LNTM Mn Mn Recover the control of the LTPs of a active effect: PRIO HYDRA PLUS – LT LIGHT... - Page 116 9-14 & THE EFFECTS HYDRA PLUS – LT LIGHT...
-
Page 117: 10 .- Sequences
10 .- SEQUENCES Hydra Plus has 2 dedicated crossfaders, X1/X2 & Y1/Y2, to execute a memories sequence in crossfades. A crossfade is a double fade between 2 memories, one of them fades-in scene and the other fades-out scene. Also, Hydra Plus can execute a sequence in any master, Mn. -
Page 118: Loading A Memories Range
If THRU is omitted the memories range loaded will be an open range and each new stored memory will be loaded at the end of this sequence in the crossfade. Examples MEM # ASSIGNX or MEM ASSIGNX HYDRA PLUS – LT LIGHT... -
Page 119: Loading Pages
Load only both crossfaders, pressing PAGE # ASSIGNX ASSIGNX Load only masters, pressing PAGE # LOAD LOAD Load crossfaders & masters, pressing PAGE # SELECT SELECT or PAGE # CALL CALL See Chapter 8 – Masters & Pages HYDRA PLUS – LT LIGHT... -
Page 120: Emptying A Sequence
(crossfade ended) the memory in X2 at 100% passes to X1 at 100% while that the next memory in the list passes to X2 at 0%. A new crossfade is ready. The crossfader LEDs, X1 & X2, indicate us the direction the movement of the faders to end the current crossfade. HYDRA PLUS – LT LIGHT... -
Page 121: Automatic Control
At the end of this crossfade, the following is ready. If the memory in X1 has T , this time · is computed and then, the following crossfade is started automatically (no GO is needed). HYDRA PLUS – LT LIGHT... - Page 122 To change the crossfade direction in progress returning to the previous scene, or start a new • crossfade to the previous memory, press PAUSE-B Mn is equivalent to GOBACK if crossfade paused or inactive PAUSE-B HYDRA PLUS – LT LIGHT...
-
Page 123: Priority Control (Masters)
When a crossfader is configured as T Off, it doesn’t compute the T programmed in the · · memories. Note that in the options window, there are options to configure the corresponding crossfader or both crossfaders at the same time. HYDRA PLUS – LT LIGHT... -
Page 124: The Order Of The Memories
MEM # ASSIGNX Memory # is assigned in X2. At any moment, it’s possible to advance to the next memory in the list, immediately (without fades), pressing: PAUSE To advance for more than 1 memory, press: PAUSE GO GO GO... PAUSE HYDRA PLUS – LT LIGHT... -
Page 125: Rate Control
100% (affecting to the programmed times) is showed in a red field. To have a rate control at any moment, it’s possible to use a master configured as RATE from the MDFY FLMT table. In the example, master 24 is configured as RATE of crossfader X. HYDRA PLUS – LT LIGHT... -
Page 126: Level Control
4: C-485 that will be transmitted by the C-485 port. For the commands types A-232, B-232 & C-485 see chapter 18 –RS232 & RS485 PORTS For the command type MACRO, see chapter 11 - MACROS. HYDRA PLUS – LT LIGHT... -
Page 127: The Mdfy Mdfy Function In Crossfaders
As the same way that for the masters, it’s possible to select and call the outputs of the crossfaders: To select the channels, scrollers and parameters (without level) of the crossfade output, press: SELECT ASSIGNX To call the channels, scrollers and parameters with level/values of the crossfade output, press: CALL ASSIGNX HYDRA PLUS – LT LIGHT... -
Page 128: Learn Time In Crossfaders
To end the learning process press LNTM again (LED at OFF). • To learn all the memories times, execute the crossfade manually using its & faders. Hydra Plus learns in each faders travel the T↑ & T↓, and if correct, the T↑ & T↓ . And ·... - Page 129 Total memory time Mem T↑ T↓ T↑ T↓ · · · 6,5 seconds (1,5+4+1) 6,5 seconds (3+3+0,5) This time is calculated by the system. NOTE: These commands are not available for the sequences loaded in masters. HYDRA PLUS – LT LIGHT...
-
Page 130: Resume
Place a memory in the master sequence: The first loaded: STEP A concrete memory: # STEP Speed control: RATE Modify X1 or X2 memory: {Stage editor} MDFY MDFY or {Blind editor} MDFY MDFY Learn times (crossfaders): LNTM GO GO ... LNTM HYDRA PLUS – LT LIGHT... -
Page 131: 11 .- Macros
11 .- MACROS Hydra Plus has 999 macros. Each macro has several keys programmed by the user that can execute at any moment. A macro: 1. Accepts any pressed key (and mouse clicks). 2. Doesn’t accept movements of faders, wheels, joystick or trackball. -
Page 132: Macro Modification
MENU toggles to the setup line of this screen, here too it’s possible to edit the text. Press EXIT to close this screen. MACRO EXAM It’s possible to exam a concrete macro or the macros list. to exam the macro # MACRO # EXAM to exam the macros list MACRO EXAM HYDRA PLUS – LT LIGHT... -
Page 133: Delete A Macro
• From the BANKS keys in mode Macro or Auto. • It associated to a memory, when the memory is executed in sequence. • From the TC, when is programmed in the events list. • HYDRA PLUS – LT LIGHT... -
Page 134: From The Editor
(or number) of each macro appears in its corresponding place. When 1 to 10 are in Macro mode, to execute a macro: Select its bank and press the corresponding key. In the example, to execute the macro stop, press 2 HYDRA PLUS – LT LIGHT... -
Page 135: Associated To A Memory
See the chapter 21. EXAMPLES The macros have a lot of possibilities. In this section, only there are some basic examples: • Macro 1, named Cross X, loads in X2 the memory 123 and starts the crossfade. HYDRA PLUS – LT LIGHT... -
Page 136: Macros And Spots
This macro is programmed in the menu 38: Power-Up Macro See chapter 14. HYDRA PLUS – LT LIGHT... -
Page 137: Resume
MACRO # = = # REC or MACRO # THRU # = = # REC Delete: The macro #: MACRO # DELETE A macros range: MACRO # THRU # DELETE All the macros: MACRO DELETE HYDRA PLUS – LT LIGHT... - Page 138 11-8 & MACROS HYDRA PLUS – LT LIGHT...
-
Page 139: 12 .- General Functions
Spots of the same type SPOT # = #' CALL, the parameters values of spot # are copied to spot parameters #' SPOT # = = #' CALL, the parameters values of the spots # & #' are exchanged. HYDRA PLUS – LT LIGHT... - Page 140 Libraries: POS, COL, GOB, BEAM, XTRA, FIG; with examples for POS library: POS # = #' REC, position # is copied to position #’ POS # = = #' REC, the positions # & #’ exchanges their contents. HYDRA PLUS – LT LIGHT...
-
Page 141: Release
The contents of a group or groups range: GROUP # RELEASE GROUP # THRU #’ RELEASE The contents of a part of a memory: MEM # PART #’ RELEASE The LTP parameters & scroller pass to tracking mode suddenly. HYDRA PLUS – LT LIGHT... -
Page 142: Select & Call Functions
The Mn contents are pre-selected SELECT Mn The contents of these masters are pre-selected Mn, Mn …Mn SELECT SELECT The Mn output is captured CALL Mn The outputs of these masters are captured Mn Mn …Mn ... CALL CALL HYDRA PLUS – LT LIGHT... -
Page 143: Mdfy & Exam Functions
Exam or modification of the lists of memories, groups, effects, pages, macros, libraries (pos, col, gob, beam, x-tra, fig): MEM EXAM MEM MDFY GROUP EXAM GROUP MDFY POS POS EXAM POS POS MDFY MACRO EXAM MACRO MDFY Etc.. Etc.. HYDRA PLUS – LT LIGHT... - Page 144 If the master has an effect, open the modification screen of its effect. {editor} MDFY Mn Add to the memory or group of Mn the editor, modifying it (only for masters with memory or group) HYDRA PLUS – LT LIGHT...
-
Page 145: Selection Of The Next Item
CHANNEL 125 SELECT NEXT NEXT SELECT NEXT NEXT SELECT b) Selective mode. NEXT (LED at on). It’s used to increment the number of channel, scroller or spots that are in the editor. This mode is only for channels, scrollers & spots. HYDRA PLUS – LT LIGHT... -
Page 146: Test Functions
Using the editor, it’s possible to test channels, spots dimmers, groups or memories. The TEST function permits us to isolate (in the editor) a channel, a spot dimmer, a memory or a group with the objective to check it. In this testing process: HYDRA PLUS – LT LIGHT... -
Page 147: Rescue
Each new data of a type is stored in the first place in the rescue list and, if is needed the last list data will be lost. To recover same the these data press RESCUE HYDRA PLUS – LT LIGHT... - Page 148 Recover the original memory 3 pressing RESCUE 30 CALL The original memory 3 is loaded in the editor. Now it’s possible to store this editor as memory 3 (MEM 3 REC REC) or any other memory number (MEM REC) HYDRA PLUS – LT LIGHT...
-
Page 149: Resume
Add the editor to X1 {Stage} MDFY MDFY // {Blind} MDFY MDFY NEXT Next item in the system {item} NEXT Next item in the editor {editor} CHANNEL/SCROLLER/SPOT NEXT TEXT {item} TEST, TEST... RESCUE: RESCUE # CALL/SELECT... HYDRA PLUS – LT LIGHT... - Page 150 12-12 & GENERAL FUNCTIONS HYDRA PLUS – LT LIGHT...
-
Page 151: 13 .- Figures
13 .- FIGURES Hydra Plus has a figures editor for the position parameters x and y. A figure permits us to program (and playback) a complex movement in an easy way. The figures are stored in memories and groups. EDITION OF A FIGURE The first step to edit a figure is set the position of the involved spots, editing their parameters •... - Page 152 XY Value Example: A Circle for 3 spots. relX+Y Spot 1: 16 Spot 2: 21 Spot 3: 26 Spot 1: 16 Spot 2: 16 Spot 3: 16 Default Spot 1: 16 Spot 2: 11 Spot 3: 6 HYDRA PLUS – LT LIGHT...
- Page 153 Spot 3: 16 / 26 Spot 1: 16 / 16 Spot 2: 16 / 16 Spot 3: 16 / 16 Default Spot 1: 16 / 16 Spot 2: 16 / 11 Spot 3: 16 / 6 HYDRA PLUS – LT LIGHT...
- Page 154 SPD Value Example: A Circle for 3 spots. relSPD Spot 1: +12 Spot 2: +22 Spot 3: +32 Spot 1: +12 Spot 2: +12 Spot 3: +12 Default Spot 1: +12 Spot 2: +2 Spot 3: -8 HYDRA PLUS – LT LIGHT...
- Page 155 Cycle permits us to adjust the effective cycle, in accordance with the time needed to draw one time (lap). A lap corresponds with a Cycle of 100. A Circle presented for one spots in several time intervals. Value Cycle The time unit, t, is Cycle=100 (1 lap= t) +200 +100 Default HYDRA PLUS – LT LIGHT...
- Page 156 Any relative control only has use when is applied to control the figure of several spots. In the monitor, the symbol - - is associated to the spots that have figure active. This symbol is showed with the color code of control (master, crossfade, editor…). HYDRA PLUS – LT LIGHT...
-
Page 157: Synchronism
WHEEL to activate this adjustment in the editor. This temporal edition in blind mode can be applied for more than one figure parameter at the same time. Resume: WHEEL WHEEL WHEEL R1 R2 ... WHEEL HYDRA PLUS – LT LIGHT... -
Page 158: General Notes
To see the COL parameters at the first place To see the GOB parameters at the first place To see the BEAM parameters at the first place BEAM To see the X-TRA parameters at the first place XTRA HYDRA PLUS – LT LIGHT... -
Page 159: 14 .- Menus
Chapter 18 – The RS232 and RS485 ports Menu 21: Chapter 19 – Midi Menu 22: Chapter 20 – Sound and externals triggers Menu 23: Chapter 21 – Synchronisms, Time Code Menu 40: Chapter 24 – Ethernet HYDRA PLUS – LT LIGHT... -
Page 160: General
Inside this menu the console presents the directory of show files of the active disk (Hard Disk or Floppy Disk). Each show uses a line for its information. A show is defined with a Name, a Title, HYDRA PLUS – LT LIGHT... -
Page 161: Store A New Show
F cell. Selecting this cell, the functions to store, load, and delete are available. Each time that a LT show is selected, the Exam zone presents you information about it. STORE A NEW SHOW To store a new show in the disk: Select the last empty line using the mouse or arrow keys. -
Page 162: Load Some Items Of A Show
LOAD SOME ITEMS OF A SHOW Hydra Plus allows you to load only some items of the show, partially. Example, it’s possible to load a Patch used in a show, without the need the load memories, pages, etc. To load some part of a show: Select the stored show with the cursor (using the mouse or arrow keys). -
Page 163: Delete A Show
LT show to a console pf other manufacture, or vice versus. If an ASCII show has been loaded in Hydra Plus, don’t forget store it in LT format to continue working with this LT show. -
Page 164: Select The Format & Disk
14-6 & MENUS A LT show can be edited in a PC, using the Off Line Editor of Hydra Plus. An ASCII show can be edited in a PC using any text editor. SELECT THE FORMAT & DISK The system allows you to select the show format (LT or ASCII), and the working disk (Hard Disk, Floppy Disk or USB Disk) in the options of the Setup line. -
Page 165: Organize Shows In Folders (Hard Disk)
Delete each one of the shows inside the folder, and quit to the previous folder. Select the folder to delete with the cursor. • Access to its F cell • Execute the option 7: Delete Folder pressing 7 ENTER • HYDRA PLUS – LT LIGHT... -
Page 166: Format A Floppy Disk
20). The items, placed out of their respective folder, are not accessible. FORMAT A FLOPPY DISK Hydra Plus uses 3½ formatted floppy disks. The format of these floppy disks is DOS. If the floppy is not formatted (or if it’s needed delete it completely), must be necessary to format it. -
Page 167: Menu 11 - Print The Console Show
Pressing 0 ENTER to unselect all the items (0: NONE) • Pressing 1 ENTER to select all the items (1: ALL) • Now, it’s possible to return to the list, pressing MENU or ↓, to adjust some ítems. HYDRA PLUS – LT LIGHT... - Page 168 At any moment, inside or outside menu Print, it’s possible to print (always in a physical printer) the screens of the 2 monitors. To print these screens press in the alphanumeric keyboard Ctrl 99 Hydra Plus uses EPSON printers (Centronics parallel port). HYDRA PLUS – LT LIGHT...
-
Page 169: Setup Configuration
• GM, that allows to configure if the General Master works in scale 0 to 100%, in scale 0 to 200%, or is DISABLED. By default, 100%. DISABLED OPTION is a good solution when fader is broken. • BLKoUT, that allows to disable (or enable) the BLKOUT key. HYDRA PLUS – LT LIGHT... -
Page 170: 32: System
DMX 2, DMX 3 & DMX 4. The adjust of speed has the objective of avoid problems with oldest DMX receivers: DMX output is updated 20 times per second (Default option and ASCII norm). 0: FAST HYDRA PLUS – LT LIGHT... -
Page 171: 34: Security
¡¡¡ Don’t forget the Password, will be needed to deactivate Security !!! 35: REMOTE To open this menu press MENU 35 Hydra PLUS has 2 types of remote control, at the same time, only a type (or none) can control the console. : Remote Pocket PC Note: For more information about these types, see the respective user manual. -
Page 172: 36: Power-Up Macro
Under this label are placed the menus 60, 61 & 69. The menus 61 & 69 are described in the chapter 3. 60: Base Screen To open this menu press MENU 60, or press MONITOR MONITOR HYDRA PLUS – LT LIGHT... -
Page 173: Special Commands
To execute any of these commands, select its corresponding line and press 0 ENTER • Notes: These commands can cause light-jump in stage! These commands are very used to give back (at zero) in processes of playback or edition. HYDRA PLUS – LT LIGHT... -
Page 174: 79: Tools
Make sure that the alphanumeric keyboard is connected. Each game has its instructions, and all them are executed from the alphanumeric keyboard, as in a PC. The games don’t affect to the Hydra Plus system. But remember, the system is stopped to game. - Page 175 Copy [4] Copy [4]: Copies the selected file or folder to the other zone (disk). Delete [5] Delete [5]: Deletes the selected file or folder. HYDRA PLUS – LT LIGHT...
- Page 176 To connect to the net the PC simulator (wOLE), it is needed that the PC has installed the IPX protocol with the type 802.3 (the same that Hydra Plus uses). In Hydra PLUS user manual there is more information about the installation of the IPX protocol).
- Page 177 MENUS & 14-19 1: Update by Ethernet Hydra Plus can be updated from a PC Windows using an Ethernet connection (in addition to the standard update using a floppy disk). This new procedure is quicker and it doesn’t need generate a software diskette.
- Page 178 9 nets, furthermore this configuration can be changed if needed. For this, Hydra Plus has a menu inside Tools that allows you to configure any connected Ebox (Ethernet <-> Dmx). To access to this menu press MENU 79 and select its option 2: LT-Light Ebox Configuration HYDRA PLUS –...
- Page 179 Net: It’s the number net (0..9) that has the universe for the DMX output. Universe: It’s the universe number (1..16) for the DMX output. Status: It’s parameter allows you to Enable or to Disable the DMX output. HYDRA PLUS – LT LIGHT...
-
Page 180: Tests
82: VGA To open this test press MENU 82 This test presents in the connected monitors, the charts of colors & characters. The console display presents its characters chart. To close this menu press EXIT HYDRA PLUS – LT LIGHT... -
Page 181: 83: Dmx-In
Follow the instructions in the screen. To close this menu press EXIT 90: DISK Used to test the disk unit. To open this test press MENU 90 Follow the instructions in the screen. To close this menu press EXIT HYDRA PLUS – LT LIGHT... -
Page 182: 91: Printer
To toggle the status of this functionality executes the menu option 99: Enable/Disable, pressing MENU 99 Remember the Text function is always active. The correspondence between the keys of the console & the alphanumeric keyboard are explained in the chapter 23. HYDRA PLUS – LT LIGHT... -
Page 183: 15 .- Channels & Scrollers Patch
The dimmers in the DMX-4 output are named 1. 4 to 512. 4 By default, the Hydra Plus channels are assigned to the first dimmers of the outputs DMX-1 & DMX-2; and the scrollers, to the first directions of the output DMX-4. -
Page 184: Channels List
Id the active cell is a +: To edit more than 1 dimmer to the channel, press ENTER to access to the +Edit window. In the +Edit window it is possible to edit as many dimmers as will be necessary. HYDRA PLUS – LT LIGHT... -
Page 185: The +Edit Window
Remember: A dimmer only can be associated a 1 channel. For this reason, in the previous example, the dimmer 3.1 has been associated with the channel 1, and the channel 3 is free (the channel 3 is associated with the dimmer 3.1 by default). HYDRA PLUS – LT LIGHT... -
Page 186: Scrollers List
(2 frames) and the system can protect it. Each time that this color is active in scene the system moves slowly the gel to avoid the hot dot produced of the lamp heat. 00..17 They are the values of each frame. HYDRA PLUS – LT LIGHT... -
Page 187: Editing Scrollers
INSERT. To return to the number of the frames by default, press DELETE. Hydra Plus has 18 frames by default. This value is present in the status line, and it can be edited here: To edit the frames by default, access to the status line (with the mouse or pressing MENU) and select the Default Frames option, and enter the frames number by default (2 to 18). -
Page 188: The +Edit Window
To edit a new associated channel, access to the last empty Cha cell. To quit of this window press EXIT Remember, a direction only can be associated a 1 scroller. Each time that a direction is edited here, its original association is lost. HYDRA PLUS – LT LIGHT... -
Page 189: Dimmers List
• Use the arrow keys or mouse to select the data (cell) to edit. • To edit the selected cell enter the appropriate number. • Accept the entered data moving the cursor or pressing ENTER. HYDRA PLUS – LT LIGHT... - Page 190 About a dimmer, the edition of a scroller number implicates the deleting of a possible channel number, and vive versus. In any cell: The selected dimmer can be tested using the at any moment. This Test is independent of its control channels. HYDRA PLUS – LT LIGHT...
-
Page 191: Selection Of List
(1 to 512) of the line 2 DIMMER .2 Select all the dimmers of a lines range, i.e., all the dimmers DIMMER .# THRU .# of the lines 2 to 3. DIMMER .2 THRU .3 HYDRA PLUS – LT LIGHT... - Page 192 Set the dimmer 1-23 of line-1 at their defaults DIMMER 1.1 THRU 23.1 REC Set the line-1 at its default. DIMMER.1 REC Set all the dimmers of all the lines at the DIMMER REC values by default. * These commands answer us confirmation. HYDRA PLUS – LT LIGHT...
-
Page 193: User Curves
CHANNELS & SCROLLERS PATCH & 15-11 USER CURVES Hydra Plus has 5 response curves, pre-programmed, to assign them to the channel dimmers. Also it has 3 user curves. The user curves can be defined in the menu 05: Define Curves... -
Page 194: User Curves
When the edition is finished, press EXIT to close this menu screen. Special editions: The commands of the Setup line are grouped by curve, and they are: ‚US6, ‚US7 & ‚US8. Remember, that pressing MENU, the cursor toggle between Setup line and curves edition zone. HYDRA PLUS – LT LIGHT... - Page 195 (fire, storm, palpitates…) using curves. In the screen, a Hard curve is presented only with 10 bars (note that the Soft curves are presented with 20 bars): Only the user curves can be Hard. HYDRA PLUS – LT LIGHT...
-
Page 196: Resumen
DIMMER •# REC Of all dimmers of the lines range: DIMMER •# THRU REC DIMMER •# THRU •# REC Of a dimmer: DIMMER ###•# REC Of a range: DIMMER ###•# THRU REC DIMMER ###•# THRU ###•# REC HYDRA PLUS – LT LIGHT... -
Page 197: 16 .- Dmx In
16 .- DMX IN The DMX input of Hydra Plus can be used to control conventional channels, to edit spots, to execute macros or, simplest, plug this DMX line to merger it with a DMX output of the console. The DMX input is configured in the menu 03: Dmx In. To open this menu press MENU 03... -
Page 198: Dmx Input Test
Example: A console is controlling channels (1-200), and other console (Hydra Plus) is controlling spots and some channels (201-350). If the output of the first console is connected to Hydra Plus, and ADD TO DMX 1 is selected, all the channels (1-350) are sent by the DMX-1 output. -
Page 199: 17 .- Spots Definition
Manuf It’s the manufacturer of the spot. Hydra Plus has 25 indexes manufacturers (in alphabetic order) and a USER option to assign to the spots of other manufacturers. To edit a desired manufacturer, enter its index number (or 99 if it is not in the list). -
Page 200: Parameters Definition
COL for the color parameters. GOB for the gobo parameters. BEAM for beam parameters, including the blades parameters. X-TRA for the rest of the spot parameters: prisms, effects, macros, speeds, etc. Spot parameters are always ordered by functionality. HYDRA PLUS – LT LIGHT... - Page 201 Steps Definition zone. The special Control parameter is used to define the spot commands. Usually, these commands are used to turn-on or turn-off the lamp, to reset the spot, etc. A Control parameter is defined with: HYDRA PLUS – LT LIGHT...
-
Page 202: Steps Definition In A Parameter
Will be necessary press áá or ââ to pass to the next or previous step. The Stop function is thought to avoid mistakes when a parameter has several functionalities, for example, dimmer & strobe, gobos & macros, etc. HYDRA PLUS – LT LIGHT... -
Page 203: Exam & Type Edition
Select with the cursor the desired Type, and enter 0 to select the option 0: Edit The Spot Definition is active for the selected Type. Now, it’s possible to edit any element of the definition. HYDRA PLUS – LT LIGHT... -
Page 204: Editing A New Type
Access to the Setup line, pressing MENU. • Select the second option and press: • 0 to select 0: Hard Disk 1 to select 1: Floppy Disk 2 to select 2: USB Disk Accept the data pressing ENTER or MENU. • HYDRA PLUS – LT LIGHT... -
Page 205: Conceptual
HARD maximum maximum 24 types DISK 250 spots TYPE SPOT maximum 9999 types TYPE SPOT . . . TYPE FLOPPY . . . maximum floppy capacity L oad Cache Save Cache Type assignation in patch HYDRA PLUS – LT LIGHT... -
Page 206: The Types Files
Access to the Files list, pressing MENU or â Select the File to erase, and select its cell Execute the 0: DELETE option, pressing 0 ENTER. The selected File is erased. It’s possible to delete other Files or close this window, pressing EXIT HYDRA PLUS – LT LIGHT... -
Page 207: 18 .- Serial Ports
18 .- SERIAL PORTS Hydra Plus has 3 serial ports (2 x RS232 and 1 x RS485) for multimedia control. Each one of these ports can control a Device. A Device is equipment that admits RS232 control or RS485 control (Slide machine, Video machine, etc). Each Device has its commands set. -
Page 208: Ports Configuration
Inside Cache, select the Device to edit executing its option 0: Edit. The Device Definition zone is active, and now it’s possible to edit any parameter or new command of this Device. The Device is defined with its name, the serial protocol configuration and its commands. HYDRA PLUS – LT LIGHT... - Page 209 ASCII is the Data format by default. Any Data in ASCII format can be edited using the alphanumeric keyboard directly. Example: 00 06 The Data in HEX format are edited using the alphanumeric keyboard, but must be preceded by a * each 2 characters. Example: *00 *06 HYDRA PLUS – LT LIGHT...
-
Page 210: Create A New Device
At the right of the screen, the system presents us the list of library Devices stored in the working disk. Select the desired Device and execute its option 0: Load. The Device is loaded in Cache, and now it’s possible to associate it to any serial port. HYDRA PLUS – LT LIGHT... -
Page 211: Save A Device
Execute the option 0: ENTER of File Tools. The system presents us the list the Device files of the working disk. Select the desired file and execute its option 0: DELETE The file is deleted HYDRA PLUS – LT LIGHT... -
Page 212: The Commands In The Show
Inside MEMLST, associating the command to a memory. When the memory begins its • crossfade the command is transmitted. Programming the command as an event in the events list. • Executing its option Run inside Device Definition in the menu 20: Serial Ports • HYDRA PLUS – LT LIGHT... -
Page 213: 19 .- Midi
CONTROLLERS-faders). The MIDI chart by default is thought to be compatible in the models Hydra Plus & Hydra Plus Compact. Both MIDI chart are different (in accordance with the keys and faders number) but compatibles between them; if a key/fader exists in both models will be the same MIDI association. -
Page 214: Setup Line
MIDI receiver, select the 1: IN option. Channel Select the communication channel (from 1-16) to the communication entering its number. Remember, the MIDI protocol use 16 channels independents. Return to the default MIDI chart, executing the 0: Default option. HYDRA PLUS – LT LIGHT... -
Page 215: Midi Chart
The rest of the columns present the Keys with their associated Notes. At the end of the last column, the special commands are presented. These special commands are: Program Change (PC) and Mouse & Keyboard. In the columns: Label Keys Line-1 Line-2 HYDRA PLUS – LT LIGHT... - Page 216 If the port is in Midi In mode, when the system receives: PC 1, the command PAGE # SELECT is executed, the page # is loaded. PC 2, the command PAGE # SELECT is executed, the page # is loaded. HYDRA PLUS – LT LIGHT...
- Page 217 Access to the next cell and enter the number of the first Controller (0-96). The Mouse & • Keyboard and transmitted using 5 consecutives Controllers for the mouse clicks and ASCII characters. This option is very used when 2 Hydras Plus are connected via MIDI. HYDRA PLUS – LT LIGHT...
-
Page 218: Examples
MIDI Keyboard MIDI: IN Midi In It’s possible to connect a MIDI sound generator, to execute some of its sound synchronized with the console. The connection: Hydra Plus MIDI Sound Generator MIDI: Out Midi In HYDRA PLUS – LT LIGHT... -
Page 219: Connecting 2 Hydras Plus
Both consoles are synchronized for edition & playback. If the main console faults, is enough to disconnect the MIDI cable between the 2 consoles and follow working in the auxiliary console. As preventive measure, it’s recommended to disable the MIDI port in the auxiliary console (OFF). HYDRA PLUS – LT LIGHT... - Page 220 19-8 & MIDI HYDRA PLUS – LT LIGHT...
-
Page 221: 20 .- Sound & External Triggers
20 .- SOUND & EXTERNAL TRIGGERS Hydra Plus has one audio input (Sound) and 2 external triggers (Ext). Each one of the filtered signals of the audio input can be configured to control a key or fader, and each external trigger to control a key. -
Page 222: Setup Line
Or select the option 0: NONE to delete the associated key/fader, pressing 0 ENTER. • The audio input is very used to synchronize an effect in step-to-step mode (STEP Mn). In this way, the effect executes its steps in accordance with the rhythm of the audio signal. HYDRA PLUS – LT LIGHT... -
Page 223: 21 .- Time Code
21 .- TIME CODE SMPTE, MTC, CLOCK & INTERNAL Hydra Plus permits us to synchronize an events list with a Time Code that can be: A Time Code external as... SMPTE or MTC (Midi Time Code) A Time Code of the console clock CLOCK... -
Page 224: Setup Line
AUTOPLAY: Select this option to start the TC counter, in cyclic mode, where the TC is active from the From value up to To value, and then the count cycle is repeated, and so on until the counter is stopped or paused. HYDRA PLUS – LT LIGHT... -
Page 225: Events List
Not editable. Text The event selected to edition is in a yellow filed. If it’s the case, the next event that will be executed is in a brown filed. HYDRA PLUS – LT LIGHT... -
Page 226: Edition Of The Events List
Events list. This list presents the next 6 events. Each time that a event is executed, the event disappears of the list, and the next event appears. The events always are ordered for their TC values. HYDRA PLUS – LT LIGHT... - Page 227 MEM # AssignX AssignX MEM # AssignY AssignY MACRO ### SELECT COMANDO # RUN The memories programmed in events present us a flag of a musical note. HYDRA PLUS – LT LIGHT...
- Page 228 21-6 & TIME CODE HYDRA PLUS – LT LIGHT...
-
Page 229: 22 .- Reset & Update
SOFTWARE UPDATE by FLOPPY The Hydra Plus software version is updated from a floppy disk. You can obtain each new software version in the LT web (www.lt-light.com) or contacting with your LT distributor. Store the Show to disk before do a software update. The update process implicates a Reset. -
Page 230: Software Update By Ethernet
22-2 & RESET & UPDATE SOFTWARE UPDATE by ETHERNET Hydra Plus can be updated from a PC Windows using an Ethernet connection (in addition to the standard update using a floppy disk). This new procedure is quicker. Remember. Store the active show in a file before to update the console. -
Page 231: Software Update By Usb Disk
RESET & UPDATE & 22-3 de 4 SOFTWARE UPDATE by USB DISK The updating of Hydra PLUS can be done using a USB disk. Remember. Store the active show in a file before to update the console. To update the software by USB disk, it’s needed: 1. - Page 232 22-4 & RESET & UPDATE HYDRA PLUS – LT LIGHT...
-
Page 233: 23 .- Off Line Editor
23 .- OFF LINE EDITOR The Hydra Plus system has an Off Line Editor for PC/Windows that permits us to create and edit Hydra Plus shows. Each console software version has its corresponding Off Line Editor (WOLE). PC SYSTEM Personal computer: PC 486 and higher. -
Page 234: Using The Off Line Editor
General Note: The next chapter is based in a QWERTY keyboard. But also an ACERTY keyboard can be used. Help In the Off Line Editor, press h to see the correspondence between the Hydra Plus keys and the PC keyboard keys. To close this program, press Tab 99, and follow the instructions. - Page 235 Caps Lock and then press the desired key. Now it’s possible to releases this desired key and press other keys… To release the first pressed key, is enough to release Caps Lock in the desired moment. HYDRA PLUS - LT...
-
Page 236: Some Exceptions
The hardware test of the console has no utility in the Off Line Editor. Special Functions To obtain the “bitmaps” Press “Pausa” in the PC-keyboard. These 3 bitmaps are stored as of console and monitors *.bmp files, inside the Off Line Editor folder. HYDRA PLUS – LT LIGHT... -
Page 237: Ole & Ethernet
DMX universes by Ethernet all the time when a Hydra Plus console is connected a its net. It’s enough that OLE Demo detects a Hydra Plus one time for that the “Demo” flag disappears. From this moment, this OLE, in its PC, always can transmit DMX by Ethernet. - Page 238 23-6 & OFF LINE EDITOR HYDRA PLUS – LT LIGHT...
-
Page 239: 24 .- Ethernet
24 .- ETHERNET The Hydra Plus Ethernet connection permits us: To connect several Hydra Plus systems (consoles and /or woles of PC) in the next modes: o Master- Full Slave o Master- Data Slave (multi-user). o Master – Master To connect other units as: o Remote Control on PDA portable computer. -
Page 240: Ethernet Configuration
In others words, it’s needed that all the units are in the same net to can interact together. HYDRA PLUS – LT LIGHT... -
Page 241: Activate The Ethernet Communication
Ethernet & 24-3 The Hydra Plus system has 10 nets, from net 0 to net 9. After a unit reset the selected net is the net 0. The user can change the net number in the setup-line of the menu 40:... - Page 242 From here we can edit the Current Session list, entered the Nh of the console that we can add to the session, always in accordance with the Nh that appears in Hydras on Net window. To delete a console of the list, insert 0. The entered number is accepted pressing ENTER. HYDRA PLUS – LT LIGHT...
-
Page 243: Dmx Configuration
One DMX output can be transmitted only for one Ethernet DMX universe. This configuration is done in the Current Session table in the Master unit: The slaves units always are configured with the same values that the master. HYDRA PLUS – LT LIGHT... -
Page 244: Examination Of The Net
SandBox converters. Others Shows the rest of connected units (no LT), units as the SandBox converters. WORKING IN MASTER & FULL SLAVE MODE If all is ok, the edition and playback processes are done in the Master console. The Full Slave console “follows”... -
Page 245: Capture
• Hydra Plus console PC executing Capture • Ethernet cable to connect between Hydra Plus & PC • In the PC, install the Ethernet protocol IPX, and this protocol must be configured with frame type: Ethernet 802.3 In the console, active the Ethernet communication (On) and transmit some DMX by Ethernet ports. - Page 246 In Capture, active the Provider Hydra ethernet IPX (Enable) and after to create the needed universes, configure them assigning to each one the desired Ethernet Universe for its control. With these minimum requisites and an Ethernet cable to connect Hydra Plus & Capture, these systems are communicated.
- Page 247 The last used: For the associated scrollers: {channels} PARAM @ # Spots parameters: Edit x/y: {spots} TB Edit a parameter: {spots} PARAM # @ # Edit a parameter using wheels, stage or blind: {spots} WHEEL WHEEL HYDRA PLUS – LT LIGHT...
- Page 248 MEM # SELECT // GROUP # SELECT MEM # THRU #’ SELECT // GROUP # THRU #’ SELECT A range: The master content: SELECT Mn SELECT Mn Mn Mn ... SELECT The masters contents: The scene: SELECT SELECT Call: HYDRA PLUS – LT LIGHT...
- Page 249 Load groups in several masters: GROUP # LOAD? Mn Mn.. LOAD? Load a range in consecutive masters: GRUPO # THRU #’ LOAD Mn MEM # THRU #’ LOAD 3 Mn CHANNEL # THRU #’ LOAD 9 Mn HYDRA PLUS – LT LIGHT...
- Page 250 PAGE # (THRU #’) = #’’ REC Exchange: PAGE # (THRU #’) = = #’’ REC DELETE: A page: PAGE # DELETE A pages range: PAGE # THRU #’ DELETE All the pages: PAGE DELETE LOS EFECTOS HYDRA PLUS – LT LIGHT...
- Page 251 Empty the crossfader or master: DELETE ASSIGNX DELETE Mn Advance or retreat: PAUSE GO PAUSE PAUSE GOBACK PAUSE Place a memory in the master sequence: The first loaded: STEP A concrete memory: # STEP Speed control: RATE Rn HYDRA PLUS – LT LIGHT...
- Page 252 {selection} CALL CALL Execute a page (normal mode), macro or library {selection} SELECT/CALL Execute a page (forced mode) {selection} SELECT SELECT/ CALL CALL Select // call to the master content SELECT Mn // CALL Mn HYDRA PLUS – LT LIGHT...
- Page 253 Of all the dimmers of the line: DIMMER •# THRU REC Of all dimmers of the lines range: DIMMER •# THRU •# REC Of a dimmer: DIMMER ###•# REC Of a range: DIMMER ###•# THRU REC DIMMER ###•# THRU ###•# REC HYDRA PLUS – LT LIGHT...
- Page 254 & RESUME HYDRA PLUS – LT LIGHT...
- Page 255 Firma y Sello Distribuidor: Firma CERTIFICADO DE GARANTIA: Para cualquier consulta sobre las condiciones de garantía están disponibles en nuestra página web: www.lt-light.com Para cualquier requerimiento de nuestro Servicio Técnico es necesaria la presentación de este Certificado de Garantía. Cortar por aquí...
Need help?
Do you have a question about the HYDRA Plus and is the answer not in the manual?
Questions and answers