Table of Contents
Advertisement
Quick Links
Advertisement
Table of Contents

Subscribe to Our Youtube Channel
Related Manuals for Insportline Halimed


Summary of Contents for Insportline Halimed
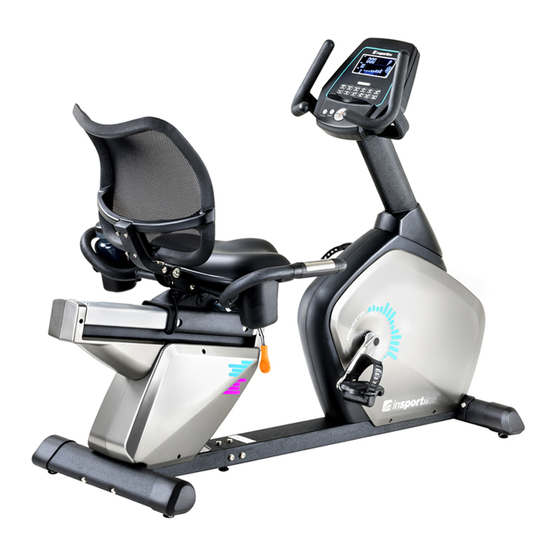
- Page 1 USER MANUAL – EN IN 20144 Recumbent inSPORTline Halimed...
-
Page 2: Table Of Contents
CONTENTS SAFETY INSTRUCTIONS ........................3 IMPORTANT NOTES ..........................4 PARTS LIST ............................4 ASSEMBLY ............................. 8 CONSOLE ............................. 15 BUTTONS ............................15 DISPLAYED DATA ..........................16 CONTROLS ............................16 ADVANTAGES OF RECUMBTION ....................... 17 MAINTENANCE ............................ 17 STORAGE ............................. 17 IMPORTANT NOTICE ........................... -
Page 3: Safety Instructions
SAFETY INSTRUCTIONS • To ensure the best safety of the exerciser, regularly check it on damages and worn parts. • If you pass on this exerciser to another person or if you allow another person to use it, make sure that that person is familiar with the content and instructions in these instructions. •... -
Page 4: Important Notes
IMPORTANT NOTES • Assemble the exerciser as per assembly instructions and be sure to only use the structural parts provided with the exerciser and designed for it. Prior to the assembly, make sure the contents of the delivery is complete by referring to the parts list of the assembly and operating instructions. - Page 5 Rear stabilizer Front stabilizer Middle post Handlebar Console Seat Back rest Decoration cover...
- Page 6 J1/J2 Left / right handlebar Bottle Pedals left/right M1/M2 Accessory basket left/right Screw M8x20 Spring washer M8 Washer M8x16 Screw M8x105 Screw M8x15 Screw M8x12 Screw M6x8 Screw M8x15...
- Page 7 Screw M4x15 Washer Screw M8x35 Adapter S4/S5 Strip right/ left Back rest support Seat support...
-
Page 8: Assembly
ASSEMBLY STEP 1 Secure the middle post (B) to the main frame (A1) using the two screws (N1) spring washer (N2) and washer (N3). STEP 2 Attach the rear stabilizer (C) to the main frame (A2) using two screws (N4), spring washer (N2) and washer (N3). - Page 9 STEP 3 Connect sensor cables (A3 and A4). Connect both frames (A1 and A2) with 6 screws (N5), spring washer (N2) and washer (N3). Make sure the wires are properly connected. Be careful not to pinch the cables. STEP 4 Slide the middle post (D) through the decorative cover (I).
- Page 10 STEP 5 Connect the backrest support (P) to the seat post (P1) and secure with the screws (N5) and attach the backrest handle adjustment to the axle (N3). Attach the post (P1) to the slider (A10) with 4 screws (N5). Connect the cable (J1-1) to the cable (A3).
- Page 11 STEP 7 Attach the backrest (H) to support the backrest (P) and secure with the screws (N8). Attach the accessory basket (M1 and M2) to the handle sides (J1 and J2) and secure with screws (N9) and washer (N10). You can place the bottle in the basket (M1 and M2) STEP 8.1 Attach the handles (E) to the middle post (D) with 2 screws (N11) and washer (N3).
- Page 12 STEP 8.2 Attach the cables (A33 and A34) to the console (F). Unscrew the pre-installed screws from the back of the console. Slide all excess cables into the bracket and slide the bracket into the bracket. Secure the bracket with two screwed bolts (F1). STEP 9 Screw the right pedal into the right crank clockwise.
- Page 13 SEAT ADJUSTMENT Push the seat adjustment handle forward (A11) forward to adjust the seat position. Then return the handle to its original position. BACKREST ADJUSTMENT You can adjust the position of the backrest using the handle under the seat.
- Page 14 TRANSPORT Ask another adult to move. Lift the machine by the rear stabilizer and place the unit on the front transport wheels. Slowly move the device. Stabilize with stabilizing feet after transport. ADAPTER CONNECTION Connect the adapter to the device and then to the wall outlet.
-
Page 15: Console
CONSOLE BUTTONS MODE Confirm selection RESET Reset values START/STOP Turn the program on or off If the countdown reaches 0:00, the console will beep for 8 seconds. If the user stops training, all values remain. Scroll up DOWN Scroll down RECOVERY Recovery status P1 –... -
Page 16: Displayed Data
DISPLAYED DATA Display: 0:00 – 99:99, Settings: 0:00 – 99:00 TIME Display: 0:00 – 99:99, Settings: 0:00 – 99:00 km DISTANCE Display: 0:00 – 9999, Settings: 0:00 – 9990 CALORIES Display: P30 - 240, Settings: 0-30 – 240 PULSE SPEED 0–99.9 km 0–999 CONTROLS... -
Page 17: Advantages Of Recumbtion
7. User profile The user can set the profile by pressing UP, DOWN and then MODE. Press and hold the MODE button for 2 seconds to exit the profile setting. 8. WATT The original power value is 120 W. The user can change the values using UP and DOWN. The console automatically adjusts the resistance according to the entered values. -
Page 18: Environment Protection
• The heart rate monitor is not a medical device. It provides only approximate information about your average heart rate, and any suggested pulse rate is not medically binding. Accumulated data may not always be accurate regarding uncontrollable human and environmental factors. ENVIRONMENT PROTECTION After the product lifespan expired or if the possible repairing is uneconomic, dispose it according to the local laws and environmentally friendly in the nearest scrapyard. - Page 19 • Unavoidable event, natural disaster • Adjustments made by unqualified person • Improper maintenance, improper placement, damages caused by low or high temperature, water, inappropriate pressure, shocks, intentional changes in design or construction etc. Warranty Claim Procedure The Buyer is obliged to check the Goods delivered by the Seller immediately after taking the responsibility for the Goods and its damages, i.e.
Need help?
Do you have a question about the Halimed and is the answer not in the manual?
Questions and answers