Advertisement
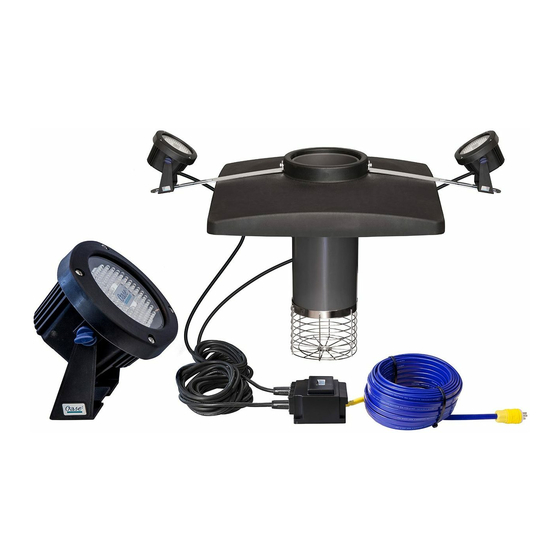
LED Light Kit
For 2 Lights
Assembly Instructions
1. To begin, place the light, lens down, on a flat surface. Slide the 2 blue nuts into the slots on the side of the light.
2. Next, loosely fit the 2 blue knobs into the nuts.
3. Now, slide the plastic bracket onto the knobs and tighten the knobs. Adjust the angle of the light upwards to your
desired preference.
4. Attach the bottom of the plastic bracket to the round end of the stainless steel arm. Be sure to orient the arm as
shown in the diagram below. Place a washer on top of the plastic bracket, and below the steel arm and sliding the
1" x 5/16" bolt down through the top and securing it with a 5/16" lock nut. The light can be positioned along the arm
by loosening the lock nut, sliding the light to the desired position, then re-tightening the nut.
5. Continue by attaching the steel arm to the water feature. Remove one of the two 2" bolts attaching the float to your
Scott water feature and align the holes with the stainless steel arm. Reinsert the bolt with washer, outward through the
housing, float and stainless steel arm. Secure with washer and nut.
6. Finally, remove the plastic clip from the end of the black power cable. Attach rubber gasket and plug it into the back of
the light and secure tightly with the included screws. Remove the port cover from the underwater transformer by removing
the 2 screws, and transfer the rubber gasket from the port cover to the plug end. Leave any unused ports securely
covered to maintain a water-tight seal. Secure plug tightly with the included screws to maintain a water-tight seal.
7. Repeat steps 1 through 6 for second light assembly.
This Kit Includes
2 LIGHT ASSEMBLIES W/HARDWARE
2 BLACK POWER CABLES
2 STAINLESS STEEL ARMS
1 UNDER WATER TRANSFORMER
POWER SUPPLY CORD
Tools Needed
PHILLIPS STYLE SCREW DRIVER
TWO 1/2" WRENCHES (OR PLIERS)
!
Always use a GFCI
Always disconnect the power
when swimmers are present
RUBBER
GASKET
BLACK
POWER
CABLE
FLOAT
HOUSING
2" BOLT
STAINLESS
STEEL ARM
RUBBER
GASKET
BLACK
POWER
CABLE
UNDER WATER
TRANSFORMER
PLASTIC
BRACKET
Advertisement
Table of Contents

Related Manuals for Scott Aerator LED Light Kit

Summary of Contents for Scott Aerator LED Light Kit
- Page 1 LED Light Kit For 2 Lights Assembly Instructions 1. To begin, place the light, lens down, on a flat surface. Slide the 2 blue nuts into the slots on the side of the light. 2. Next, loosely fit the 2 blue knobs into the nuts. 3. Now, slide the plastic bracket onto the knobs and tighten the knobs. Adjust the angle of the light upwards to your desired preference. 4. Attach the bottom of the plastic bracket to the round end of the stainless steel arm. Be sure to orient the arm as shown in the diagram below. Place a washer on top of the plastic bracket, and below the steel arm and sliding the 1" x 5/16" bolt down through the top and securing it with a 5/16" lock nut. The light can be positioned along the arm by loosening the lock nut, sliding the light to the desired position, then re-tightening the nut. 5. Continue by attaching the steel arm to the water feature. Remove one of the two 2" bolts attaching the float to your Scott water feature and align the holes with the stainless steel arm. Reinsert the bolt with washer, outward through the housing, float and stainless steel arm. Secure with washer and nut. 6. Finally, remove the plastic clip from the end of the black power cable. Attach rubber gasket and plug it into the back of the light and secure tightly with the included screws. Remove the port cover from the underwater transformer by removing the 2 screws, and transfer the rubber gasket from the port cover to the plug end. Leave any unused ports securely covered to maintain a water-tight seal. Secure plug tightly with the included screws to maintain a water-tight seal. 7. Repeat steps 1 through 6 for second light assembly. RUBBER GASKET BLACK 2" BOLT POWER CABLE PLASTIC BRACKET This Kit Includes STAINLESS 2 LIGHT ASSEMBLIES W/HARDWARE...
- Page 2 The Scott Aerator Awesome Warranty All standard Scott Aerator products are unconditionally warranted for five years against motor defects in materials or workmanship, under normal operating conditions. All other product components are warranted for one year from date of purchase. Scott Aerator will repair or replace failed parts under warranty when the defective unit is returned to the factory, shipping prepaid, and factory inspection establishes that the part was defective. The unit must be returned to the factory prior to shipment of...
Need help?
Do you have a question about the LED Light Kit and is the answer not in the manual?
Questions and answers