Table of Contents
Advertisement
Available languages
Available languages
Quick Links
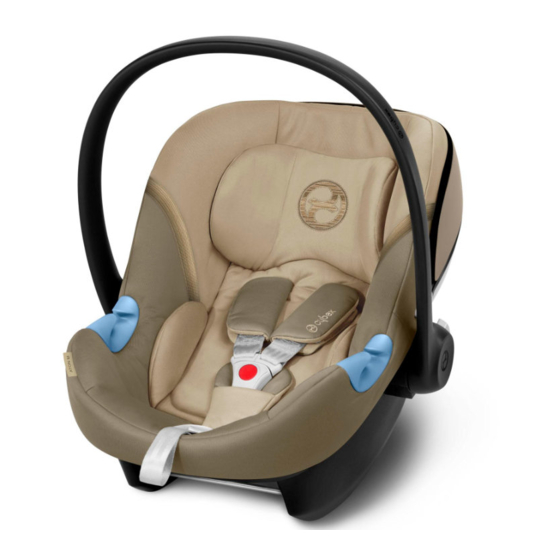
ATON M + SAFELOCK BASE
Manual del Propietario - Guarde para uso futuro.
WARNING
To reduce the risk of serious injury or
death, read this owner's manual prior to
installing and using this child restraint.
Owner's Manual - Keep for future use.
Para reducir el riesgo de lesiones graves o
muerte, lea este manual del usuario antes de
instalar y usar el asiento infantil para el automóvil.
ADVERTENCIA
Advertisement
Chapters
Table of Contents

Related Manuals for CYBEX gold ATON M


Summary of Contents for CYBEX gold ATON M
- Page 1 ATON M + SAFELOCK BASE Owner‘s Manual - Keep for future use. Manual del Propietario - Guarde para uso futuro. WARNING ADVERTENCIA To reduce the risk of serious injury or Para reducir el riesgo de lesiones graves o death, read this owner’s manual prior to muerte, lea este manual del usuario antes de installing and using this child restraint.
-
Page 2: Table Of Contents
UNIQUE FEATURES OF THE ATON M....15 WHAT IS LATCH? ........30 OVERVIEW OF THE SAFELOCK BASE ... 16-17 OUTER SEATING POSITIONS ....30 OVERVIEW OF THE ATON M INFANT CARRIER REMOVING AND STORING ............... 18-19 LATCH CONNECTORS ......32-33 USING THE INFANT CARRIER USING THE LOAD LEG ...... - Page 3 IF THESE INSTRUCTIONS ARE NOT FOLLOWED, THE SAFETY OF A CHILD MAY BE SEVERELY ENDANGERED. KEEP INSTRUCTIONS FOR FUTURE USE. INSTALLING THE BASE ADJUSTING THE RECLINE ANGLE WITHOUT USING LATCH ........40-43 THE BASE ..........66-67 USING A LAP AND SHOULDER BELT..44-47 USING THE INFANT CARRIER USING A LAP BELT ONLY .......
-
Page 4: Registration And Recall Information
1-877-242-5676 Your Name Your Street Address www.cybex-online.com State Zip Code City E-mail Address For helpful information regarding Child restraints: CHILD RESTRAINT REGISTRATION CARD www.safekids.org RG5009 Model Name : Aton M https://www.nhtsa.gov/equipment Model Number : xxxxx /car-seats-and-booster-seats Date of Manufacture: xxxx/xx/xx... -
Page 5: Warnings And Important Safety Information
WARNINGS AND IMPORTANT INFORMATION WARNING! DO NOT place rear-facing child seat on front seat with air bag. • DEATH OR SERIOUS INJURY can occur. The back seat is the safest place for children 12 and under. • DO NOT use this restraint in the front seat of a vehicle equipped with an air bag. Interaction between a rear facing restraint and air bags may cause serious injury or death. - Page 6 WARNING! DEATH or SERIOUS INJURY can occur, • READ this Owner’s Manual carefully before first side air bags and child restraint installations, use, and keep it for future reference. to determine allowable seating positions. • FOLLOW ALL INSTRUCTIONS on this child •...
- Page 7 WARNING! DEATH or SERIOUS INJURY can occur, • WHEN USED INSIDE A VEHICLE • ONLY USE this child restraint rear-facing. • NEVER install this child restraint in vehicle seats • ONLY USE with children who weigh between that face the rear or side of the vehicle. 4 and 35 lb (1.8 and 15.9 kg) AND whose height •...
- Page 8 WARNING! DEATH or SERIOUS INJURY can occur, • NEVER LEAVE CHILD UNATTENDED in or • ALWAYS check to make sure the Infant Carrier is securely attached to the Base each around the vehicle even for one minute. time you use this restraint. After attaching the Vehicle backovers can happen in any type of Infant Carrier to the base, lift up on the Infant vehicle.
- Page 9 WARNING! DEATH or SERIOUS INJURY can occur, • NEVER LEAVE a vehicle seat back with a • NEVER leave an empty child restraint folding mechanism unlocked. In the event of unsecured in your vehicle. This restraint must a sudden stop, an unlocked vehicle seat back always be secured, even when not occupied.
- Page 10 WARNING! DEATH or SERIOUS INJURY can occur, • NEVER use this child restraint when it is older • Fall Hazard: Child’s activity can move carrier. than six (6) years. The date of manufacture can NEVER place carrier on counter tops, tables, be found on a label affixed to the bottom of or any other elevated surfaces.
- Page 11 WARNING! DEATH or SERIOUS INJURY can occur, • ADDITIONAL SAFETY INFORMATION ¡ADVERTENCIA! WARNING! Children have STRANGLED in loose or partially buckled harness straps. Fully restrain the child even when the carrier is used outside the vehicle. Los niños se han ESTRANGULADO en las correas del arnés sueltas o parcialmente abrochado.
- Page 12 WARNING! DEATH or SERIOUS INJURY can occur, • REGISTER your child restraint with the • DO NOT carry the child restraint by the canopy manufacturer. This is the best way to reach you or harness adjustment strap. in the event of a recall. •...
- Page 13 WARNING! DEATH or SERIOUS INJURY can occur, • NEVER USE INFANT CARRIER OR BASE IF IT HAS DAMAGED, BROKEN OR MISSING PARTS. • ALWAYS REPLACE THE CHILD RESTRAINT AND BASE AFTER A CRASH OF ANY KIND EVEN IF IT WAS UNOCCUPIED. A crash can cause unseen damage to the child restraint that may not be visible.
-
Page 14: Child Height And Weight Limits
estraint around your child. restraint anchorage system CHILD HEIGHT AND WEIGHT LIMITS The American Academy of Pediatrics recommends children n the written instructions should ride rear-facing for as long as possible up to 2 years in age, or until they reach maximum height and weight for their rrier. -
Page 15: Unique Features Of The Aton M
LOCK-OFF INSTALLATION LOAD LEG The CYBEX Aton M Belt Lock-Off achieves a The European-style Load Leg quick and secure installation, whether you prevents the seat from rotating... -
Page 16: Overview Of The Safelock Base
OVERVIEW OF THE SAFELOCK BASE Lock-off Level Adjustment Vehicle Handle Handle Belt Release Guide Lock-off Infant Carrier Attachment Lock Lock-off Attachment Bar Vehicle Load Belt Leg Lock Opening Indicator Infant Carrier Attachment Lock Level Indicator Carrier Release Buttons Carrier Lock Indicator Load Leg Load Leg Load Leg Lock... - Page 17 OVERVIEW OF THE SAFELOCK BASE REAR VIEW UNDERSIDE Level Indicator VIEW Load Leg Storage Compartment LATCH Adjuster Strap LATCH Leveling Foot Connector Storage LATCH Adjuster Button (both sides of base) LATCH Strap Release Loop LATCH Connector...
-
Page 18: Overview Of The Aton M Infant Carrier
OVERVIEW OF THE CYBEX ATON M INFANT CARRIER Carry Handle TOP VIEW Headrest No Rethread Harness Adjuster (behind the top of the headrest) Shoulder Pads (removable) Canopy L.S.P. device (stored) Chest Clip Harness Straps Carry Handle Adjustment Button Travel System... - Page 19 OVERVIEW OF THE CYBEX ATON M INFANT CARRIER BOTTOM Shoulder Belt Guide VIEW Base Attachment Rod L.S.P. device (stored) Carry Handle Adjustment Button Owner's Manual (Stored) Harness Base Attachment Rod Harness Adjustment Strap...
-
Page 20: Using The Infant Carrier
USING THE INFANT CARRIER WARNING! HANDLE TO AVOID SERIOUS INJURY OR DEATH: ALWAYS make sure the handle is securely locked in the upright carrying position (A) before carrying. ONLY USE POSITION A in the vehicle. Never hang toys or other objects from handle when using child restraint in a vehicle as they could seriously injure a child in a sudden stop or crash. -
Page 21: Canopy
USING THE INFANT CARRIER - CANOPY CANOPY Unfold the sun canopy by pulling gradually on the plastic cover. To fold back, push the sun canopy back to initial position. -
Page 22: Adjustment
USING THE INFANT CARRIER HARNESS BUCKLE To release Buckle Tongues, firmly press the red button on the Harness Buckle and pull the tongues out. CLICK! CLICK! To fasten, insert each Tongue into Buckle, listening for an audible CLICK. Pull on each to verify a secure connection. -
Page 23: Adjusting The Seat
The headrest may be adjusted up and down through eleven positions to fit your baby. The Aton M is shipped in the lowest position with the Infant Body Support already in position. Unbuckle the Harness and Chest Clip. Place the child in the Infant Carrier, with their back flat against the infant carrier seat back. -
Page 24: Securing The Child
USING THE INFANT CARRIER SECURING THE CHILD Loosen Harness by firmly pressing down on the Harness Adjustment Button while pulling forward on both straps at shoulder level. Press red button on Harness Buckle to release Tongues. Separate Chest Clip and spread straps apart. Place child in Infant Carrier in seated position making sure their bottom is in the seat, and their back is fully supported. - Page 25 USING THE INFANT CARRIER Pull up on Harness Straps to make snug around the child's hips while holding the Harness Buckle in place. Slowly pull the adjuster strap to tighten the Shoulder Straps. A snug strap should not allow any slack. It lies in a relatively straight line without sagging.
-
Page 26: Vehicle Seat Location Requirements
NOTE: The Aton M is allowed to touch the vehicle seat(s) in front of it, as long the recline angle of the Aton M is not affected. -
Page 27: Vehicle Seat Belt Requirements
VEHICLE SEAT BELT REQUIREMENTS - ACCEPTABLE BELTS If you have any of these types of vehicle belt systems listed, these are SAFE to use to install your child restraint in the vehicle. Review Lap/Shoulder Belt with Locking Latch Plate vehicle owner’s manual for specific instructions on child restraint installation. - Page 28 VEHICLE SEAT BELTS NEVER TO USE WITH THIS CHILD RESTRAINT: If you have any of these types of vehicle belt systems listed, NEVER use any of these to install your child restraint in the vehicle. These vehicle belt systems are UNSAFE to use to install your child restraint in the vehicle.
- Page 29 VEHICLE SEAT BELTS NEVER TO USE WITH THIS CHILD RESTRAINT: · · Lap belts with an Lap/Shoulder Belts with Emergency Locking 2 Retractors (including Retractor (ELR). inflatable seat belts) Belts are These lap belts stay attached to retractors at the loose and can move ends of the lap and shoulder until locking in a crash...
-
Page 30: Using Latch
USING LATCH What is LATCH? LATCH is an acronym for Lower Anchors and Tethers for CHildren and refers to a pair of fixed Lower Anchors (or bars) and a Top Tether anchor that are built into your vehicle, in vehicles built after September 1, 2002. - Page 31 USING LATCH Center Seating Positions If your vehicle does not have Lower Anchors in the center seating position, check your Vehicle Owner’s Manual to see if you are allowed to use the two inner Lower Anchors from the outboard seating positions to install a Child Restraint. CYBEX allows this child restraint to be installed using the two inner Lower Anchors from the outboard seating positions if the distance between the inner Lower Anchors is...
-
Page 32: Removing And Storing Latch Connectors
REMOVING AND STORING LATCH CONNECTORS To Remove from Storage: To install the Base using LATCH, the Connectors must be removed from their storage compartments. Pull on the LATCH strap release loop and pull the connector out of the storage compartment. Repeat on other side. - Page 33 To Store: When using a vehicle belt to secure the Base, the LATCH Connectors MUST be stored in the Base. Loose Connectors could seriously injure vehicle occupants in the event of a crash. CLICK! Fully extend the LATCH strap. Slide each connector back into its Storage slot until an audible CLICK is heard.
-
Page 34: Using The Load Leg
USING THE LOAD LEG Turn the base over and pull the load leg out from the Storage Compartment. Pull the Load Leg up until it CLICKS and is locked into the fully open position. CLICK! Turn the base over and check the Load Leg Lock Indicator on the top of the load leg area. - Page 35 The Load Leg is an effective safety feature of the Aton M and using it is strongly recommended. However, many vehicles have a hump in the floor that could cause the Load Leg, even its shortest position, to push the...
- Page 36 USING THE LOAD LEG To Extend Install the Base making sure Recline Angle is correct for your child. See page 39. Squeeze the Load Leg Adjustment Button on the Load Leg and extend the Foot until it rests on the vehicle floor. As you lower the leg, the Load Leg Lock Indicator buttons will show green on other side of the Load Leg Foot as long as the leg is locked into position.
- Page 37 USING THE LOAD LEG To Store Turn the base over rotate the Load Leg towards the Storage Compartment. CLICK! Push the Load Leg in until it CLICKS and locks into the Storage Compartment.
-
Page 38: Adjusting The Recline Angle Using The Base
ADJUSTING THE RECLINE ANGLE USING THE BASE It is very important for your child's safety that this child restraint be installed at the correct recline angle. Before attaching the Infant Carrier to the Base, always check the Level Indicator for the correct recline angle range based on your child's weight. DO NOT use this or any other child restraint with a premature, low birth weight, or medically fragile infant, until after you have consulted with your doctor. - Page 39 Adjust Recline Angle Squeeze the Level Adjustment Handle to extend or retract the Leveling Foot until the Base is within the green zone as shown. There are four recline positions. Release handle to lock Foot in place. Install Base. Be sure to check for correct recline angle after installation.
-
Page 40: Installing The Base Using Latch
INSTALLING THE BASE USING LATCH BEFORE installing base, make sure vehicle is on level ground. Place base on an approved LATCH vehicle seating location. Remove LATCH anchors from storage. Remove each connector by pulling the red strap while pulling out. Unfold the Load Leg from underneath the Base. - Page 41 Squeeze the Lock-off Handle Release and lift up the lock off. Once open, Lock-off will remain open on its own. Attach both LATCH Connectors to the Lower LATCH Anchors. Each should make an audible CLICK when attached. Make sure they are attached by pulling firmly on the connectors.
- Page 42 INSTALLING THE BASE USING LATCH Press the Lock-off down, until it locks into place as shown. If Lock-off does not lock, try loosening the CLICK! LATCH strap slightly. Grab the Base at the Belt Guides and pull from side to side and front to back to make sure the base is installed correctly.
- Page 43 Check the Recline Angle. The ball should be in the green zone. If the ball falls in the red zone, remove Base, adjust recline angle and reinstall. See page 39. To remove, pull red strap on LATCH connector then unhook from the anchor point.
-
Page 44: Using A Lap And Shoulder Belt
INSTALLING THE BASE USING A LAP AND SHOULDER BELT BEFORE installing base, make sure vehicle is on level ground. Place base on an approved vehicle seating location. MAKE SURE LATCH connectors are stored. Unfold the Load Leg from underneath the Base. Position Base on a rear vehicle seat. - Page 45 Pull out vehicle belt to form a single length of about 24 inches (60 cm). Hold the Buckle Tongue in one hand and squeeze the lap and shoulder belts together in the other. Route the vehicle belts through the vehicle belt path opening on the side of the base and under the Lock-off through the Belt Guides on both sides of the Base.
- Page 46 INSTALLING THE BASE USING A LAP AND SHOULDER BELT Press the Lock-off down until it locks into place. CLICK! If the Lock-off does not lock, try loosening the vehicle belt slightly. Grab the Base at the Belt Guides and pull from side to side and front to back to make sure it is installed correctly.
- Page 47 Install load leg, see page 36. Check that the Recline Angle remained in the green zone. If it falls in the red zone, remove Base, adjust recline angle and reinstall. See page 39. Make sure that vehicle belt buckle and hardware do not interfere with correct installation of the Base, or with the connection of the Infant Carrier to the Base.
-
Page 48: Using A Lap Belt Only
INSTALLING THE BASE USING A LAP BELT ONLY BEFORE installing base, make sure vehicle is on level ground. Place base on an approved vehicle seating location. MAKE SURE LATCH connectors are stored. Unfold the Load Leg from underneath the Base. Position Base on a rear vehicle seat. - Page 49 Route the lap belt through the vehicle belt path opening on the side of the base and under the Lock-off, then through the Belt Guides on both sides of the base. BUCKLE THE BELT. Remove slack from the lap belt and make sure the belt lies flat and is not twisted.
- Page 50 INSTALLING THE BASE USING A LAP BELT ONLY Press the Lock-off down until it locks into place. CLICK! If the Lock-off does not lock, try loosening the vehicle belt slightly. Grab the Base at the Belt Guides and pull from side to side and front to back to make sure the base is installed correctly.
- Page 51 Check that the Recline Angle remained in the green zone. If it falls in the red zone, remove Base, adjust recline angle and reinstall. See page 39. Make sure that vehicle belt buckle and hardware do not interfere with correct installation of the Base, or with the connection of the Infant Carrier to the Base.
-
Page 52: Using The Infant Carrier With The Base
USING THE INFANT CARRIER WITH THE BASE Attaching Infant Carrier to Base Make sure handle is locked in Position A (see page 20). ALWAYS verify that the handle is LOCKED in Position A before lifting Infant Carrier by the handle. An unlocked handle could move unexpectedly, causing child to fall out. -
Page 53: Releasing Infant Carrier From Base
The Cybex Aton M is allowed to touch the vehicle seat(s) in front of it, as long as the recline angle of the Aton M is not affected. Releasing Infant Carrier from Base If used, retract the L.S.P. (Linear Side Impact Protection) device. See page 65. -
Page 54: And Shoulder Belt
INSTALLING INFANT CARRIER WITHOUT THE BASE USING A LAP/SHOULDER BELT NEVER install this child restraint using a Position A non-locking vehicle lap shoulder belt. ( See page 28-29) Place child in the carrier. Position the infant carrier on a rear vehicle seat, with the handle in Position A ( see page 20), with the foot end towards the vehicle seat back, push it firmly against the vehicle seat. - Page 55 Lift shoulder belt over handle and around Carrier. Make sure not to twist vehicle shoulder belt. Slide shoulder belt into the blue Shoulder Belt Guide. Make sure the shoulder belt passes below the L.S.P. (Linear Side Impact Protection) devices on both sides. Refer to your vehicle Owner's Manual for how your vehicle lap and shoulder belt locks.
- Page 56 Infant Carrier near the vehicle seat back to adjust the angle. See page 67. The CYBEX Aton M is allowed to touch the vehicle seat(s) in front of it, as long the recline angle of the Aton M is not affected.
- Page 57 REMOVAL FROM THE VEHICLE Press the release button to push the Linear Side-impact Protection (L.S.P.) back into the seat. NOTE! In order to protect both your vehicle and the infant car seat, the Linear Side-impact Protection (L.S.P.) must be pushed back into the seat before taking the seat out.
-
Page 58: Using Only A Lap And Shoulder Belt (Alternate Method)
INSTALLING INFANT CARRIER ONLY WITH A LAP/SHOULDER BELT (ALTERNATE) Use this alternate installation method only when the method found on page 54 does not work with your vehicle Lap and Shoulder belts. Place child in the carrier. Position Infant Carrier on a rear vehicle seat, with the foot end firmly against the back of the vehicle seat. - Page 59 Carrier, near the vehicle seat back to adjust the angle, if necesarry. See page 67. The Aton M is allowed to touch the vehicle seat(s) in front of it, as long the recline angle of the Aton M is not affected.
- Page 60 If the Infant Carrier is next to a vehicle door or panel, extend the adjacent L.S.P. (Linear Side Impact Protection) device. Pull out the L.S.P. (Linear Side-impact Protection) device on the side of the Aton M adjacent to the vehicle door or panel listening for an audible CLICK.
- Page 61 REMOVAL FROM THE VEHICLE 1. Press the release button to push the Linear Side-impact Protection (L.S.P.) back into the seat. NOTE! In order to protect both your vehicle and the infant car seat, the Linear Side-impact Protection (L.S.P.) must be pushed back into the seat before taking the seat out.
-
Page 62: Installing The Infant Carrier
INSTALLING THE INFANT CARRIER WITH A LAP BELT ONLY Position A Place child in the child restraint. Position Infant Carrier on a rear vehicle seat, with the foot end firmly against the back of the vehicle seat. Route vehicle lap belt under BOTH THE HANDLE AND CARRIER Belt Guides. - Page 63 Infant Carrier near the vehicle seat back to adjust the angle. See page 67. The Aton M is allowed to touch the vehicle seat(s) in front of it, as long the recline angle of the Aton M is not affected.
-
Page 64: Using The Linear Side-Impact Protection (Lsp)
USING THE LINEAR SIDE-IMPACT PROTECTION (L.S.P.) The “Linear Side-impact Protection” (L.S.P.) is built into the Aton M. This system enhances the safety of your child in the event of a side crash. In order to achieve the best possible protective effect, unfold the L.S.P. as far as possible towards the car door closest to the infant car seat. - Page 65 To Extend Pull out the L.S.P. device on the side of the Aton M adjacent to the vehicle door or panel listening for an audible CLICK. To Retract Depress the button while pushing the device back into the carrier. CLICK!
-
Page 66: Adjusting The Recline Angle Without The Base
ADJUSTING THE RECLINE ANGLE WITHOUT THE BASE WARNING! Failure to properly recline the child restraint on the vehicle seat increases the risk of death or serious injury. It's very important for your child's safety that this child restraint be installed at the correct angle. DO NOT use this or any other child restraint with a premature, low birth weight, or medically fragile infant, until after you have consulted with your doctor. - Page 67 Adjust Recline Adjust the seat angle until the red Level Line on the Infant Carrier is level with the ground. If you are having trouble achieving the proper recline angle: - Uninstall Infant Carrier. - Place a tightly rolled towel or pool noodle under the Infant Carrier, where indicated.
-
Page 68: Using The Infant Carrier On An Aircraft
The FAA recommends that children up to 40 pounds (18 kg) use a certified, harnessed child seat while travelling on an airplane. The Aton M is certified for airplane use only without the base. DO NOT use the Base on an airplane. - Page 69 Grab the Infant Carrier at the Belt Guides and Always have the handle locked in Position A pull from side to side and front to back to make (see page 20.) while using this child restraint sure it is installed correctly. The Infant Carrier on aircraft.
-
Page 70: General Information About Sensorsafe 2.0
GENERAL INFORMATION ABOUT SENSORSAFE 2.0 Secure your child into the child restraint as you would normally. The SensorSafe 2.0 Receiver Plug monitors both the Chest Clip Transmitter and the vehicle. When you arrive at your destination and turn your vehicle off, the SensorSafe 2.0 system sounds a series of gentle tones reminding you that your baby is in the vehicle. - Page 71 GENERAL INFORMATION ABOUT SENSORSAFE 2.0 • The SensorSafe 2.0 Chest Clip is designed to go into a sleep mode after being clipped for 12 hours. Although 12-hour vehicle trips without stops are uncommon and not recommend- ed, the Chest Clip must be opened and closed after 12 hours to reactivate the SensorSafe 2.0 system.
- Page 72 GENERAL INFORMATION ABOUT SENSORSAFE 2.0 SensorSafe 2.0 Technology ™ Questions? Comments?: Visit us at: http://cybex-online.com/us/contact.html Or call CYBEX at: 1-877-242-5676 This device meets the requirements of SAE J3005. FCC Certified: Chest Clip Model: SOSR2, FCC ID: 2ABS2-SOSR2 Receiver Plug Model: SS2, FCC ID: 2ABS2-SS2 This device complies with Part 15 of the FCC Rules.
- Page 73 GENERAL INFORMATION ABOUT SENSORSAFE 2.0 This equipment generates, uses, and can radiate radio frequency energy and, if not installed and used in accordance with the instructions, may cause harmful interference to radio com- munications. However, there is no guarantee that interference will not occur in a particular installation.
-
Page 74: Using Sensorsafe 2.0
USING SENSORSAFE 2.0 1. INSTALL THE SENSORSAFE 2.0 RECEIVER. Locate the 16PIN OBDII port in your vehicle. Refer to your vehicle owner’s manual for location. Plug in the SensorSafe 2.0 Receiver. If unable to locate your vehicle manual, the SensorSafe 2.0 Application may contain information regarding the location of the 16PIN OBDII port for your vehicle Your SensorSafe 2.0 Receiver will sound one prolonged... - Page 75 USING SENSORSAFE 2.0 3. CYCLE THE SENSORSAFE 2.0 CHEST CLIP. Your SensorSafe 2.0 Chest Clip is designed to “go to sleep” if clipped for more than 12 hours. The chest clip will “wake up” or reset by simply opening and closing. TO PRESERVE BATTERY LIFE, ALWAYS STORE THE SENSORSAFE 2.0 CHEST CLIP IN THE UNCLIPPED POSITION.
- Page 76 USING SENSORSAFE 2.0 REPLACING THE SENSORSAFE 2.0 CHEST CLIP BATTERY. 1. Loosen Harness by pressing Harness Release Button on the front of the Child Restraint and pulling forward on both Harness Straps. 2. Unbuckle Harness by pressing the button on the Crotch Buckle and pulling out both Buckle Tongues.
- Page 77 USING SENSORSAFE 2.0 4. Turn the male side of the Chest Clip over and loosen screws with a small Phillips screw- driver. Remove the cover 5. Remove Circuit Board from Chest Clip. Remove Battery from Circuit Board. Replace Battery with new BR2032 Lithium button cell Battery, as shown. 6.
-
Page 78: Care And Cleaning
CARE AND CLEANING WARNING! The infant car seat must never be BACKREST used without the cover. COVER HEADREST COVER Removing the Seat Cover The integrated Harness System cannot be removed from the seat. NEVER remove or attempt to remove parts of the Harness System. DO NOT damage, remove or dispose of any EPS SHOULDER foam. - Page 79 CARE AND CLEANING 6. Unsnap the two black snaps holding the canopy fabric and push canopy forward. 7. Pull seat pad forward and over the side wings, remove from around the travel system release buttons. 8. Remove seat fabric from around the harness adjustment button and push crotch buckle retainer up through the bottom of the seat.
-
Page 80: Washing Instructions
WASHING INSTRUCTIONS Seat cover parts (Seat pad, buckle pad, shoulder pad and infant body support) can be washed as follows: - Machine wash COLD, delicate cycle, mild detergent - Drip Dry To avoid seat cover parts shrinking: - DO NOT machine wash warm or hot - DO NOT TUMBLE DRY - DO NOT iron - DO NOT use bleach... - Page 81 Harness Buckle Harness Straps Food, drink or other Sponge clean using warm water and mild soap. Air dry. Do not iron. debris may collect inside the harness buckle which can affect LATCH Connectors proper function. Sponge clean or thoroughly rinse LATCH Connectors with warm water.
-
Page 82: Safety Checklist
SAFETY CHECKLIST Did you read and understand this Owner’s If the child restraint is next to a vehicle Manual and all labels found on this child door or panel, is the adjacent L.S.P. restraint? (Linear Side-impact Protection) device extended? Is the child restraint rear facing in an approved Does your child weigh between 4 and 35 lb vehicle seat location? (1.8—15.9 kg) -
Page 83: Warranty
WARRANTY INFORMATION AND REPLACEMENT PARTS For information about warranty and replacement parts, please contact: Columbus Trading-Partners USA Inc. Attn: ParentLink 1801 Commerce Drive Piqua, Ohio 45356 or call 1-877-242-5676 or visit www.cybex-online.com... - Page 84 DEL VEHÍCULO..........109 LÍMITES DE PESO Y ALTURA DEL NIÑO .....96 USO DEL SISTEMA LATCH CARACTERÍSTICAS ÚNICAS ¿EN QUÉ CONSISTE EL SISTEMA LATCH? DEL SISTEMA ATON M ........97 ..............112 DESCRIPCIÓN GENERAL DE LA BASE POSICIONES DE ASIENTOS EXTERIORES SAFELOCK...........98-99 ..............113 DESCRIPCIÓN GENERAL DEL PORTABEBÉ...
- Page 85 SI NO SE SIGUEN ESTAS INSTRUCCIONES, LA SEGURIDAD DE UN NIÑO PUEDE VERSE SERIAMENTE AMENAZADA. GUARDE LAS INSTRUCCIONES PARA USO FUTURO. INSTALACIÓN DE LA BASE AJUSTE DEL ÁNGULO DE RECLINADO SIN LA USO DEL SISTEMA LATCH....122-125 BASE............148-149 USO DEL CINTURÓN PARA REGAZO Y USO DEL PORTABEBÉ...
-
Page 86: Registro E Información Sobre Retiro De
Zip Code Para obtener información útil sobre los sistemas E-mail Address mismo la parte que CHILD RESTRAINT REGISTRATION CARD de sujeción infantil: RG5009 Model Name : Aton M www.safekids.org se muestra. Model Number : xxxxx https://www.nhtsa.gov/equipment Date of Manufacture: xxxx/xx/xx /car-seats-and-booster-seats... -
Page 87: Advertencias E Información Importante De Seguridad
ADVERTENCIAS E INFORMACIÓN IMPORTANTE DE SEGURIDAD ¡ADVERTENCIA! NO coloque el asiento infantil orientado hacia atrás en un asiento • delantero con bolsa de aire. Pueden ocurrir LESIONES GRAVES O LA MUERTE. El asiento trasero es el lugar más seguro para los niños de 12 años de edad y menores. - Page 88 ¡ADVERTENCIA! Pueden ocurrir LESIONES GRAVES o la MUERTE. • LEA con cuidado este manual del propietario las bolsas de aire, las bolsas de aire laterales antes de usar el producto por primera vez y y las bolsas de aire delanteras en el lado guárdelo para uso futuro.
- Page 89 ¡ADVERTENCIA! Pueden ocurrir LESIONES GRAVES o la MUERTE. • CUANDO SE USA EN EL GRAVES o la MUERTE. El asiento TRASERO es INTERIOR DE UN VEHÍCULO el lugar más seguro para niños de 12 años de edad y menores. • USE SOLO con niños que pesen entre •...
- Page 90 ¡ADVERTENCIA! Pueden ocurrir LESIONES GRAVES o la MUERTE. • NUNCA DEJE AL NIÑO SIN SUPERVISIÓN • Verifique SIEMPRE para asegurarse de que el dentro o alrededor del vehículo, ni siquiera portabebé esté firmemente sujeto a la base por un minuto. Los retrocesos de vehículos cada vez que use este sistema de sujeción.
- Page 91 ¡ADVERTENCIA! Pueden ocurrir LESIONES GRAVES o la MUERTE. • NUNCA DEJE el respaldo de un asiento • Compruebe SIEMPRE que las hebillas y otras del vehículo con el mecanismo de plegado partes no tengan superficies calientes antes desbloqueado. En caso de una parada de colocar al niño en el sistema de sujeción repentina, un respaldo desbloqueado podría infantil.
- Page 92 ¡ADVERTENCIA! Pueden ocurrir LESIONES GRAVES o la MUERTE. • NUNCA use este sistema de sujeción infantil • Peligro de asfixia: El portabebé se puede si tiene una antigüedad de más de seis (6) voltear sobre superficies blandas y asfixiar el años.
- Page 93 ¡ADVERTENCIA! Pueden ocurrir LESIONES GRAVES o la MUERTE. • INFORMACIÓN ADICIONAL DE SEGURIDAD ¡ADVERTENCIA! WARNING! Children have STRANGLED in loose or partially buckled harness straps. Fully restrain the child even when the carrier is used outside the vehicle. Los niños se han ESTRANGULADO en las correas del arnés sueltas o parcialmente abrochado.
- Page 94 ¡ADVERTENCIA! Pueden ocurrir LESIONES GRAVES o la MUERTE. • REGISTRE el sistema de sujeción infantil con NO deje objetos sueltos (p. ej., comestibles, el fabricante. Esta es la forma más eficaz de libros, bolsas) en un vehículo. En el caso de una comunicarse con usted en caso de un retiro de parada repentina, los objetos sueltos seguirán productos del mercado.
- Page 95 ¡ADVERTENCIA! Pueden ocurrir LESIONES GRAVES o la MUERTE. • NUNCA USE EL PORTABEBÉ NI LA BASE SI TIENE PARTES DAÑADAS, ROTAS O FALTANTES. • REEMPLACE SIEMPRE EL SISTEMA DE SUJECIÓN INFANTIL Y LA BASE DESPUÉS DE UN CHOQUE DE CUALQUIER TIPO AUN CUANDO NO ESTÉ...
-
Page 96: Límites De Peso Y Altura Del Niño
straint around your child. restraint anchorage system LÍMITES DE PESO Y ALTURA DEL NIÑO La Academia Estadounidense de Pediatría recomienda que n the written instructions los niños deben viajar orientados hacia atrás durante el mayor tiempo posible hasta los 2 años de edad, o hasta que alcancen rrier. -
Page 97: Características Únicas
La traba de seguridad del cinturón del sistema el caso de un choque con impacto lateral. CYBEX Aton M permite una instalación rápida y PATA DE CARGA segura, ya sea que elija usar el sistema LATCH o los cinturones del vehículo. -
Page 98: Descripción General De La Base Safelock
DESCRIPCIÓN GENERAL DE LA BASE SAFELOCK Liberador del asa Asa de ajuste de Guía del de la traba de nivel cinturón seguridad del vehículo Traba de seguridad Bloqueo de accesorio Barra de acoplamiento del portabebé de la traba de seguridad Abertura del cinturón Indicador de bloqueo de... - Page 99 DESCRIPCIÓN GENERAL DE LA BASE SAFELOCK VISTA TRASERA VISTA DE LA PARTE INFERIOR Indicador de nivel Compartimiento de almacenamiento de la pata de carga Correa del ajustador LATCH Almacenamiento del conector Pie nivelador LATCH Botón ajustador del (ambos lados de la base) sistema LATCH Lazo de liberación de la correa LATCH...
-
Page 100: Descripción General Del Portabebé
DESCRIPCIÓN GENERAL DEL PORTABEBÉ DEL SISTEMA CYBEX ATON M Asa de transporte VISTA Cabecera SUPERIOR Ajustador del arnés sin reinserción de correas (detrás de la parte superior de la cabecera) Acojinado para los hombros (extraíble) Capota Dispositivo L.S.P. (almacenado) Clip para el pecho Correas del arnés... - Page 101 DESCRIPCIÓN GENERAL DEL PORTABEBÉ DEL SISTEMA CYBEX ATON M VISTA Guía del cinturón para el hombro INFERIOR Varilla de acoplamiento de la base Dispositivo L.S.P. (almacenado) Botón de ajuste del asa de transporte Manual del propietario (guardado) Arnés Varilla de acoplamiento de la base Correa de ajuste del arnés...
-
Page 102: Uso Del Portabebé
USO DEL PORTABEBÉ ¡ADVERTENCIA! EVITE LESIONES GRAVES O LA MUERTE: Asegúrese SIEMPRE de que el asa esté bloqueada firmemente en la posición vertical de transporte (A) antes de transportarlo. USE SOLO LA POSICIÓN A en el vehículo. Nunca cuelgue juguetes ni otros objetos del asa cuando use el sistema de sujeción infantil en un vehículo, ya que podrían causar lesiones graves a un niño en una parada repentina o choque. -
Page 103: Capota
USO DEL PORTABEBÉ - CAPOTA CAPOTA Despliegue la capota para el sol jalando gradualmente la cubierta de plástico. Para plegar hacia atrás, empuje la capota para el sol hacia atrás a la posición inicial. -
Page 104: Hebilla Del Arnés, Clip Para El Pecho, Ajuste Del Arnés
USO DEL PORTABEBÉ HEBILLA DEL ARNÉS Para liberar las lengüetas de la hebilla, presione firmemente el botón rojo en la hebilla del arnés y jale las lengüetas hacia afuera. ¡CLIC! ¡CLIC! Para abrochar, inserte cada lengüeta en la hebilla, hasta que escuche un CLIC. Jale cada una para comprobar su conexión segura. -
Page 105: Cómo Ajustar El Asiento
La cabecera se puede ajustar hacia arriba y hacia abajo a través de once posiciones para adaptarse al bebé. El sistema Aton M se envía en la posición más baja con el soporte para el cuerpo del bebé ya en su posición. -
Page 106: Cómo Asegurar Al Niño
USO DEL PORTABEBÉ CÓMO ASEGURAR AL NIÑO Afloje el arnés presionando firmemente hacia abajo el botón de ajuste del arnés mientras jala hacia adelante ambas correas al nivel del hombro. Presione el botón rojo en la hebilla del arnés para liberar las lengüetas. Separe el clip para el pecho y separe las correas. - Page 107 USO DEL PORTABEBÉ Jale las correas del arnés para ceñirlas alrededor de las caderas del niño mientras sostiene la hebilla del arnés en su lugar. Jale lentamente la correa del ajustador para apretar las correas para el hombro. Una correa ceñida no debe tener holgura.
-
Page 108: Requisitos De Ubicación Del Asiento Del Vehículo
Los asientos plegables pueden caer hacia adelante y causar lesiones graves a su niño en un choque vehicular. NOTA: El sistema Aton M puede tocar los asientos del vehículo que quedan enfrente, siempre y cuando el ángulo de reclinado del sistema Aton M no se vea afectado. -
Page 109: Requisitos Del Cinturón De Seguridad Del Vehículo
REQUISITOS DEL CINTURÓN DE SEGURIDAD DEL VEHÍCULO - CINTURONES ACEPTABLES Si tiene alguno de estos tipos de sistemas de cinturón Cinturón para regazo y hombro con de vehículo enumerados, estos son SEGUROS usar para instalar el sistema de sujeción infantil en placa de sujeción de bloqueo el vehículo. - Page 110 LOS SIGUIENTES TIPOS DE CINTURONES DE SEGURIDAD DEL VEHÍCULO COMPATIBLES CON ESTE SISTEMA DE SUJECIÓN INFANTIL: Si tiene alguno de estos tipos de sistemas de cinturones para vehículos enumerados, NUNCA use ninguno de estos para instalar el sistema de sujeción infantil en el vehículo. Estos sistemas de cinturón de vehículo NO SON SEGUROS de usar para instalar el sistema de sujeción infantil en el vehículo.
- Page 111 LOS SIGUIENTES TIPOS DE CINTURONES DE SEGURIDAD DEL VEHÍCULO COMPATIBLES CON ESTE SISTEMA DE SUJECIÓN INFANTIL: · Cinturones de seguridad equipados · con un retractor Cinturones para regazo y de bloqueo de hombro con 2 retractores emergencia (ELR). (incluidos los cinturones Estos cinturones de seguridad inflables) de seguridad...
-
Page 112: Uso Del Sistema Latch
USO DEL SISTEMA LATCH ¿En qué consiste el sistema LATCH? LATCH son las siglas en inglés de "anclajes inferiores y correas de sujeción para niños" (Lower Anchors and Tethers for CHildren) y se refiere a un par de anclajes (o barras) inferiores fijos y a un anclaje de correa de sujeción superior integrados en vehículos fabricados después del 1 de septiembre de 2002. -
Page 113: Posiciones De Asientos Exteriores
USO DEL SISTEMA LATCH NUNCA use el sistema LATCH junto con los cinturones del vehículo para instalar este sistema de sujeción infantil. El uso de ambos no está aprobado y puede causar un rendimiento inadecuado del sistema de sujeción infantil. Posiciones de asiento central Si el vehículo no tiene anclajes inferiores en el asiento central, consulte el manual del propietario del vehículo para ver si... -
Page 114: Cómo Retirar Y Almacenar Los Conectores Latch
CÓMO RETIRAR Y ALMACENAR LOS CONECTORES LATCH Para retirar del almacenamiento: Para instalar la base usando el sistema LATCH, los conectores se deben retirar de sus compartimientos de almacenamiento. Jale el lazo de liberación de la correa LATCH y saque el conector fuera del compartimento de almacenamiento. - Page 115 Para almacenar: Cuando use un cinturón de vehículo para sujetar la base, los conectores LATCH DEBEN almacenarse en la base. Los conectores sueltos pueden lesionar gravemente a los ocupantes de un vehículo en el caso de un choque. ¡CLIC! Extienda por completo la correa LATCH. Deslice cada conectar en el hueco de almacenamiento hasta que escuche un CLIC.
-
Page 116: Uso De La Pata De Carga
USO DE LA PATA DE CARGA Voltee la base y saque la pata de carga fuera del compartimento de almacenamiento. Jale la pata de carga hacia arriba hasta que escuche un CLIC y se bloquee en la posición totalmente abierta. ¡CLIC! Voltee la base y compruebe el indicador de bloqueo de pata de carga en la parte... - Page 117 La pata de carga es una característica de seguridad efectiva del sistema Aton M y se recomienda encarecidamente su uso. Sin embargo, muchos vehículos tienen una elevación en el piso que podría hacer que la No debe haber pata de carga, incluso su posición más corta,...
- Page 118 USO DE LA PATA DE CARGA Para extender Instale la base asegurándose de que el ángulo de reclinado sea correcto para el niño. Consulte la página 121. Presione el botón de ajuste de la pata de carga en la pata de carga y extienda la base hasta que descanse sobre el piso del vehículo.
- Page 119 USO DE LA PATA DE CARGA Para almacenar Voltee la base y gire la pata de carga hacia el compartimento de almacenamiento. ¡CLIC! Empuje la pata de carga hacia dentro hasta que escuche un CLIC y se bloquee en el compartimiento de almacenamiento.
-
Page 120: Ajuste Del Ángulo De Reclinado Usando La Base
AJUSTE EL ÁNGULO DE RECLINADO USANDO LA BASE Es muy importante para la seguridad del niño que este sistema de sujeción infantil se instale en el ángulo de reclinado correcto. Antes de conectar el portabebé a la base, verifique siempre el indicador de nivel para determinar el ángulo correcto de reclinado en función del peso de su niño. - Page 121 Ajustar ángulo de reclinado Apriete la manija de ajuste de nivel para extender o retraer el pie nivelador hasta que la base quede dentro de la zona verde, como se muestra. Existen cuatro posiciones de reclinado: Suelte la manija para bloquear el pie en su lugar. Instale la base.
-
Page 122: Instalación De La Base Uso Del Sistema Latch
INSTALACIÓN DE LA BASE USANDO EL SISTEMA LATCH ANTES de instalar la base, asegúrese de que el vehículo esté sobre terreno nivelado. Coloque la base en un asiento de vehículo aprobado para el sistema LATCH . Retire los anclajes LATCH del almacenamiento. - Page 123 Presione la liberación de la manija de la traba de seguridad y levante la traba. Una vez abierta, la traba de seguridad permanecerá abierta por sí sola. Acople ambos conectores LATCH a los anclajes inferiores LATCH. Debe escuchar un CLIC al acoplar cada uno. Asegúrese de que estén acoplados jalando firmemente los conectores.
- Page 124 INSTALACIÓN DE LA BASE USANDO EL SISTEMA LATCH Presione la traba de seguridad hacia abajo hasta que quede bloqueada en su lugar, como se muestra. ¡CLIC! Si la traba de seguridad no se bloquea, intente aflojar la correa LATCH ligeramente. Tome la base por las guías del cinturón y jale de un lado a otro y de adelante hacia atrás para asegurarse de que la base esté...
- Page 125 Compruebe el ángulo de reclinado. La bola debe estar en la zona verde. Si la bola cae en la zona roja, retire la base, ajuste el ángulo de reclinado y vuelva a instalar. Consulte la página 121. Para retirarla, jale la correa roja en el conector LATCH y luego desenganche del punto de anclaje.
-
Page 126: Hombro
INSTALACIÓN DE LA BASE USANDO UN CINTURÓN PARA REGAZO Y HOMBRO ANTES de instalar la base, asegúrese de que el vehículo esté sobre terreno nivelado. Coloque la base en un asiento aprobado del vehículo. ASEGÚRESE de que los conectores LATCH están almacenados. - Page 127 Jale el cinturón del vehículo para formar una sola longitud de aproximadamente 60 cm (24 in). Sostenga la lengüeta de la hebilla con una mano y apriete juntos los cinturones para regazo y hombro con la otra. Pase los cinturones del vehículo a través de la abertura de la trayectoria del cinturón del vehículo en un lado de la base y debajo de la traba de Algunos cinturones de seguridad...
- Page 128 INSTALACIÓN DE LA BASE USANDO UN CINTURÓN PARA REGAZO Y HOMBRO Empuje la traba de seguridad hacia abajo hasta que quede bloqueada en su lugar. ¡CLIC! Si la traba de seguridad no se bloquea, intente aflojar ligeramente el cinturón del vehículo. Tome la base por las guías del cinturón y jale de un lado a otro y de adelante hacia atrás para asegurarse de que la base esté...
- Page 129 Instale la pata de carga, consulte la página 110. Compruebe que el ángulo de reclinado permanezca en la zona verde. Si cae en la zona roja, retire la base, ajuste el ángulo de reclinado y vuelva a instalar. Consulte la página 121.
-
Page 130: Regazo
INSTALACIÓN DE LA BASE USANDO SOLO EL CINTURÓN PARA REGAZO ANTES de instalar la base, asegúrese de que el vehículo esté sobre terreno nivelado. Coloque la base en un asiento aprobado del vehículo. ASEGÚRESE de que los conectores LATCH están almacenados. - Page 131 Una vez abierta, la traba de seguridad permanecerá abierta por sí sola. Pase el cinturón para regazo a través de la abertura de la trayectoria del cinturón del vehículo en un lado de la base y debajo de la traba de seguridad, y luego a través de las guías del cinturón en ambos lados de la base.
- Page 132 INSTALACIÓN DE LA BASE USANDO SOLO EL CINTURÓN PARA REGAZO Empuje la traba de seguridad hacia abajo hasta ¡CLIC! que quede bloqueada en su lugar. Si la traba de seguridad no se bloquea, intente aflojar ligeramente el cinturón del vehículo. Tome la base por las guías del cinturón y jale de un lado a otro y de adelante hacia atrás para asegurarse de que la base esté...
- Page 133 Compruebe que el ángulo de reclinado permanezca en la zona verde. Si cae en la zona roja, retire la base, ajuste el ángulo de reclinado y vuelva a instalar. Consulte la página 121. Asegúrese de que la hebilla del cinturón del vehículo y el herraje no interfieran con la instalación correcta de la base, o con la conexión del portabebé...
-
Page 134: Uso Del Portabebé Con La Base
USO DEL PORTABEBÉ CON LA BASE Cómo acoplar el portabebé a la base Asegúrese de que el asa esté bloqueada en la Posición A (consulte la página 94). ASEGÚRESE de que el asa esté BLOQUEADA en la Posición A antes de levantar el portabebé... -
Page 135: Cómo Liberar El Portabebé
El sistema Cybex Aton M puede tocar los asientos del vehículo que quedan enfrente, siempre y cuando el ángulo de reclinado del sistema Aton M no se vea afectado. Cómo liberar el portabebé de la base Si se usa, retraiga el L.S.P. -
Page 136: Regazo Y Hombro
INSTALACIÓN DEL PORTABEBÉ SIN LA BASE USANDO UN CINTURÓN PARA REGAZO Y HOMBRO NUNCA instale este sistema de sujeción infantil con un Posición A cinturón para regazo y hombro del vehículo sin bloqueo. (Consulte la página 110-111) Coloque al niño en el portabebé. Coloque el portabebé... - Page 137 Levante el cinturón para el hombro sobre el asa y alrededor del portabebé. Asegúrese de no torcer el cinturón para el hombro del vehículo. Deslice el cinturón para el hombro en la guía azul del cinturón para el hombro. Asegúrese de que el cinturón para el hombro pase por debajo de los dispositivos L.S.P.
- Page 138 ángulo. Consulte la página 149. El sistema CYBEX Aton M puede tocar los asientos del vehículo que quedan enfrente, siempre y cuando el ángulo de reclinado del sistema Aton M no se vea afectado.
- Page 139 CÓMO RETIRARLO DEL VEHÍCULO Presione el botón de liberación para volver a colocar la protección lineal contra impactos laterales (L.S.P.) en el asiento. NOTA: Con el fin de proteger tanto su vehículo como el autoasiento infantil, la protección lineal contra impactos laterales (L.S.P.) se debe empujar hacia atrás en el asiento antes de retirarlo.
-
Page 140: Instalación Del Portabebé Sin La Base
INSTALACIÓN DEL PORTABEBÉ SIN LA BASE CON UN CINTURÓN PARA REGAZO Y HOMBRO (ALTERNATIVO) Use este método de instalación alternativo solo cuando el método descrito en la página 136 no funcione con los cinturones para regazo y hombro del vehículo. Coloque al niño en el portabebé. - Page 141 ángulo, si es necesario. Consulte la página 141. El sistema Aton M puede tocar los asientos del vehículo que quedan enfrente, siempre y cuando el ángulo de reclinado del sistema Aton M no se vea afectado.
- Page 142 (L.S.P.) adyacente. Saque el dispositivo de protección lineal contra impactos laterales (L.S.P.) en un lado del sistema Aton M adyacente a una puerta o panel del vehículo hasta que escuche un CLIC.
- Page 143 CÓMO RETIRARLO DEL VEHÍCULO 1. Presione el botón de liberación para volver a colocar la protección lineal contra impactos laterales (L.S.P.) en el asiento. NOTA: Con el fin de proteger tanto su vehículo como el autoasiento infantil, la protección lineal contra impactos laterales (L.S.P.) se debe empujar hacia atrás en el ¡CLIC! asiento antes de retirarlo.
-
Page 144: Uso Solo Del Cinturón Para Regazo
CÓMO ACOPLAR EL PORTABEBÉ SOLO CON EL CINTURÓN PARA REGAZO Posición A Coloque al niño en el sistema de retención infantil. Coloque el portabebé en un asiento trasero del vehículo, con el extremo del pie colocado firmemente contra la parte trasera del asiento del vehículo. - Page 145 ángulo. Consulte la página 149. El sistema Aton M puede tocar los asientos del vehículo que quedan enfrente, siempre y cuando el ángulo de reclinado del sistema Aton M no se vea afectado. Tenga SIEMPRE el asa bloqueada en la Posición A mientras usa el sistema de sujeción infantil en un...
-
Page 146: Uso De La Protección Lineal Contra Impactos Laterales (Lsp)
USO DE LA PROTECCIÓN LINEAL CONTRA IMPACTOS LATERALES (L.S.P.) La "protección lineal contra impactos laterales" (L.S.P.) está integrada en el sistema Aton M. Este sistema mejora la seguridad del niño en el caso de un choque lateral. Para lograr el mejor efecto de protección posible, despliegue el L.S.P. - Page 147 Para extender Saque el dispositivo L.S.P. en un lado del sistema Aton M adyacente a una puerta o panel del vehículo hasta que escuche un CLIC. Para retraer Presione el botón mientras empuja el dispositivo nuevamente en el portabebé. ¡CLIC!
-
Page 148: Ajuste Del Ángulo De Reclinado Sin La Base
AJUSTE DEL ÁNGULO DE RECLINADO SIN LA BASE ¡ADVERTENCIA! No reclinar correctamente el sistema de sujeción infantil en el asiento del vehículo, aumenta el riesgo de lesiones graves o la muerte. Es muy importante para la seguridad del niño que este sistema de sujeción infantil se instale en el ángulo correcto. - Page 149 Ajustar reclinado Ajuste el ángulo del asiento hasta que la línea roja de nivel en el portabebé esté nivelada con el piso. Si tiene problemas para lograr el ángulo de reclinado correcto: - Desinstale el portabebé. - Coloque una toalla bien enrollada o un flotador de piscina alargado debajo del portabebé, donde se indica.
-
Page 150: Uso Del Portabebé En Un Avión
La FAA recomienda que los niños de hasta 18 kg (40 lb) usen un asiento infantil certificado, con arnés, al viajar en un avión. El sistema Aton M está certificado para su uso en aviones solo sin la base. NO use la base en el avión. - Page 151 Tenga tiempre el asa bloqueada en la Tome el portabebé por las guías del cinturón Posición A y jale de un lado a otro y de adelante hacia (consulte la página 102) mientras usa el atrás para asegurarse de que esté instalado sistema de sujeción infantil en el avión.
-
Page 152: Información General Acerca De Sensorsafe Tm 2.0
INFORMACIÓN GENERAL ACERCA DE SENSORSAFE Abroche al niño en el sistema de sujeción infantil como lo haría normalmente. El enchufe del receptor SensorSafe 2.0 monitorea el transmisor del clip para el pecho y el vehículo. Cuando llegue a su destino y apague su vehículo, el sistema SensorSafe 2.0 hace sonar una serie de tonos suaves que le recuerdan que su bebé... - Page 153 INFORMACIÓN GENERAL ACERCA DE SENSORSAFE • El clip para el pecho SensorSafe 2.0 está diseñado para entrar en modo de suspensión después de estar abrochado durante 12 horas. Aunque los viajes de 12 horas sin parar en un vehículo son poco comunes y no se recomiendan, el clip para el pecho debe abrirse y cerrarse después de 12 horas para reactivar el sistema SensorSafe 2.0.
- Page 154 INFORMACIÓN GENERAL ACERCA DE SENSORSAFE Tecnología SensorSafe ™ ¿Preguntas? ¿Comentarios?: Visítenos en: http://cybex-online.com/us/contact.html O llame a CYBEX al: 1-877-242-5676 Este dispositivo cumple con los requisitos de SAE J3005. Certificado por FCC: Clip para el pecho modelo: SOSR2, FCC ID: 2ABS2-SOSR2 Enchufe receptor modelo: SS2, FCC ID: 2ABS2-SS2 Este dispositivo cumple con la parte 15 de las reglas de la FCC.
- Page 155 INFORMACIÓN GENERAL ACERCA DE SENSORSAFE Este equipo genera, usa y puede irradiar energía de radiofrecuencia y, si no se instala y usa de acuerdo con las instrucciones, puede causar interferencia perjudicial en las comunicaciones de radio. No obstante, no hay garantía de que no se producirá interferencia en una instalación particular. Si este equipo causa interferencia perjudicial en la recepción de radio o televisión, lo cual puede comprobarse apagando y volviendo a encender el equipo, se sugiere al usuario tratar de corregir la interferencia aplicando una o más de las siguientes medidas:...
-
Page 156: Uos Sensorsafe 2.0
USO SENSORSAFE 2.0 1. INSTALE EL RECEPTOR SENSORSAFE 2.0. Localice el puerto 16PIN OBDII . Consulte el manual del propietario de su vehículo para obtener información sobre su ubicación. Enchufe el receptor SensorSafe 2.0. Si no puede localizar el manual del vehículo, la aplica- ción SensorSafe 2.0 puede contener información sobre la ubicación del puerto 16PIN OBDII para su vehículo. - Page 157 USO SENSORSAFE 2.0 3. REALICE UN CICLO DEL CLIP PARA EL PECHO SENSORSAFE 2.0. El clip SensorSafe 2.0 está diseñado para entrar en modo de suspensión si permanece abrochado durante más de 12 horas. El clip para el pecho se activará o restablecerá simplemente al abrirlo y cerrarlo.
- Page 158 USO SENSORSAFE 2.0 CÓMO REEMPLAZAR LA BATERÍA DEL CLIP PARA EL PECHO SENSORSAFE 2.0. 1. Presione el botón de liberación del arnés en la parte delantera del sistema de sujeción infantil y jale ambas correas del arnés hacia adelante para aflojarlo. 2.
- Page 159 USO SENSORSAFE 2.0 4. Voltee el lado macho del clip para el pecho y afloje los tornillos con un desarmador Phillips pequeño. Retire la cubierta 5. Retire la placa de circuitos del clip para el pecho. Retire la batería de la placa de circuitos.
-
Page 160: Cuidado Y Limpieza
CUIDADO Y LIMPIEZA ¡ADVERTENCIA! El autoasiento de bebé no se CUBIERTA DEL debe usar nunca sin la cubierta. RESPALDO CUBIERTA DE LA CABECERA Cómo retirar la cubierta del asiento El sistema integrado del arnés no se puede retirar del asiento. NUNCA retire ni intente retirar las partes del sistema del arnés. - Page 161 CUIDADO Y LIMPIEZA 6. Desabroche los dos broches negros que sujetan la tela de la capota y empuje la capota hacia adelante. 7. Jale el acojinado del asiento hacia adelante y sobre las alas laterales, retírelo de alrededor de los botones de liberación del sistema de viaje.
-
Page 162: Instrucciones De Lavado
INSTRUCCIONES DE LAVADO Las partes de la cubierta del asiento (acojinado del asiento, acojinado de la hebilla, acojinado para el hombro y soporte corporal para el bebé) se pueden lavar de la siguiente manera: - Lavar en la lavadora con agua FRÍA, ciclo para ropa delicada, con detergente suave. - Escurrir para secar. - Page 163 Hebilla del arnés Correas del arnés Es posible que se Limpiar con esponja usando agua tibia y jabón acumulen alimentos, suave. Dejar secar al aire. No planchar. bebidas u otros desechos dentro de la hebilla del Conectores LATCH arnés, lo que puede afectar el funcionamiento Limpiar con esponja o enjuagar a fondo con correcto.
-
Page 164: Lista De Verificación De Seguridad
LISTA DE VERIFICACIÓN DE SEGURIDAD ¿Leyó y comprendió este manual del ¿Está bloqueada el asa en la posición A? propietario y todas las etiquetas que se (consulte la página 94). encuentran en este sistema de sujeción infantil? Si el sistema de sujeción infantil está junto a ¿El sistema de sujeción infantil está... -
Page 165: Garantía
INFORMACIÓN DE GARANTÍA Y PARTES DE REPUESTO Para obtener información sobre la garantía y las partes de repuesto, comuníquese con: Columbus Trading-Partners USA Inc. Attn: ParentLink 1801 Commerce Drive Piqua, Ohio 45356 o llame al: 1-877-242-5676 o visite www.cybex-online.com... - Page 166 CYBEX Industrial Limited Suite 1222, 12/F. | Leighton Centre | 77 Leighton Road | Causeway Bay | Hong Kong | WWW.CYBEX-ONLINE.COM/US Distributed in the United States by Columbus Trading Partners USA Inc. 560 HARRISON AVENUE | BOSTON, MA 02118 USA WWW.CYBEX-ONLINE.COM/US TOLL FREE: 1-877-242-5676 | E-MAIL: SUPPORT.US@COLUMBUSTP.COM | ©...
Need help?
Do you have a question about the ATON M and is the answer not in the manual?
Questions and answers