
Subscribe to Our Youtube Channel
Related Manuals for Ezviz LC1C


Summary of Contents for Ezviz LC1C
- Page 1 Scan the QR code with the EZVIZ App to add the device to your account. Please keep it for further reference. www.ezvizlife.com...
- Page 3 (hereinafter referred to as “EZVIZ”). This user manual (hereinafter referred to as “the Manual”) cannot be reproduced, changed, translated, or distributed, partially or wholly, by any means, without the prior written permission of EZVIZ. Unless otherwise stipulated, EZVIZ does not make any warranties, guarantees or representations, express or implied, regarding to the Manual.
- Page 4 EC DECLARATION OF CONFORMITY Hereby, Hangzhou EZVIZ Software Co.,Ltd. declares that the radio equipment type [CS-LC1C] is in compliance with Directive 2014/53/EU. The full text of the EC DECLARATION OF CONFORMITY is available at the following web link: http://www.ezvizlife.com/declaration-of-conformity.
-
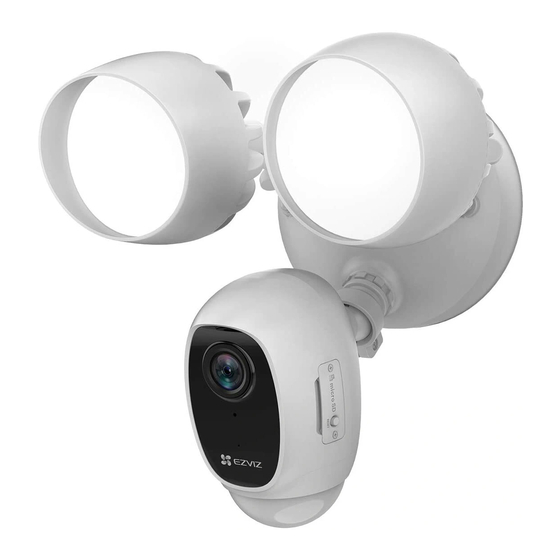
Page 5: What's In The Box
Loosen the adjustment collar and rotate the camera up to 360°. Tighten the adjustment collar when you have the camera in the position you want. Micro SD Card Initialize the card in the EZVIZ app before using it. (sold separately) Reset Button Hold for 5 seconds to restart and reset all parameters to default. -
Page 6: Installation
2. Insert a micro SD card (sold separately) into the slot until a click. 3. Place the cover back on. After installing the micro SD card, you should initialize the card in the EZVIZ app before using it. For detailed operation, refer to page 5: Initialize... -
Page 7: Step 4 Install The Mounting Bracket
Step 3 Separate the mounting bracket from the security light camera. 1. Unscrew the 2 base screw caps. 3. After separating the mounting bracket from the camera, the 2. Pull the security light camera off the mounting bracket, and resulting picture is shown as below. unplug the wire connector from the bracket. - Page 8 Figure :Connect the Wires Wires from your wall Connect to Matching Wire on Camera Yellow-green-Ground Yellow-green Brown-Hot Brown Blue-Neutral Blue Step 6 Snap the wire connector into place. After securing the wires, snap the wire connector into the base of the mounting bracket. Mounting Bracket Wire Connector Step 7...
-
Page 9: Led Indicator Status
Add a security light camera to EZVIZ 1. Log in the EZVIZ app. 2. From the EZVIZ app Home screen, tap “+” on the upper-right hand corner to go to the scan QR code interface. 3. Scan the QR Code on the security light camera. - Page 10 위치 조정 고리를 풀고 카메라를 최대 360°까지 돌립니다. 카메라를 원하는 위치에 놓고 위치 조정 고리를 조입니다. 카메라 위치 조정 고리 마이크로 SD 카드 사용하기 전에 EZVIZ 앱에서 카드를 초기화하십시오. (별도 판매) 재시작하고 모든 특성을 기본값으로 초기화하려면 5초 동안 누릅니다. 초기화 버튼...
- Page 11 1. 카메라 측면 커버를 제거합니다. 2. 딸깍 소리가 날 때까지 마이크로 SD 카드(별도 판매)를 슬롯에 삽입합니다. 3. 커버를 다시 닫습니다. 마이크로 SD 카드를 삽입한 후, 사용하기 전에 EZVIZ 앱에서 카드를 초기화해야 합니다. 자세한 작동 방법은 10페이지를 참조하십시오. 마이크로 SD 카드를 초기화합니다...
- Page 12 3단계 마운팅 브래킷을 보안등 카메라에서 분리합니다. 1. 베이스 나사 캡 2개를 풉니다. 3. 카메라에서 마운팅 브래킷을 분리한 후의 결과물은 다음과 같습니다. 2. 마운팅 브래킷에서 보안등 카메라를 빼낸 다음 브래킷에서 전선 커넥터를 분리합니다. 마운팅 브래킷 베이스 나사 캡 마운팅 포스트 전선 커넥터 마운팅...
- Page 13 그림: 전선 연결 벽면의 전선 카메라의 전선에 일치 시켜 연결 연두색-접지 연두색 갈색-전압 갈색 파란색-중성 파란색 6단계 전선 커넥터를 제자리에 끼웁니다. 전선을 고정한 후에는 전선 커넥터를 마운팅 브래킷 바닥에 끼웁니다. 마운팅 브래킷 전선 커넥터 7단계 8단계 브래킷에 보안등 카메라를 고정합니다. 차단기...
- Page 14 되었습니다. EZVIZ에 보안등 카메라 추가 1. EZVIZ 앱에 로그인합니다. 2. EZVIZ 앱 홈 화면의 오른쪽 구석 상단에 있는 "+"를 눌러 QR 코드 스캔 인터페이스로 이동하십시오. 3. 보안등 카메라에 있는 QR 코드를 스캔합니다. 4. Wi-Fi 구성을 종료하려면 EZVIZ 앱 마법사를 따르십시오.
- Page 15 Nới lỏng vòng điều chỉnh và xoay camera, có thể xoay tối đa 360°. Siết chặt vòng điều chỉnh khi bạn đã xoay camera đến vị trí mong muốn. Thẻ micro SD Khởi tạo thẻ trong ứng dụng EZVIZ trước khi sử dụng. (bán riêng) Nút khởi động lại Giữ...
- Page 16 2. Đưa thẻ micro SD (bán riêng) vào khe cắm cho đến khi nghe thấy tiếng tách. 3. Lắp nắp đậy lại. Sau khi lắp thẻ micro SD, khởi tạo thẻ trong ứng dụng EZVIZ trước khi sử dụng. Để xem thao tác vận hành chi tiết, hãy tham khảo trang 15: Khởi...
- Page 17 Bước 3 Tách giá gắn khỏi camera chiếu sáng an ninh. 1. Tháo 2 nắp vít tấm đế. 3. Sau khi tách giá gắn ra khỏi camera thì tình trạng sẽ giống như hình 2. Kéo camera chiếu sáng an ninh ra khỏi giá gắn và tháo đầu nối minh họa sau.
- Page 18 Hình: Nối các dây Các dây trên tường nhà bạn Nối với dây tương ứng trên Camera Tiếp địa vàng-xanh lá Vàng-xanh lá Nóng-nâu Nâu Trung tính-xanh dương Xanh dương Bước 6 Cắm đầu nối dây vào đúng vị trí. Sau khi siết chặt các dây, hãy cắm đầu nối dây vào tấm đế...
- Page 19 1. Đăng nhập vào ứng dụng EZVIZ. 2. Từ màn hình Trang chủ của ứng dụng EZVIZ, nhấn vào biểu tượng “+” ở góc trên cùng bên phải để chuyển đến giao diện quét mã QR. 3. Quét mã QR trên camera an ninh kiêm đèn chiếu sáng.
- Page 20 คลายแหวนปรั บ ระดั บ และสามารถหมุ น กล้ อ งได้ ส ู ง สุ ด 360º หมุ น แหวนปรั บ ระดั บ ให้ แ น่ น เมื ่ อ คุ ณ ตั ้ ง กล้ อ งในต� า แหน่ ง ที ่ ต ้ อ งการได้ แ ล้ ว การ์ ด Micro SD เริ ่ ม การใช้ ง านการ์ ด ในแอป EZVIZ ก่ อ นที ่ จ ะใช้ ง าน (จ� า หน่ า ยแยกต่ า งหาก) ปุ...
- Page 21 หลั ง จากติ ด ตั ้ ง การ์ ด micro SD คุ ณ ต้ อ งเริ ่ ม การใช้ ง านการ์ ด ในแอป EZVIZ ก่ อ นใช้ ง าน ส� า หรั บ การใช้ ง านอย่ า งละเอี ย ด โปรดดู...
- Page 22 ขั ้ น ตอนที ่ 3 แยกที ่ ร องยึ ด การติ ด ตั ้ ง ออกจากกล้ อ งหลอดไฟรั ก ษาความปลอดภั ย 1. ไขสกรู ท ี ่ ย ึ ด ฐานทั ้ ง 2 ตั ว ออก 3. หลั ง จากท� า การแยกที ่ ร องยึ ด การติ ด ตั ้ ง ออกจากกล้ อ งแล้ ว 2.
- Page 23 ภาพ :เชื ่ อ มต่ อ สายไฟ สายไฟจากผนั ง ของคุ ณ เชื ่ อ มต่ อ กั บ สายไฟที ่ ค ู ่ ก ั น ในกล้ อ ง สี เ หลื อ ง-เชี ย ว-สายดิ น สี เ หลื อ ง-เขี ย ว สี...
- Page 24 1. ในแอป EZVIZ ตรวจสอบสถานะของการ์ ด หน่ ว ยความจ� า โดยท� า การแตะที ่ Storage Status (สถานะหน่ ว ยความจ� า ) ที ่ อ ยู ่ ใ นอิ น เตอร์ เ ฟซ Device Settings (การตั ้ ง ค่ า อุ ป กรณ์...
- Page 25 Kendurkan ring penyetel dan putar kamera hingga 360º. Kencangkan ring penyetel saat kamera sudah berada di posisi yang Anda inginkan. Kartu Micro SD Inisialisasi kartu dengan aplikasi EZVIZ sebelum menggunakannya. (dijual terpisah) Tombol Reset Tahan selama 5 detik untuk memulai ulang dan mereset semua parameter ke default.
- Page 26 2. Masukkan kartu micro SD (dijual terpisah) ke slot sampai terdengar bunyi klik. 3. Pasang kembali penutupnya. Setelah memasang kartu micro SD, Anda harus menginisialisasi kartu di aplikasi EZVIZ sebelum menggunakannya. Untuk detail pengoperasian, lihat halaman 25: Inisialisasi Kartu Micro SD...
- Page 27 Langkah 3 Pisahkan braket pemasangan dari kamera lampu keamanan. 1. Buka sekrup 2 tutup sekrup bawah. 3. Setelah memisahkan braket pemasangan dari kamera, gambar 2. Lepaskan kamera lampu keamanan dari braket pemasangan, yang dihasilkan akan terlihat seperti di bawah. lalu lepaskan konektor kabel dari braket. Braket Pemasangan Tutup Sekrup Dasar Pin Pemasangan...
- Page 28 Gambar: Hubungkan Kabel Kabel dari dinding Hubungkan untuk Memasangkan Kabel di Kamera Kuning-hijau-Ground Kuning-hijau Coklat-Aktif Coklat Biru-Netral Biru Langkah 6 Pasang konektor kabel di posisinya. Setelah mengencangkan kabel, pasang konektor kabel ke bagian bawah braket pemasangan. Braket Pemasangan Konektor Kabel Langkah 7 Langkah 8 Pasang kamera lampu keamanan di braket.
- Page 29 Tambahkan kamera lampu keamanan ke EZVIZ 1. Masuk ke aplikasi EZVIZ. 2. Dari layar Utama aplikasi EZVIZ, ketuk tanda “+” di sudut kanan atas untuk membuka antarmuka pemindaian kode QR. 3. Pindai kode QR pada kamera lampu keamanan. 4. Ikuti panduan aplikasi EZVIZ untuk menyelesaikan konfigurasi Wi-Fi.
- Page 30 鏡頭 安全燈 Micro SD 卡插槽 (位於蓋子後面) 重設按鈕 燈調整旋鈕 (傾斜) 燈調整圈 (旋轉) 攝影機調整圈 底座螺帽 名稱 說明 燈調整旋鈕 (傾斜) 鬆開調整旋鈕並將燈傾斜,最多可傾斜 180°。將燈調整至需要的位置,並鎖緊調整旋鈕。 燈調整圈 (旋轉) 鬆開調整圈並將燈旋轉,最多可旋轉 360°。將燈調整至需要的位置,並鎖緊調整圈。 攝影機調整圈 鬆開調整圈並旋轉攝影機,最多可旋轉 360°。將攝影機調整至需要的位置,並鎖緊調整圈。 Micro SD 卡 記憶卡使用前請先在 EZVIZ 應用程式中初始化。 (另售) 重設按鈕 按住 5 秒鐘即可重新啟動並將所有參數重設為預設值。 藉由 PIR (被動式紅外線),裝置可偵測人體、動物或其他物體。...
- Page 31 • 攝影機建議設定角度:22 度,如下圖所示。 22° 步驟 1 在控制安全燈電路的斷路器中斷電力。 • 如果您不知道斷路器位於何處,或不知道如何關閉范光燈電路的電源,請洽詢持有證照的電氣技師。 • 在安裝過程中請全程將斷路器維持在關閉狀態。 步驟 2 安裝 Micro SD 卡 (選擇性)。 1. 取下攝影機側邊的蓋子。 2. 將 micro SD 卡 (另售) 插入插槽中,直到聽見喀嚓聲。 3. 裝回蓋子。 初始化 Micro SD 卡 安裝 micro SD 卡之後,您應該在使用前於 EZVIZ 應用程式中將卡片初始化。如需詳細操作指示,請參閱第 30 頁: 。...
- Page 32 步驟 3 將安裝架與安全燈攝影機分離。 1. 鬆開 2 個底座螺帽。 3. 將安裝架從攝影機分離後的樣貌如下圖所示。 2. 將安全燈攝影機從安裝架拉出,並從該支架取下導線連接器。 底座螺帽 安裝架 安裝腳柱 導線連接器 將安裝腳柱留在安裝架上。 步驟 4 安裝支架。 • 安裝支架時,請確認 (UP) 標誌面朝上。 • 請確定牆壁/天花板的強度足以承受三倍的安全燈攝影機重量。 安全燈攝影機可以安裝在牆上或天花板上。這裡以牆壁安裝為例。 1. 選擇乾淨平坦的表面。 2. 在牆上鑽兩個孔並插入定錨。 3. 將牆上導線穿過安裝架的橡膠。 4. 使用安裝螺絲將安裝架固定在牆上。 定錨 安裝螺絲 步驟 5 連接導線。 依照步驟將牆上的導線連接到安全攝影機上的導線,如下圖所示。 1.
- Page 33 圖:連接導線 牆上導線 連接到攝影機上相對應導線 黃綠 - 接地線 黃綠色 棕 - 火線 棕色 藍 - 中性線 藍色 步驟 6 將導線連接器卡至定位。 導線固定完畢後,將導線連接器卡入安裝架的底座中。 安裝架 導線連接器 步驟 7 步驟 8 將安全燈攝影機放置在安裝架上。 於斷路器恢復供電。 將安裝腳柱對準安全燈攝影機上的孔並壓合,鎖緊底座螺帽。 開啟安全燈電路的電源。 底座螺帽...
- Page 34 • 安全燈攝影機可支援 2.4GHz Wi-Fi 訊號。若您擁有雙頻路由器與個別的 2.4Ghz 及 5GHz 網路,請確認將手機連線至 2.4Ghz 網路。 • 您要安裝安全燈攝影機時,若發現 Wi-Fi 網路訊號強度低於 50%,建議使用 Wi-Fi 訊號延伸器來增強安裝地點的訊號。 低功率電波輻射性電機管理辦法 第十二條 經型式認證合格之低功率射頻電機,非經許可,公司、商號或使用者均不得擅自變更頻率、加大功率或變更原設計之特性及功能。 第十四條 低功率射頻電機之使用不得影響飛航安全及干擾合法通信;經發現有干擾現象時,應立即停用,並改善至無干擾時方得繼續使用。前項合 法通信,指依電信法規定作業之無線電通信。低功率射頻電機須忍受合法通信或工業、科學及醫療用電波輻射性電機設備之干擾。 初始化 micro SD 卡 1. 在 EZVIZ 應用程式中,輕觸「Device Settings (裝置設定)」介面中的「Storage Status (儲存狀態)」,以檢查記憶卡狀態。 2. 如果記憶卡狀態顯示為「Uninitialized (未初始化)」,請點擊以將記憶卡初始化。其後,狀態會變為「Normal (正常)」。 如需詳細資訊,請造訪 www.ezvizlife.com。...
- Page 35 セキュリティライトカメラ ネジキット クイックスタートガイド セキュリティライトカメラ レンズ セキュリティライト microSDカードスロット (カバーの裏) リセットボタン ライト調整ノブ(上下方向) ライト調整リング(左右回転) カメラ調整リング ベーススクリューキャップ 名前 説明 ライト調整ノブ(上下方向) 調整ノブを緩めて、ライトの向きを 180 度以内で調整します。希望の位置を向いたら、調整ノブを締めます。 ライト調整リング 調整リングを緩めて、ライトの向きを 360 度以内で調整します。希望の位置を向いたら、調整リングを締め (左右回転) ます。 カメラ調整リング 調整リングを緩めて、カメラの向きを 360 度以内で調整します。カメラが希望の位置を向いたら、調整リングを 締めます。 microSDカード 使用前に EZVIZ アプリで初期化してください。 (別売り) リセットボタン 5 秒間長押しすると再起動し、パラメータがすべてデフォルトにリセットされます。 PIR (パッシブ赤外線センサー)で、人間、動物、その他の物体を検知できます。...
- Page 36 4. アプリを起動し、EZVIZ ユーザアカウントを登録します。 設置 • 設置高度は動体検知に影響を与えます。セキュリティライトカメラで推奨される設置高度は、地上3 m (10 フィート)の高さです。 • また、推奨の設定角度は、22 度です(下を参照)。 22 度 手順 1 セキュリティライトに入る電源のブレーカーを落とします。 • ブレーカーの場所やセキュリティライト用の電源を切る方法がわからない場合は、正規の電気技師に相談してください。 • 設置作業の間はブレーカーを切った状態にしてください。 手順 2 microSD カードの取り付け(オプション) 1. カメラ側面のカバーを取り外します。 2. スロットに microSD カード(別売り)をカチッと音がするまで挿入します。 3. カバーを元通りに取り付けます。 microSD カードを挿入したら、使用する前に EZVIZ アプリでカードを初期化してください。操作の詳細は 35 ページのmicroSD カード の初期化を参照してください。...
- Page 37 手順 3 セキュリティライトカメラから取り付けブラケットを取り外す 1. 2 つのベーススクリューキャップを緩めます。 3. カメラを取り付けブラケットから取り外した後の写真を以下に示 2. セキュリティライトカメラを取り付けブラケットから引き出し します。 て、線の端のコネクタをブラケットから外します。 取り付けブラケット ベーススクリューキャップ 取り付け棒 電源線コネクタ 取り付け棒はブラケットの中に残しておいてください。 手順 4 取り付けブラケットの設置 • 取り付けブラケットを設置するときは、(UP) と表示された面が上向きになるようにしてください。 • 壁や天井がカメラの 3 倍の重量に耐えられる十分な強度をもっていることを確認してください。 カメラは壁面や天井に設置できます。ここでは壁面を例にとって説明します。 1. 汚れがなく平らな面を選びます。 2. 壁の 2 箇所に穴を開け、アンカーを挿入します。 3. 電源線を壁から取り付けブラケットのゴムの部分まで延ばします。 4. 取り付けブラケットをネジで壁面に固定します。 アンカー 取り付けネジ 手順...
- Page 38 図: 電源線の接続 壁からの電源線 対応するカメラの電源線 黃緑: アース 黃緑 茶: ライブ 茶 青: ニュートラル 青 手順 6 電源線コネクタを接続します。 電源線を固定した後、電源線コネクタを取り付けブラケットの台座に接続します。 取り付けブラケット 電源線コネクタ 手順 7 手順 8 セキュリティライトカメラをブラケットに取り ブレーカーを上げます。 付けます。 取り付け棒をセキュリティライトカメラの穴に合わせて押し込 セキュリティライトの電源を入れます。 み、ベーススクリューキャップを固定します。 ベーススクリューキャップ...
- Page 39 • セキュリティライ トカメラは、 2.4GHz 帯の Wi-Fi で動作します。 2.4 GHz 帯と 5 GHz 帯のどちらもサポー トするデュアルバン ドルーター を使用されている場合は、 スマー トフォンが 2.4 Ghz 帯で接続されていることを確認してください。 • セキュリティライ トカメラを設置する場所の Wi-Fi 電波の強さが 50% 未満の場合、 Wi-Fi 信号エクステンダを使用して Wi-Fi 信号を増幅 することをおすすめします。 microSD カードの初期化 1. EZVIZ アプリで、Device Settings (デバイス設定)画面の Storage Status (ストレージステータス)をタップして、メモリカード の状態を確認します。 2. メモリカードのステータスが「Uninitialized」(未初期化)と表示されている場合、タップして初期化します。初期化が終わると、ステー タスが 「Normal」(正常)に変化します。 詳細情報については www.ezvizlife.com を参照してください。...
- Page 40 No distributor, reseller, agent, or employee is authorized to make any modification, extension, or addition to this warranty. Your EZVIZ product is warranted for a period of one (1) year from the date of purchase against defects in materials and workmanship, or such longer period as may be required by law in the country or state where this product is sold, when used normally in accordance with user manual.
- Page 41 위험이 존재합니다 . 귀하는 제품 정보 , 데이터 및 제품을 사용함에 있어 발생하는 배선 연결 , 고정 , 전기 , 가정 , 제품 , 제품 주변 기기 , 컴퓨터 , 모바일 기기 및 기타 모든 물품과 반려동물 등에 관한 일체의 손실 , 책임 , 손상에 관해 전적으로 책임 ( 및 EZVIZ 의 면책 ) 이 있...
- Page 42 đổi, mở rộng hoặc bổ sung nào đối với gói bảo hành này. Sản phẩm EZVIZ của quý vị được bảo hành trong thời hạn một (1) năm kể từ ngày mua cho các khiếm khuyết về vật liệu và chế tác hoặc trong thời hạn dài hơn luật pháp của quốc gia hoặc tiểu bang nơi sản phẩm này được bán có...
- Page 43 • ริ ้ ว รอยความเสี ย หายรวมถึ ง แต่ ไ ม่ จ � า กั ด เฉพาะรอยขี ด ข่ ว น รอยบุ บ และพลาสติ ก ในช่ อ งต่ อ หั ก • ซอฟต์ แ วร์ ใ ดๆ แม้ ว ่ า จะบรรจุ ร วมหรื อ ขายร่ ว มกั บ ฮาร์ ด แวร์ ข อง EZVIZ •...
- Page 44 Anda dapat meminta layanan garansi dengan menghubungi Layanan Pelanggan kami. Untuk setiap produk EZVIZ yang rusak dalam masa garansi, EZVIZ akan, sesuai pilihannya, (i) memperbaiki atau mengganti produk Anda secara gratis; (ii) menukar produk Anda dengan produk yang berfungsi setara; atau (iii) mengembalikan harga pembelian asli, dengan ketentuan Anda memberikan tanda terima pembelian asli atau salinannya, penjelasan singkat tentang cacat, dan mengembalikan produk dalam kemasan aslinya.
- Page 45 有限保固 感謝您購買 Hangzhou EZVIZ Software Co., Ltd. ( 簡稱「EZVIZ」) 的產品。本有限保固 ( 簡稱「保固」) 向身為 EZVIZ 產品原購買者的您提供明確之法律權利。針對不同州、省或轄區,您還可以享有其他的法律權利。本保固僅適用於產品的 原購買者。「原購買者」是指向授權賣方購買 EZVIZ 產品的任何消費者。在本保固條件下之免責聲明、除外責任條款及 責任限制,將不適用於適用法律所禁止的範圍。經銷商、轉售商、代理商或員工都未經授權對本保固進行任何修改、延長 或新增。 您的 EZVIZ 產品從購買日起算一 (1) 年內針對材質和工藝保固有效,或依據本產品販售地的國家或州 / 省法律可以有更長 的保固期,前提是本產品在使用上有符合使用手冊的要求。 您可以聯連絡我們的客服部門,以提出保固服務的請求。 在保固條件下任何有瑕疵的 EZVIZ 產品,EZVIZ 將有權選擇 (1) 免費修理或更換您的產品;(2) 以功能相當的產品來交換您 的產品;或 (3) 退還原購買金額,前提是您必須提供原始購買收據或收據複本、簡單說明瑕疵狀況,並且以原包裝退回該產 品。EZVIZ 可自行決定是否要以全新或整修過的產品或零件來修理或更換。本保固不涵蓋運輸成本、保險費,或由於您退...
- Page 46 限定的保証について Hangzhou EZVIZ Software Co., Ltd. (以下 EZVIZ とする)の製品をご購入頂きありがとうございます。 この限定保証は、EZVIZ 製品の購入者に対して特定の法的権利を保証します。地域または国によっては異なるその他の法的権利を持つことも出来ま す。 この限定保証は、製品の最初の購入者にのみ適用されます。 「最初の購入者」とは、EZVIZ 製品を正規販売者から購入したことのある消費者を意 味します。 この限定保証に基づく免責条項、除外条項および責任の制限は、準拠法で禁止されている範囲には適用されません。 卸売業者、販売代理店、小売店などの取扱会社、又はそれらに勤める従業員は、この限定保証に対して、いかなる変更及び追加、又は期間の延長等 を行うことは出来ません。 お客様の EZVIZ 製品は、ユーザーマニュアル(取扱説明書)に従って通常使用の場合は購入日から 1 年間保証されます。又、販売されている地域 や国の法律、使用されている材料や製造上の欠陥等によっては、それ以上の期間保証される場合もございます。 サポートセンターへご連絡頂き、保証サービスを要求することができます。 保証の下で、万が一欠陥のある EZVIZ 製品についての取扱について、弊社(EZVIZ)は以下の選択権があります。 (i)お客様の製品を無料で修理または交換すること。 (ii)お客様の製品を機能的に同等の製品と交換すること。 (iii)お客様の製品を製品箱に同梱の上、御購入証明となるレシート原本又はコピーと、欠陥についての簡単な説明書きを添えて御返品頂く事によ って、御購入代金を払い戻すこと。 但し、弊社独自の判断により、新しい製品又は後継品への交換又は新しく導入された部品・部材を使用して修理 させて頂く場合がございます。 併せて、この保証サービスは、製品を返送する際に発生した送料並びに各種保険、お客様が負ったその他の付随 費用には適用されません。 適用される法律によって禁止されている場合を除き、上記事項は、製品の欠陥等によって生じる契約の不履行に 対する唯一の排他的な救済手段です。 この限定保証のもとで修理または交換された製品は、配送日から 90 日又は保証期間が 91 日以上残っている場合は...
- Page 47 UD16981B-A...
Need help?
Do you have a question about the LC1C and is the answer not in the manual?
Questions and answers