Table of Contents
Advertisement
Advertisement
Table of Contents

Subscribe to Our Youtube Channel
Summary of Contents for Dyconn Dubbler Dock Pro+ 6-Bay
-
Page 3: Table Of Contents
How to Perform the Offline Compare Process ........9 Online Cloning ..................10 Online Cloning with Dubbler Dock Pro+ ..........10 CloneDrive Software Installation ..........10 FlashCopy Operation ................14 Using the FlashCopy Software ............14 DiscErase Operation ................17 Using the DiscErase Software ............17 Erase Method Chart ..............20 Dyconn Limited Warranty ................22... -
Page 4: Product Introduction
PRODUCT Introduction Product Description: The Dyconn Dubbler Dock Pro+ 6-Bay is a powerful, versatile and portable 1:5 HDD duplicator and docking station. It’s super fast transfer speed 500MB/s makes data back-up and management quick and easy. The Dubbler Dock Pro+ is compatible with 3.5/2.5 internal SATA HDDs. -
Page 5: Product Specifications
(149 x 60 x 104mm) Care and Maintenance: The Dyconn Dubbler Dock Pro+ should be treated with care during use and storage. As such, please follow the suggested maintenance advice below: 1. Keep the device away from rain, humidity and all forms of liquid and condensation that contain minerals that may corrode electronic circuitry. -
Page 6: Product Diagram
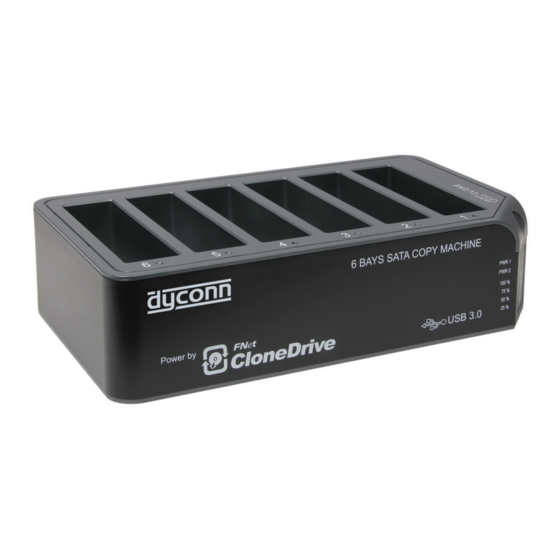
PRODUCT Diagram Product Diagram: 1. Power Indicator 1 2. Power Indicator 2 3. Clone/Compare Processing % Indicator 4. Clone/Compare Button 5. Bay 1 6. Bay 2 7. Bay 3 8. Bay 4 9. Bay 5 10. Bay 6 11. USB 3.0 Input 12. -
Page 7: Offline Cloning
Offline Cloning Offline Cloning with Dubbler Dock Pro+ Warning: All data in the Target HDD will be erased after the cloning operation. Please note the below-noted conditions before performing the cloning process: 1. Bay 1: Source HDD 2. Bay 2, 3, 4, 5, 6: Target HDD 3. -
Page 8: How To Perform The Offline Cloning Process
Offline cloning How to perform the Offline Cloning Process 1. Place the Source HDD into the Bay 1 tray, followed by the placement of Target HDD into Bay 2, 3, 4, 5, 6. 2. Turn On the Power to the Dubbler Dock Pro+. 3. -
Page 9: Offline Compare Mode
Offline Compare mode How to perform the Offline Compare Process NOTE: For Offline Compare Mode, the source drive must be placed in Bay 6. Also, make sure Bay 1 is Empty. 1. Insert the Source HDD into Bay 6, followed by the placement of Target HDDs into Bay 2, 3, 4, 5. -
Page 10: Online Cloning
ONLINE Cloning Online Cloning with Dubbler Dock Pro+ Warning: All data in the Target HDD will be erased after the CloneDrive cloning operation. Please note the CloneDrive software is NOT compatible with MAC OS. CloneDrive Software Installation 1. Please download the latest version of “CloneDrive” software from the Support/Download page on our official website. - Page 11 ONLINE cloning Online Cloning with Dubbler Dock Pro+ 6. Securely place the Source HDD into Bay 1, followed by the placement of the Target HDDs into Bay 2 – 6. Connect the Dubbler Dock Pro+ to the computer via USB cable. Turn On the power to the Dubbler Dock Pro+. 7.
- Page 12 ONLINE cloning Online Cloning with Dubbler Dock Pro+ 8. Choose Clone the External Disk, which makes the HDD in Bay 1 the Source HDD, and the HDDs in the 2 – 6 bays as Target HDDs.
- Page 13 ONLINE cloning Online Cloning with Dubbler Dock Pro+ 9. Choose Clone System Disk to External Disk, which makes the PC HDD the Source HDD, and the HDDs in Bay 1 – 6 as the Target HDDs. 10. Click the Start icon located on the lower-right side of the software program.
-
Page 14: Flashcopy Operation
FLASHCOPY OPERATION Using the FlashCopy Software The Flashcopy is an advanced software technology that enables users to enjoy transfer speeds twice as fast as USB 3.0, even when using USB 2.0. Please note the FlashCopy software is NOT compatible with MAC OS. 1. - Page 15 FLASHCOPY OPERATION 7. Once the program starts, you will see data content for all mounted HDDs. To start, click on the Target drive(s) to which data will be copied. Select the folder(s) to be copied by clicking and dragging the file(s)/folder(s) from the Source HDD (left) to the Target HDDs (right).
- Page 16 FLASHCOPY OPERATION Using the FlashCopy Software 9. A status window will show detail information on the transferring process. 10. After the FlashCopy operation finishes, a report window will show.
-
Page 17: Discerase Operation
disc erase OPERATION Using the DiscErase Software The DiscErase software is an advanced software technology that provides many security erase options for your HDDs. Please note the DiscErase software is NOT compatible with MAC OS. 1. To start, please download the latest “DiscErase” software version from the Support/Download page on our official website. - Page 18 DISc ERASE OPERATION Using the DiscErase Software 7. The DiscErase software will start and display the mounted HDDs in the Dubbler Dock Pro+. 8. Check boxes 1 – 6 or any single box to choose which HDDs will be erased.
- Page 19 DISc ERASE OPERATION Using the DiscErase Software 9. Choose a desired erase method by clicking on the Erase Method button. (For information on the available erasing methods, refer to the chart on page 20.) Click Ok.
-
Page 20: Erase Method Chart
DISc ERASE OPERATION Using the DiscErase Software Erase Method Chart The Erase Method Chart reflects the security erase methods available with the DiscErase software. Please conduct thorough research before choosing an appropriate erasing method. One Pass Zeros (1 pass) One Pass Random (1 Pass) US DoD 5220-22.M (3 Pass) US DoD 5220.22-M (ECE) (7 Pass) Canadian OPS-II... - Page 21 DISc ERASE OPERATION Using the DiscErase Software 10. To initiate the erasing process, click the Start button. When prompted, enter the auto-generated verification code and click Ok. The erasing process will commence. 11. A status bar will show the progression of the erasing process. Once the erasing process finishes, the software will revert back to the original display screen.
-
Page 22: Dyconn Limited Warranty
Dyconn deems acceptable) for the product. DYCONN, at its option, shall repair or replace the defective unit covered by this warranty. In order to keep this limited warranty in effect, the product must have been handled and used as prescribed in the instructions accompanying this warranty.
Need help?
Do you have a question about the Dubbler Dock Pro+ 6-Bay and is the answer not in the manual?
Questions and answers