Table of Contents
Advertisement
MC
Thank you for purchasing Pegasus' labor saving device.
Study this manual very carefully before beginning any
of the procedures and then use the device correctly and
safely.
Keep this manual in a convenient place for quick refer-
ence when needed.
Device
Elastic feeder (standard type)
with tape cutter / inserter
INSTRUCTIONS
Models: MC400
9A2854E
Advertisement
Table of Contents

Related Manuals for Pegasus MC Series


Summary of Contents for Pegasus MC Series
- Page 1 Device Models: MC400 Thank you for purchasing Pegasus' labor saving device. Study this manual very carefully before beginning any of the procedures and then use the device correctly and safely. Keep this manual in a convenient place for quick refer- ence when needed.
-
Page 2: Table Of Contents
....................... 1 1.Introduction . -
Page 3: Introduction
Therefore you have to keep in mind you could easily touch them. To prevent accidents, it is essential that you use the safe products supplied by Pegasus correctly. All the people who will use sewing machines must study this manual and the instruction manual for sewing machines very carefully and then take necessary safety measures before beginning any of the procedures. -
Page 4: Safety Precautions
Be sure to follow the instructions when you operate the machine and/or labor saving device. If you use the machine and/or labor saving device incorrectly, you may get an electrical shock. If you use the machine and/or labor saving device incorrectly, your hands and/or fingers may be injured. -
Page 5: Notes For Each Procedure
●Do not modify the machine and device yourself. ARNING ARNING ※Consult you local Pegasus' sales office or representative for modification. Connecting the cords When connecting the power cord, be sure to turn off the (2)Before operating the device power and disconnect the power plug from the outlet. - Page 6 2.To prevent accidents, be careful that any foreign matter such as 3.Use Pegasus' genuine parts when repairing and/or replacing water, other liquids or metals do not get into the device. parts. 3.Wear clothes that cannot be caught in the machine.
-
Page 7: Application And Performance
Application and performance Application For attaching elastic to waists/leg openings of leotards, swimsuits, etc. Performance Tape width : 4.2 11.8 mm (In case of using the optional presser foot for inch size tape : 12 - 26 mm) Max. machine speed : 7000 s.p.m 26 items (types of sewn products) from A to Z can be programmed and stored in the MC device. -
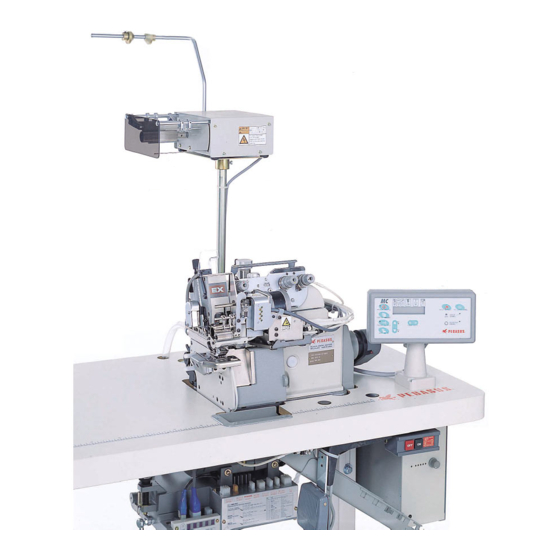
Page 8: System Construction
System construction * Install the knee switch, air source and solenoid valve properly according to the type of machine, usage and the shape of machine table. Reel stand MC device Finger switch (For tape cutter) Console box Air source solenoid valve Power box Knee switch Lint collector... -
Page 9: Installing Each Component
Installing each component 1. Installing the MC device CAUTION CAUTION Always turn off the power, unplug the machine from the outlet and then only well-qualified technicians should install the MC device. Install the bracket with the MC device on the machine head with screws 1 as shown in the illustration. - Page 10 Installing each component 4. Installing the reel stand CAUTION CAUTION Always turn off the power, unplug the machine from the outlet and then only well-qualified technicians should install the reel stand. Install the reel stand on the machine table. 5. Installing the lint collector CAUTION CAUTION Always turn off the power, unplug the machine from...
- Page 11 Installing each component 6. Installing the solenoid filter regulator speed controller CAUTION CAUTION Always turn off the power, air compressor first and then only well-qualified technicians should install the solenoid filter regulator / speed controller. Connect other lines first before connecting to the air source (air compressor).
- Page 12 Installing each component 7. Installing the knee switch CAUTION CAUTION Always turn off the power, unplug the machine from the outlet and then only well-qualified technicians should install the knee switch. Install the knee switch conveniently on the underside of the machine table.
-
Page 13: Description Of Mc Power Box
Description of MC power box Specified for Europe LED for power source Output connector (output) Indicates the power is on/off. To connect the relay cord for the solenoid valve and the Lit when the power is on. step indicator. Power connector (input) Stepping motor connector (output) To connect the power cord. -
Page 14: Replacing The Fuse For The Power Box
If the replaced fuse is also blown out, the power box may be out of order. Stop using the MC power box and contact your local Pegasus' sales office or representative. Remove fuse holder cap 1 with the screwdriver by turning in the direction of the arrow, and replace the fuse 2 with a new one. -
Page 15: Connecting Cords
Connecting cords ARNING ARNING Connect the earth wire correctly. Otherwise you may Always turn off the power, unplug the machine from get an electric shock when you touch the MC power box the outlet and then only well-qualified technicians should and/or the machine. -
Page 16: Connecting Air Lines
Connecting air lines ARNING ARNING CAUTION CAUTION Failure to connect air lines properly may cause Always turn off the power and air compressor first and hazardous faulty operations. To prevent accidents and then only well-qualified technicians should connect the air damage to the machine, check all the air lines for correct lines. -
Page 17: Adjusting The Filter Regulator
Adjusting the filter regulator 1. Adjusting air pressure Pull up knob 1 on filter regulator until it clicks. Then set the air pressure at 0.5 Mpa (5 kgf/cm Turning 1 in the direction increases the air pressure. ● Turning 1 in the direction decreases the air pressure. -
Page 18: Functions Of The Machine Treadle / External Switches
Functions of the machine treadle / external switches Machine treadle CAUTION CAUTION Pressing the treadle with toes If you press the machine pedal while adjusting the device on the console box, the machine will get actuated. Be careful. ● Pressing the treadle with toes ・・・ Starts the machine. -
Page 19: Adjusting The Overlap Of The Knives
Adjusting the overlap of the knives ARNING ARNING Turn off the power first and then well-qualified technicians should adjust the device. Be careful not to injure any part of your fingers when handling the knives. To obtain 1.0 - 2.0 mm overlap of movable knife 1 and stationary knife 2, turn nut 3 as required. -
Page 20: Inserting Tape (Elastic)
Inserting tape (elastic) CAUTION CAUTION Always turn off the power, unplug the machine from the outlet and then only well-qualified technicians should insert the tape (elastic). Be careful not to injure your fingers and/or hands when handling the knives. Turn off the air compressor, confirm air pressure is 0 (zero) and then insert the tape (elastic). - Page 21 Inserting tape (elastic) Insert tape (elastic) 4 as shown in the illustration. Adjust guides 9 so that tape (elastic) 4 can go along guide 9 smoothly. Insert tape(elastic) 4 between roller 8 and driving roller 10 and up to presser foot guide 11. CAUTION CAUTION When inserting the tape (elastic), be careful that your...
-
Page 22: Description Of Mc Console Box
Description of MC console box FEED FEED PRGM PRGM 送り量 送り量 品番 品番 INC. INC. INC. INC. DEC. DEC. MACHINE RUN 増 増 増 増 減 減 回転検出 回転検出 PROGRAM PROGRAM プログラム プログラム TAPE SET TAPE SET テープセット テープセット FEED FEED PRGM PRGM 送り量 ... -
Page 23: Function Selecting Mode
Function selecting mode Every time FUNCTION key is depressed, the display on the screen changes sequentially so that you can switch functions and set counters. Note : The language mode (Japanese or English) is set to English at the factory. To change to Japanese, call up display (5) (see below) and select Japanese. - Page 24 Function selecting mode [ Message on the display ] [ Function and details ] To enter the number of stitches to turn the tape (elastic) C o u n t e r 0 1 feed roller in the reverse direction at the start of sewing. 0 0 0 2 The initial value is 2 stitches.
-
Page 25: Entering And Changing The Sewing Data
Entering and changing the sewing data 1. Before entry Initializing the MC device When the MC device is used for the first time, initialize the MC device first. Note It is not necessary to initialize the MC device at the start of each day. -
Page 26: Changing Pgm (Items)
Entering and changing the sewing data 3. Changing PGM (items) To change the sewing data which have been already programmed. Turn on the machine while pressing PROGRAMMING key PROGRAM PROGRAM プログラム プログラム Press FUNCTION key several times to call up Item No. - Page 27 Entering and changing the sewing data ( ( 3) ) Turn on the machine. ( ( 4) ) Press the treadle with heel to insert the tape(elastic). ( ( 5) ) Make sure the end of the tape(elastic) reaches the needle drop. In case the end of the tape(elastic) does not reach the needledrop, adjust the inserting amount of the tape(elastic) as follows.
-
Page 28: Entering And Checking The Stitch Count To Turn The Tape(Elastic) Feed Roller In The Reverse Direction
Entering and changing the sewing data 5. Entering and checking the stitch count to turn the tape (elastic) feed roller in the reverse direction This stitch count is entered in order to turn the roller in the reverse direction and remove the slack of tape/elastic at the start of sewing. Adjust the stitch count according to the characteristic of tape/elastic and/or tension of tape (elastic) on finished products. -
Page 29: Entering The Feeding Amount
Entering the feeding amount An example of entering sewing data follows. Feeding amount A Knee switch Feeding amount B Start of sewing Feeding amount A Knee switch Knee switch Feeding amount B CAUTION CAUTION The numbers of feeding amounts below are only example for entry. Enter the numbers according to your products. Press PROGRAMMING key to turn on the PROGRAMMING indicator light. -
Page 30: Sewing
Sewing Firstly, make sure the tape (elastic) is inserted properly. Then perform sewing operation by following the steps below. Turn on the machine. Call up an item (program) to be sewn. If required, perform the procedures 2 to 3 by referring PRGM ... -
Page 31: Testing Mode
When any error message comes out, check the connection of cords/air lines and the pressure of the filter regulator, and then perform the test again. If the error is still shown, contact your local Pegasus' sales office or representative. . To restart sewing, turn off the power and then turn on the... -
Page 32: Error Message
Error message If the following instructions are displayed while the MC device is being used, turn off the power and then turn on the power again. If ERROR 3 is displayed, turn off the power and initialize the MC device. (See page 23.) = ... -
Page 33: Adjusting The Ks Device (Chain Cutter)
Adjusting the KS device (chain cutter) CAUTION CAUTION Always turn off the power, unplug the machine from the outlet and then only well-qualified technicians should adjust the device. Remove the needle by referring to the illustrations. CAUTION CAUTION Be careful your hands and/or fingers are not injured by the needle point. - Page 34 Adjusting the KS device (chain cutter) Install the chain cutter on the machine so that block 7 can fit in groove 6 of the lever. Replace screw 3. Turn the machine pulley by hand until movable knife 8 is at the bottom of its stroke. Loosen screw 10 and adjust the overlap of movable knife 8 and stationary knife 9.
-
Page 35: Adjusting The Needle Thread Tension With The Thread Releaser (Sc)
Adjusting the needle thread tension with the thread releaser (SC) CAUTION CAUTION Always turn off the power and air compressor first and then only well-qualified technicians should make the following adjustment. Perform a sewing operation and check the needle thread tension. - Page 36 PEGASUS SEWING MACHINE MFG. CO., LTD. 5-7-2, Sagisu, Fukushima-ku, Osaka 553-0002, Japan. Phone :(06)6458-4739 Telefax:(06)6454-8785 December 2001 Printed in Japan The description in this INSTRUCTIONS is subject to change without notice.
Need help?
Do you have a question about the MC Series and is the answer not in the manual?
Questions and answers