Advertisement
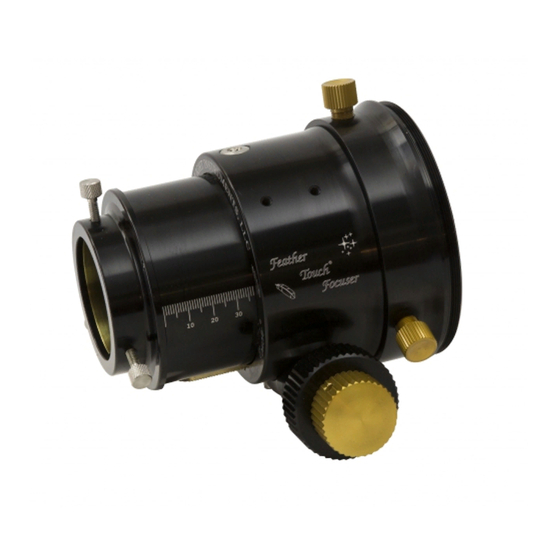
Feather Touch® Focuser Mounting Instructions
If you have purchased a focuser to be used on a Newtonian type telescope please follow the directions for attaching the focuser to the telescope tube.
1. If you are replacing an old focuser remove the focuser and check the bolt hole pattern that is in the telescope tube. Our bolt pattern is square and measures 2.75 inches on
each side. We have supplied (4) 8-32 x .75 lg Stainless Steel Socket Head Cap screws with nuts and washers. If the tube is thicker, please contact us and we can send you
some longer screws.
2. Check the opening for the draw tube. If the opening of the draw tube is less than 2 5/8
through the hole. We recommend a drum sander attachment that can be used with an electric hand drill. These are available in most hardware stores and consist of a
rubber wheel on a ¼ inch mandrel. This can be purchased in different sizes and a 1 ½ inch model will do fine. Get a few sanding belts along with this and increase the
opening as needed. Other methods may also be used but in my opinion may be more difficult.
3. If new holes are needed for the mounting screws, use the base as the template to locate the holes. The base can easily be removed by loosening the (2) 6-32 set screws
located on opposing edges of the base. A 1/16 Allen wrench will be needed. Drill (4) 3/16
4. You can now attach the focuser back onto the base by rotating the focuser to the desired position and tightening the (2) set-screws. Finger tight will be sufficient to hold
the focuser securely in place. If the focuser needs to be repositioned at any time feel free to do so. The set-screws will leave a mark on the inside of the focuser housing
but this is unavoidable and was designed this way.
5. For both flat and curved base plates, either a 1/8 inch hex key or slotted screw driver is required to adjust leveling screws.
If you have purchased a focuser to be used on a Schmidt-Cassegrain (SCT) type telescope please follow the directions for attaching the focuser to the telescope.
1. Remove any threaded collars from the end of the telescope to expose the threads that are to be used with the adapter.
2. Remove the threaded adapter from the focuser by loosening the (3) 6-32 set screws. These can be seen on the top of the adapter opposite the large thread. No need to
remove them, two turns will be enough to pull the focuser from the adapter.
3. Screw the adapter onto the threaded end of the SCT.
4. Re-attach the focuser to the threaded adapter. Finger tight will be sufficient to hold the focuser securely in place. If the focuser needs to be repositioned at any time feel
free to do so. The set-screws will leave a mark on the inside of the focuser housing but this is unavoidable and was designed this way.
For refractor type telescopes please follow the directions for
3"/ 4" CNC Focusers
1. Remove the end cap or attachments to the telescope focuser draw tube so that the threads are exposed.
2. Remove the threaded adapter from the focuser by loosening the (3) 6-32 set screws. These can be seen on the top of the adapter opposite the large thread. No need to
remove them, two turns will be enough to pull the focuser from the adapter.
3. Screw the adapter onto the threaded end of the focuser draw tube.
4. Re-attach the focuser to the threaded adapter. Finger tight will be sufficient to hold the focuser securely in place. If the focuser needs to be repositioned at any time feel
free to do so. The set-screws will leave a mark on the inside of the focuser housing but this is unavoidable and was designed this way.
Vixen
1. For Vixen tubes remove the existing focuser by removing the 3 Phillips head screws that hold the focuser to the telescope tube.
2. Remove the adapter from the focuser by loosening the (3) 6-32 set screws. These can be seen on the top of the adapter opposite the large thread. No need to remove them,
two turns will be enough to pull the focuser from the adapter.
3. Attach the adapter with the (3) supplied Stainless Steel Button Head Cap Screws. The original equipment is metric and will not fit the adapter threads. Re-attach the focuser
to the threaded adapter. Finger tight will be sufficient to hold the focuser securely in place. If the focuser needs to be repositioned at any time feel free to do so. The set-
screws will leave a mark on the inside of the focuser housing but this is unavoidable and was designed this way.
1.25" to 2" Eyepiece Adapter
If your Feather Touch® Focuser was ordered with a low profile adapter several points should be noted. Our adapter uses a slightly different design than has been customarily used. The intent of
this design was to use an adapter that has as low of a profile as possible. Normally 1 ¼ inch adapters use a flange on the end of the adapter so that there is room for a locking thumbscrew for the
eyepiece. However this extra distance that the flange takes up, brings the short focal length eyepieces further from the focal point. It also decreases the amount of in-travel for 1 ¼ inch eyepieces
where the extra in-travel is generally required. Our adapters provide a solution to these problems.
There are two thumb screws on the draw tube that are opposed at 120 degrees. If the 1 ¼ inch adapter is used you only need to tighten one of these thumb screws. There are two half moon cuts
on the face of the draw tube, these are used to position the adapter so that the same thumb screw that is normally used for 2 inch eyepieces can be used with the 1 ¼ inch adapter. There is a
brass guide in the adapter and a transfer plug. This plug is pushed in by the thumb screw and in-turn presses onto the brass collar of the 1 ¼ inch adapter. In order for you to capture the position of
this transfer plug a key needed to be provided on the 1 ¼ inch adapter. That's the reason for the two half moons. The screw on the face of the adapter will key into the half moon thereby
orientating the adapter so that the transfer plug is in line. The 1 ¼ adapter should always be keyed into a position opposite the thumb screw that is to be used. They can of course be switched for
left handed use.
U n c o m p r o m i s i n g Q u a l i t y a n d C r a f t s m a n s h i p f o r t h e D i s c r i m i n a t i n g A m a t e u r A s t r o n o m e r
FTF20FocuserInstallationWarrantySheetV1.0.odt
N
N
EWTONIAN
EWTONIAN
S
S
CHMIDT
CHMIDT
R
A
R
A
EFRACTOR
EFRACTOR
PPLICATIONS
PPLICATIONS
attaching
A
A
PPLICATIONS
PPLICATIONS
th
inches you will need to increase the diameter so that the drawtube will enter
th
holes and attach the base to the telescope with the supplied hardware.
-C
A
-C
A
ASSEGRAIN
ASSEGRAIN
PPLICATIONS
PPLICATIONS
: (V
3"/ 4" CNC F
: (V
3"/ 4" CNC F
IXEN
IXEN
AND
AND
the focuser to the telescope.
H
T
H
T
INTS
AND
IPS
INTS
AND
IPS
S t a r l i g h t I n s t r u m e n t s . c o m
Starlight Instruments, LLC
Starlight Instruments, LLC
2380 E. Cardinal Drive, Columbia City, Indiana 46725 USA
t: 260.244.0020 e:
support@starlightinstruments.com
:
:
:
:
)
)
OCUSERS
OCUSERS
web: StarlightInstruments.com
page 1 of 2
Advertisement
Table of Contents

Related Manuals for Starlight Instruments Feather Touch

Summary of Contents for Starlight Instruments Feather Touch
- Page 1 1.25” to 2” Eyepiece Adapter If your Feather Touch® Focuser was ordered with a low profile adapter several points should be noted. Our adapter uses a slightly different design than has been customarily used. The intent of this design was to use an adapter that has as low of a profile as possible. Normally 1 ¼ inch adapters use a flange on the end of the adapter so that there is room for a locking thumbscrew for the eyepiece.
- Page 2 Cleaning Your Feather Touch® Focuser needs very little maintenance. An occasional cleaning of the rails and friction plate can be done using a cotton swab to remove dirt from their surfaces. The bearings can also be cleaned by holding the cotton swab lightly between the rail and the bearing while pushing the draw tube in and out. If too much pressure is used on the cotton swab some of the fibers may get caught between these surfaces.
Need help?
Do you have a question about the Feather Touch and is the answer not in the manual?
Questions and answers