Table of Contents
Advertisement
Quick Links
EUROSTER Q7TXRX
Programmable room thermostat for all types of heating and air-conditioning devices.
MANUFACTURER: P.H.P.U. AS, Chumiętki 4, 63-840 Krobia, Poland
In
order
to
take
this installation and operation manual carefully.
I. SAFETY RULES AND MAINTENANCE
DANGER!
•
Please read this manual carefully prior to installing the thermostat.
•
Voltages hazardous to life may be present on the thermostat output cables; therefore
only qualified technicians may install the thermostat.
•
Do not install any thermostats showing signs of mechanical damage.
1. THERMOSTAT MAINTENANCE
Do not use the thermostat in rooms with excessive humidity, significant dustiness or with
presence of caustic or flammable vapors.
If necessary wipe it carefully with a damp cloth.
Do not use strong detergents, solvents or any other cleaning liquids or powders. Avoid
contact with water or other liquids.
Do not lubricate, grease or apply any other preservatives.
Protect against high and freezing temperatures.
Movable elements should operate easily and do not need any force to be applied on them
under any circumstances.
In case any problems occur with proper operation of the thermostat, please contact your
technician or Euroster service.
2. BATTERIES
Low batteries indication
If the icon
appears on the display, it is necessary to replace the batteries.
It is recommended to replace the batteries with new ones prior to each heating season.
Use alkaline batteries only.
– INSTALLATION AND OPERATION MANUAL
GW
EUROSTER Q7TXRX
full
advantage
version: 27.11.2014
GW
of
the
thermostat
capabilities
please
1
read
Advertisement
Table of Contents

Subscribe to Our Youtube Channel
Related Manuals for EUROSTER Q7TXRXGW


Summary of Contents for EUROSTER Q7TXRXGW
- Page 1 Movable elements should operate easily and do not need any force to be applied on them under any circumstances. In case any problems occur with proper operation of the thermostat, please contact your technician or Euroster service. 2. BATTERIES Low batteries indication If the icon appears on the display, it is necessary to replace the batteries.
-
Page 2: User Functions
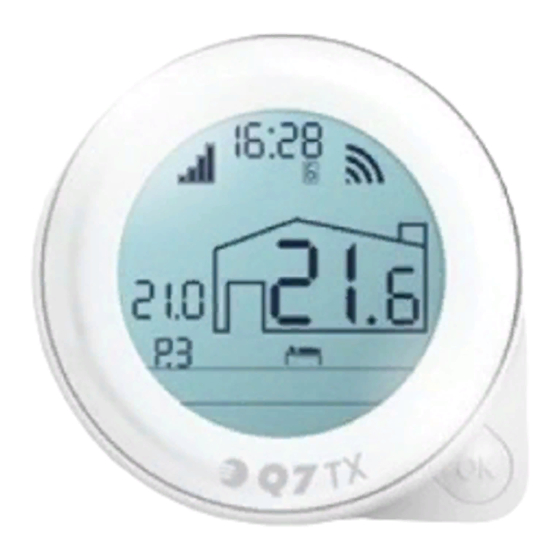
EUROSTER Q7TXRX – INSTALLATION AND OPERATION MANUAL Do not use rechargeable batteries because their voltage is 1.2 V, which does not ensure the proper operation of the thermostat. Replacement of batteries The battery compartment cover is on the bottom of the thermostat. - Page 3 EUROSTER Q7TXRX – INSTALLATION AND OPERATION MANUAL Standard appearance of the operating window: Icon of the radio communication – the range of the device operation The range icon informs of a proper communication between the thermostat and the receiver and of the strength of the signal between them. If at least one unit of the signal icon is full, then the communication is proper.
- Page 4 The orders sent from the thermostat are not taken into account. The heating / cooling device is switched on permanently until the switch is set to "0" position. ATTENTION: Do not tamper the buttons neither make any modifications in the receiver settings prior to consulting your technician or Euroster service.
-
Page 5: Basic Settings
EUROSTER Q7TXRX – INSTALLATION AND OPERATION MANUAL If several thermostats cooperate with one RX receiver, then the receiver display will alternately show the information concerning all of the thermostats. First of all, digit 1 (designating thermostat number one) is displayed followed by the temperature measured with thermostat number one, then digit 2 is visible followed by the temperature measured with thermostat number two, etc. - Page 6 EUROSTER Q7TXRX – INSTALLATION AND OPERATION MANUAL Select digits of the current date and hour, and confirm each of them subsequently. The following is set respectively: • last two digits of year • month • • hour • minutes. After confirming minutes, the thermostat updates the entered date and the service menu may be exited or other functions may be selected.
- Page 7 EUROSTER Q7TXRX – INSTALLATION AND OPERATION MANUAL In order to activate heating in advance, enter SERVICE (3) menu / HEATING IN ADVANCE (item 307), select: YES, then option: COMPLETE or LIMITED and confirm. For a full description see: section III. Service functions.
- Page 8 EUROSTER Q7TXRX – INSTALLATION AND OPERATION MANUAL In order to set up a duration value, immediately after selecting one of the three temperatures turn the knob (without pressing OK) and set the duration hours. Confirm. Set the duration minutes. Confirm.
- Page 9 EUROSTER Q7TXRX – INSTALLATION AND OPERATION MANUAL • range starting hour and minutes, • range ending hour and minutes, • icon (if no icon is visible, turn the knob counterclockwise). After confirming the icon, P with a proper number is displayed again. The thermostat will automatically arrange the ranges in the proper sequence;...
- Page 10 EUROSTER Q7TXRX – INSTALLATION AND OPERATION MANUAL In order to set a vacation temperature, enter MODES (item 1) and take the following steps subsequently: • Select VACATION (item 101) – use the knob to set YES and confirm; • Set year of starting vacation period (START: YEAR) and confirm;...
-
Page 11: Service Functions
EUROSTER Q7TXRX – INSTALLATION AND OPERATION MANUAL III. SERVICE FUNCTIONS SERVICE menu (item 3) enables previewing and altering advanced functions of the thermostat. Settings introduced by a technician at the time of the thermostat start-up are enough for the proper control of room temperatures without the need to correct any of the options. - Page 12 EUROSTER Q7TXRX – INSTALLATION AND OPERATION MANUAL • PWM CYCLES – allowable number of cycles during one hour is from 2 to 20. An hour divided by the number of cycles gives duration of one full cycle. • MIN. PWM TIME – minimum duration of one cycle: from 1 to 10 minutes. In case of using devices that require a minimum start-up time or an operation lasting not less than a specific period, take it into account and adjust this parameter properly.
- Page 13 EUROSTER Q7TXRX – INSTALLATION AND OPERATION MANUAL • changing temperature only at the beginning of a particular range; • setting the same temperature but setting it earlier or later in order to change duration of a given period; • changing the temperature and starting time of a range with the new temperature.
- Page 14 EUROSTER Q7TXRX – INSTALLATION AND OPERATION MANUAL Switching the thermostat off switches off this protection as well. 9. SENSOR CORRECTION (item 309) – modification of temperature readings and display by a preset value. It is recommended to leave this value unchanged, thus set to 0.
- Page 15 RESET (item 1) – using it deletes all settings and restores the thermostat factory settings, including the installation settings and default interlock code. It is recommended to consult a technician or EUROSTER technical service prior to resetting the device. Reset is implemented with a separate code: 7153, irrespective of the code set in the service menu.
- Page 16 EUROSTER Q7TXRX – INSTALLATION AND OPERATION MANUAL b. NUMBER OF TX – selecting from 1 to 6 determines how many thermostats will operate with one RX module Setting a value of 1 enables operation with several RX modules. NUMBER OF RX option is available.
- Page 17 EUROSTER Q7TXRX – INSTALLATION AND OPERATION MANUAL It is possible to connect two receivers, one for the heating and the other for the air- conditioning device (see III. Service functions point 12). The operation with several TX thermostats is possible only when value of 1 is selected.
-
Page 18: Installation And Connection
EUROSTER Q7TXRX – INSTALLATION AND OPERATION MANUAL After transferring the technician's own settings, it is enough to pair the thermostat (with the newly introduced settings) with the new receiver. 3. RX RECEIVER SETTINGS – "PROG" FUNCTION To modify the settings, hold the left button for over 3 s. "Prog", NO and heating icon will be displayed. - Page 19 1. Electrical connection block 2. Output cable, using NO (normally open) mode 3. Euroster RXGW 4. Euroster Q7TX placed in any room In arrangement with a gas boiler 1. Electrical connection block 2. Output cable, using NO (normally open) mode 3.
- Page 20 EUROSTER Q7TXRX – INSTALLATION AND OPERATION MANUAL In arrangement with a central heating pump 1. CH boiler 2. CH pump 3. Heat consumer – radiator 4. Electrical connection block 5. Euroster RXGW 6. Euroster Q7TX 7. Output cable DIMENSIONS...
-
Page 21: Technical Data
Thermostat weight without batteries: thermostat without batteries – 114 g; receiver – 359 g Warranty period: 2 years Dimensions (W/H/D) mm: the thermostat – 82/82/35.6; the receiver – 69/145/71 6. KIT CONTENTS • Euroster Q7TX temperature thermostat • RXGW receiver • AA batteries •... - Page 22 EUROSTER Q7TXRX – INSTALLATION AND OPERATION MANUAL WARRANTY CERTIFICATE EUROSTER Q7TXRX GW thermostat Warranty terms: 1. The warranty is valid for 24 months from the device sale date. 2. Claimed thermostat together with this warranty certificate must be supplied to the seller.
Need help?
Do you have a question about the Q7TXRXGW and is the answer not in the manual?
Questions and answers