
Subscribe to Our Youtube Channel
Related Manuals for ICONE ALLROAD


Summary of Contents for ICONE ALLROAD
- Page 1 ALLROAD MANUALE DELLE ISTRUZIONI PER L’USO INSTRUCTION MANUAL FOR USE www.iconeway.com...
- Page 3 Locali. È possibile circolare con la Bicicletta a Pedalata Assistita sulle strade e sulle vie pubbliche solo con l’aggiunta degli equipaggiamenti prescritti dalla legge nel Paese di utilizzo (consultare il Codice della Strada). Le Biciclette a Pedalata Assistita ICONE sono conformi al disposto dell’Art. 50 del Nuovo Codice della Strada: I velocipedi sono veicoli con due o più...
- Page 4 11. Parametri tecnici 4. Piegatura e metodi di utilizzo 12. Informazioni sul servizio assistenza 5. Soluzioni tecniche “fai da te” 13. Certificato della e-Bike ICONE 6. Ciclocomputer 14. Scheda di garanzia 7. Ricarica e protezione della batteria 15. Verbale di consegna 8.
- Page 5 Per potervi garantire la massima sicurezza quando usate questo prodotto, vi invitiamo a leggere con attenzione il presente manuale delle istruzioni. Con l’acquisto di questa e-Bike ICONE avete scelto un prodotto di qualità. La vostra nuova e-Bike ICONE è stata realizzata con parti sviluppate e prodotte con precisione.
- Page 6 Aspetto e specifiche sono soggetti a modifiche senza preavviso allo scopo di migliorare costantemente la qualità del prodotto. Si prega di osservare prima di utilizzare la e-Bike ICONE, gli avvertimenti e precauzioni contenuti nel presente manuale. Se prestate la bicicletta elettrica ad altri per l’uso, lasciate che gli utenti leggano attentamente le istruzioni, al fine di minimizzare al massimo la possibilità...
- Page 7 SICUREZZA E COMPORTAMENTO Il conducente deve avere almeno 16 anni. Il conducente deve essere in grado di andare in bicicletta, ossia deve disporre delle conoscenze di base relative all’impiego di una bici ed essere dotato del senso dell’equilibrio necessario per guidare e controllare una bicicletta a Pedalata Assistita. Il conducente, da fermo, deve essere in grado di salire e scendere con sicurezza.
- Page 8 Evitare l’esposizione al sole forte e alla pioggia, evitare luoghi dove la temperatura è troppo elevata o dove è presente gas corrosivo. Questo al fine di evitare danni alla superficie e corrosione chimica della vernice e dei componenti elettrici che possono a loro volta causare guasti di funzionamento e incidenti.
- Page 9 2. Controlli prima della prima escursione CONTROLLARE BENE LO STATO DEL VEICOLO: • Controllare attentamente i freni, le ruote ed i pneumatici, la connessione pieghevole e le parti di smontaggio rapido, per assicurare che il veicolo sia in buone condizioni. •...
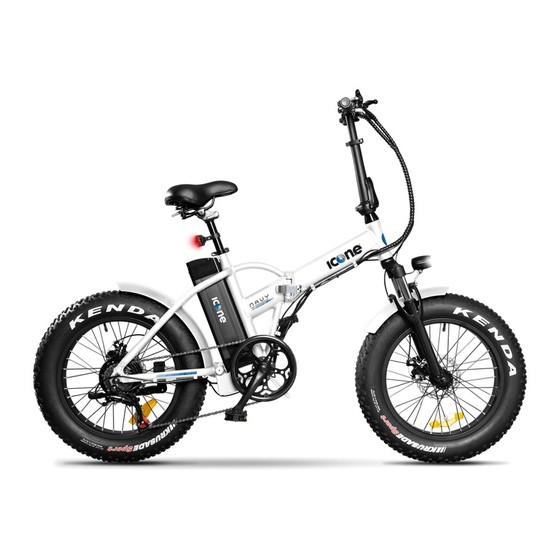
- Page 10 ALLROAD Telaio: Sella Ciclocomputer Reggisella Manubrio Fanale posteriore Leva del cambio Chiusura del reggisella Leva del Freno Batteria Campanello Parafango posteriore Regolazione altezza manubrio Motore Maniglia piegatura manubrio Cambio Fanale anteriore Deragliatore Forcella ammortizzata Catena Parafango anteriore Pedivella Pneumatico Pedale...
- Page 11 Maniglia di piegatura telaio Blocco di sicurezza Disco del freno anteriore Disco del freno posteriore Cavalletto Catarifrangente...
- Page 12 3. Alla guida ACCENSIONE: Accendere l’interruttore, il display si accenderà quando connesso. EPAC/PEDELEC: Proprio come le normali biciclette, posizionare la bicicletta e salire in sella, posizionare un piede sul pedale e cominciare a pedalare dopo che tutto sia OK. Durante la pedalata una volta raggiunta una velocita’...
- Page 13 4. Piegatura e metodi di utilizzo METODO DI PIEGATURA: • Togliere la maniglia di sollevamento. • Rilasciare l’anello della clip di sicurezza, • Aprire la maniglia di piegatura e piegare l’estremità superiore in basso • Regolare la posizione. Il metodo di piegatura del telaio è lo stesso. Aggiungete spesso olio lubrificante al dispositivo di piegatura del telaio.
- Page 14 ALLROAD Manubrio: Ciclocomputer Display cambio Campanello Leva del cambio su Leva del freno anteriore Leva del cambio giù Manubrio Leva del freno posteriore...
- Page 15 Totale chilometri Tempo di Valori numerici viaggio Sul display potrebbero comparire immagini e/o icone relative a funzioni non supportate dal prodotto acquistato. Pertanto, si prega di fare sempre riferimento al presente manuale. ATTENZIONE! Nell’uso del display, prestare attenzione alla sicurezza, non collegare il display quando l’alimentazione è...
- Page 16 Modalità: se spenta indica che la velocità visualizzata sul display è la velocità corrente, AVG indica che la velocità indicata è la velocità media, MAX indica che la velocità indicata è la velocità massima. Velocità: quando il display è acceso, mostra la velocità. Errore: questa icona lampeggia in caso di malfunzionamento del sistema e non verrà...
- Page 17 Definizione dei tasti: Tasto sù Tasto giù Modalità On/Off...
- Page 18 Accensione / Spegnimento Tenere premuto il pulsante di accensione per 1 secondo per accendere/spegnere il display. Se nessuna operazione viene effettuata e la velocità è 0 per 5 minuti, il display si spegne automaticamente. Selezione Livello Pedalata Assistita Premere i pulsanti + / - per modificare il livello di assistenza. Sono disponibili 5 modalità.
- Page 19 Cambiare visualizzazione display Le informazioni cambiano da velocità media, velocità massima, chilometri di viaggio, chilometraggio totale e tempo di viaggio premendo brevemente M quando il display è acceso. Mostra: • Velocità media (AVG) > Velocità massima (MAX). • Chilometri di viaggio (TRIP) > Chilometraggio totale (ODO) > Tempo di viaggio (TIME). Se non viene eseguita alcuna operazione per 5 secondi, il display tornerà...
- Page 20 Accensione / Spegnimento Luci Tenere premuto il pulsante per 1 secondo per accendere/spegnere il faro anteriore. Il motore non funziona quando la tensione della batteria è bassa, il display può comunque tenere il faro acceso per un pò mentre utilizzate la e-bike. Interfaccia mostrata come di seguito: Modalità...
- Page 21 Percentuale di carica Durante la guida, il display mostrerà il valore della carica corrente e 5 livelli per indicare il livello di potenza. 0-5 livello da basso ad alto. Il livello 0 significa nessuna potenza di assistenza. Livello 0 Livello 1 Livello 2 Livello 3 Livello 4...
- Page 22 Reset dei dati Premere il pulsante + / - per cambiare no o sì. Interfaccia mostrata come di seguito: Impostazione unità Premere il pulsante + / - per cambiare tra Metrico (Km/h) e Imperiale (MPH). Interfaccia mostrata come di seguito:...
- Page 23 Luminosità faro Premere il pulsante + / - per modificare la luminosità del faro, da 1 a 5. Interfaccia mostrata come di seguito: Spegnimento automatico Premere il pulsante + / - per modificare il tempo di spegnimento automatico, da 0 a 15. Il numero rappresenta il tempo (minuti) per lo spegnimento, OFF significa disabilitare la funzione di spegnimento automatico, il valore predefinito è...
- Page 24 Impostazioni diametro ruota Premere + / - per modificare l’impostazione della ruota, da 16 a 29. Il numero rappresenta il diametro, in pollici, della ruota. Impostare 22 Interfaccia mostrata come di seguito: Impostazioni del voltaggio Premere + / - per alternare tra 36V / 48V / UbE. UbE significa impostazione della tensione definita dall’utente, questo parametro può...
- Page 25 Password Premi il pulsante M per accedere al menu delle impostazioni avanzate di fabbrica (menù non disponibile). Bypassare la password e modificare le impostazioni di fabbrica comporta il decadimento della garanzia. Interfaccia mostrata come di seguito: Codici di Errore Quando c’è un guasto, l’icona appare sullo schermo e mostra il codice di errore. Interfaccia mostrata come di seguito: Tabella dei codici di errore: CODICE ERRORE...
- Page 26 7. Ricarica e protezione della batteria Usare il caricabatterie che corrisponde alla vostra e-Bike (mai usare un caricabatterie di un differente modello). Prima della ricarica, impostare l’interruttore su OFF e togliere la chiave. Tenere il caricabatterie in un luogo asciutto e ventilato quando non in funzione. Il caricabatterie è...
- Page 27 Potete inoltre rimuovere la batteria dalla e-bike e ricaricarla. La batteria può essere rimossa ripiegando la bici e accedendo al vano batteria situato nella parte centrale del display liberando la stessa per mezzo della chiave in dotazione. Terminata la ricarica riposizionate la batteria inserendola nel suo alloggio e poi bloccate nuovamente la batteria con la chiave.
- Page 28 ALLROAD Batteria: Maniglia Presa di ricarica Serratura e blocco della batteria Binario di aggancio batteria Scocca batteria...
- Page 29 1. La bici deve essere caricata dal proprio carica batteria specifico. Il carica batteria non standard o non omologato può causare la perdita della durata della batteria o il guasto della batteria. 2. Metodo di rilevamento della batteria: premere il pulsante di stato della batteria per conoscere il livello corrente della batteria attraverso il colore dell’indicatore di stato della batteria.
- Page 30 ALLROAD Carica batteria: Case del carica batteria Spina di alimentazione Indicatore di carica Spina di ricarica batteria È necessario verificare attentamente se la tensione d’ingresso nominale del carica batteria è coerente con la tensione di rete. La batteria può essere caricata direttamente sulla bici o rimossa dalla bici e portata all’interno e in altri luoghi appropriati per la ricarica.
- Page 31 Istruzioni del carica batteria 1. Seguire le istruzioni di ricarica accuratamente. In caso contrario, tutte le conseguenze devono essere assunte dall’utente in modo indipendente. 2. Usare solo il carica batteria originale. 3. Prestare attenzione al tipo e alla tensione applicabile della batteria e del carica batteria. L’uso misto è...
- Page 32 Risoluzione dei problemi comuni della e-bike GUASTO CAUSA GUASTO RISOLUZIONE DEI PROBLEMI Regolazione della 1. La tensione della batteria è 1. Caricare la batteria completamente. velocità fallisce o la troppo bassa. massima la velocità è bassa Mozzo del motore 1. Il cablaggio della batteria è 1.
- Page 33 8. Manutenzione e riparazione Le ruote anteriore e posteriore del veicolo devono essere al centro della forcella anteriore e del telaio. La tensione di ciascun raggio del cerchio deve essere simile mantenendo il cerchione di forma normale, senza rottura o flessioni. Il bordo della bicicletta deve essere liscio, trasportare oggetti piatti frontalmente aumenta la resistenza aerodinamica alla guida e quindi il pericolo durante la guida.
- Page 34 9. Questioni che richiedono attenzione Ogni volta che si guida la bicicletta, è necessario controllare gli spazi di frenata, la potenza e l’efficienza del freno. Attenzione: se il freno funziona in maniera anomala, il motore può smettere di funzionare. • Rispettare le leggi ed i regolamenti sul traffico, non andare mai in retromarcia se non in condizione di assoluta sicurezza.
- Page 35 10. Manutenzione ATTENZIONE! Prima di effettuare qualsiasi tipo di manutenzione spegnere e rimuovere la chiave ed effettuare pedalate fisiche e controlli di sicurezza come una normale bicicletta. Per i poli della batteria, nell’eventualità siano sporchi, pulire i poli per non ridurre l’efficienza della batteria o bruciare i poli stessi.
- Page 36 11. Parametri tecnici Velocità Max 25 km/h Ruote 20” KENDA Freni a disco meccanico ant. / post. Forcella ammortizzata Display LCD Cambio SHIMANO a 6 velocità Luci a LED azionabili dal display Sella Comfort Manubrio pieghevole e regolabile in altezza Sella ribaltabile per estrazione batteria Motore 250W - 36V Brushless Portata massima 115 kg...
- Page 37 12. Informazioni sul servizio assistenza Gli utenti devono operare secondo questo manuale del prodotto, in caso motivo di difetti di produzione, secondo le disposizioni della legge, l’azienda soddisfa i suoi obblighi di garanzia. Scaduto il periodo di garanzia sulle componenti principali, tutti gli interventi saranno a pagamento.
- Page 38 Leva del freno freno ruota anteriore freno ruota anteriore attribuzione freno ruota posteriore freno ruota posteriore delle leve Timbro e firma del rivenditore specializzato ICONE 14. Scheda di garanzia Cliente Cognome, Nome Indirizzo CAP / Località Tel / Fax E-mail Modello La presente scheda è...
- Page 39 15. Verbale di consegna La consegna al cliente della e-Bike ICONE di cui sopra effettuata dopo il montaggio finale in condizione di marcia e la verifica o il controllo del regolare funzionamento dei punti indicati di seguito (le ulteriori operazioni necessarie sono riportate tra parentesi).
- Page 40 NOTE Fotografa il codice QR con uno smartphone o un tablet e scopri il mondo ICONE. Costi di connessione in base al contratto di telefonia mobile.
- Page 41 Bicycle on roads and public roads only with the addition of the equipment prescribed by law in the country of use (see the Highway Code). ICONE Assisted Pedal Bicycles comply with the provisions of Art. 50 of the New Code of the Street:: Velocipedes are vehicles with two or more wheels operating exclusively with muscular propulsion, by means of pedals, operated by the people on the vehicle;...
- Page 42 8. Maintenance and repair WARNING!! DANGER!! Important information about the Icone Bicycle The addition of incorrect or designed accessories and components for this e-Bike can cause damage to the latter and compromise the safety of its operation. This can lead to dangerous driving situations, falls and accidents.
- Page 43 Your new ICONE e-Bike has been made with parts developed and produced with precision. In this manual you will find a series of tips about the use of the ICONE e-Bike as well as important information on its construction characteristics, care and maintenance.
- Page 44 Appearance and specifications are subject to change without notice in order to constantly improve product quality. Before using the ICONE e-Bike, please observe the warnings and precautions contained in this manual. If you lend the electric bicycle to others for use, let users read the instructions carefully, in order to minimize the possibility of accidents.
- Page 45 SAFETY AND BEHAVIOR The driver must be at least 16 years old. The driver must be able to ride a bicycle, that is, he must have the basic knowledge relating to the use of a bike and be equipped with the sense of balance necessary to ride and control a pedal-assisted bicycle.
- Page 46 Avoid exposure to strong sun and rain, avoid places where the temperature is too high or where corrosive gas is present. This is to avoid damage to the surface and chemical corrosion of the paint and electrical components which can in turn cause malfunctions and accidents. The driver must be a person capable of understanding the danger.
- Page 47 2. Check before the first excursion CHECK THE VEHICLE STATUS WELL: • Check the brakes, wheels and tires carefully, the folding connection and the quick disassembly parts, to ensure that the vehicle is in good condition. • Check that the battery charge is sufficient to support the mileage you intend to travel. •...
- Page 48 ALLROAD Frame: Saddle Cycle Computer Seat Post Handlebar Rear light Gear shift lever Closing the seatpost Brake lever Battery Bell Rear fender Handlebar height adjustment Engine Handlebar folding handle Gear shift Front light Derailleur Suspension fork Chain Front fender Crank...
- Page 49 Frame folding handle Security lock Front brake disc Rear brake disc Easel Reflector...
- Page 50 3. Driving TURNING ON: Turn on the switch, the display will turn on when connected. EPAC / PEDELEC: Just like normal bicycles, place the bicycle and get on the saddle, place one foot on the pedal and start pedaling after everything is OK. During pedaling, once a set speed has been reached, the motor will automatically activate and start operating and making your e-Bike move.
- Page 51 4. Folding and methods of use METODO DI PIEGATURA: • Togliere la maniglia di sollevamento. • Rilasciare l’anello della clip di sicurezza, • Aprire la maniglia di piegatura e piegare l’estremità superiore in basso • Regolare la posizione. Il metodo di piegatura del telaio è lo stesso. Aggiungete spesso olio lubrificante al dispositivo di piegatura del telaio.
- Page 52 ALLROAD Manubrio: Cycle computer Display gear shift Bell Gear lever up Front brake lever Gear lever down Handlebar Rear brake lever...
- Page 53 6. Cycle computer Basic interface: Light Battery indicator Mode Unit speed Pedal assisted level Speed Error Walk assist Travel Kilometers Unit Total Kilometers Riding time Numeric values Images and / or icons relating to functions not supported by the purchased product may appear on the display.
- Page 54 Mode: if it’s off, it indicates that the speed shown on the display is the current speed, AVG indicates that the indicated speed is the average speed, MAX indicates that the indicated speed is the maximum speed. Speed: when the display is on, it shows the speed. Error: this icon flashes in the event of a system malfunction and will not be displayed during normal use.
- Page 55 Definition of the buttons: Down Mode On/Off...
- Page 56 Power on/off Press and hold the power button for 1 second to turn the display on/off. If no operation is performed and the speed is 0 for 5 minutes, the display turns off automatically. Assisted Pedal Level Selection Press the buttons to change the assistance level.
- Page 57 Change display view The information changes from average speed, maximum speed, travel kilometers, total mileage and travel time by briefly pressing M when the display is on. Exhibition: • Average speed (AVG)> Maximum speed (MAX). • Travel kilometers (TRIP)> Total mileage (ODO)> Travel time (TIME). If no operation is performed for 5 seconds, the display will automatically return to the speed display.
- Page 58 Lights on/off Press and hold the + button for 1 second to turn the headlight on / off. The engine does not work when the battery voltage is low, the display can still keep the hea- dlight on for a while while using the e-bike. Interface shown as below: Walk assist mode Press and hold -, the bike has entered Walk Assist mode.
- Page 59 Percentage of charge While riding, the display will show the current charge value and 5 levels to indicate the power level. 0-5 level from low to high. Level 0 means no assist power. Level 0 Level 1 Level 2 Level 3 Level 4 Level 5 Setting interface...
- Page 60 Reset data Press the + / - button to change no or yes. Interface shown as below: Unit setting Press the + / - button to switch between Metric (Km/h) and Imperial (MPH). Interface shown as below:...
- Page 61 Light brightness Press the + / - button to change the brightness of the headlight, from 1 to 5. Interface shown as below: Auto off Press the + / - button to change the automatic switch-off time, from 0 to 15. The number re- presents the time (minutes) for the switch-off, OFF means to disable the automatic switch-off function, the default value is 5 minutes.
- Page 62 Wheel diameter settings Press + / - to change the wheel setting, from 16 to 29. The number represents the diameter, in inches, of the wheel. Set 22 Interface shown as below: Voltage settings Press + / - to switch between 36V / 48V / UbE. UbE means setting the voltage defined by the user, this parameter can be set via computer.
- Page 63 Password Press the M button to access the advanced factory settings menu (menu not available). Bypassing the password and changing the factory settings will void the warranty. Interface shown as below: Error codes When there is a failure, the icon appears on the screen and displays the error code. Interface shown as below: Error code table: ERROR CODE...
- Page 64 7. Charging and protecting the battery Use the charger that corresponds to your e-Bike (never use a charger of a different model). Before recharging, set the switch to OFF and remove the key. Keep the charger in a dry and ventilated place when not in use.
- Page 65 You can also remove the battery from the e-bike and recharge it. The battery can be removed by folding the bike and accessing the battery compartment located in the central part of the display, releasing it using the key supplied. After charging, replace the battery by inserting it in its housing and then lock the battery again with the key.
- Page 66 ALLROAD Battery: Handle Charging socket Battery lock and block Battery docking track Battery case...
- Page 67 1. The bike must be charged by its specific battery charger. Charging a not standard or not approved battery can cause loss of battery life or battery failure. 2. Battery detection method: press the battery status button to find out the battery current level through the color of the battery status indicator.
- Page 68 ALLROAD Charger: Charger case Power plug Charge gauge Battery charging plug It is necessary to carefully check whether the nominal input voltage of the battery charger is consistent with the mains voltage. The battery can be charged directly on the bike or removed from the bike and taken inside and in other appropriate places for recharging.
- Page 69 Battery charger instructions 1. Follow the charging instructions carefully. Otherwise, all the consequences must be assumed by the user independently. 2. Use only the original battery charger. 3. Pay attention to the type and applicable voltage of the battery and charger. Mixed use is strictly prohibited.
- Page 70 Solving common e-bike problems POSSIBLE CAUSES TROUBLESHOOTING TROUBLE Speed adjustment 1. The battery voltage is too low. 1. Charge the battery completely. fails or the maximum speed is low Engine hub does not 1. The battery harness is loose. 1. Repair and connect again. work after ignition 2.
- Page 71 8. Maintenance and repair The front and rear wheels of the vehicle must be in the center of the front fork and chassis. The tension of each radius of the rim must be similar, keeping the rim of normal shape, without breaking or bending.
- Page 72 9. Issues requiring attention Whenever you ride your bicycle, you need to check the braking distances, the power and efficiency of the brake. Warning: if the brake works abnormally, the engine can stop working. • Respect traffic laws and regulations, never go in reverse unless in absolute safety. •...
- Page 73 10. Maintenance WARNING! Before carrying out any type of maintenance, turn off and remove the key and perform physical pedaling and safety checks like a normal bicycle. For the battery poles, if they are dirty, clean the poles in order not to reduce the efficiency of the battery or burn the poles themselves.
- Page 74 11. Technical parameters Max speed 25 km/h Wheels 20” KENDA Mechanical disc brake front / rear Suspended fork LCD display Gear SHIMANO 6 speed LED lights activated from the display Comfort seat Foldable and height adjustable handlebar Folding saddle for battery extraction Motor 250W - 36V Brushless Maximum load 115 kg Sidestand...
- Page 75 In the event of a defect, the following must be provided: complete packaging, product, all accessories attached, invoice. THIS MANUAL CONTAINS IMPORTANT SAFETY AND PERFORMANCE INDICATIONS. IT IS RECOMMENDED TO READ CAREFULLY BEFORE USING THE ICONE E-BIKE, PAYING SPECIAL ATTENTION TO THE WARNINGS AND PRECAUTIONS TO BE ADOPTED IN ITS MANAGEMENT.
- Page 76 Right lever Brake front wheel brake front wheel brake lever assignment rear wheel brake rear wheel brake Stamp and signature of the ICONE specialist dealer 14. Warranty card Customer Surname, Name Address Postcode / Locality Tel / Fax E-mail Model...
- Page 77 15. Delivery report The delivery to the customer of the ICONE e-Bike mentioned above carried out after the final assembly in running condition and the verification or control of the regular operation of the points indicated below (further necessary operations are shown in parentheses).
- Page 78 NOTES Photograph the QR code with a smartphone or tablet and discover the ICONE world. Connection costs based on the mobile phone contract.
- Page 80 #iconeway www.iconeway.com © 2020 ICONE è un marchio registrato. Tutti i diritti sono riservati.
Need help?
Do you have a question about the ALLROAD and is the answer not in the manual?
Questions and answers