
Related Manuals for Lumag MD500E


Summary of Contents for Lumag MD500E
- Page 1 Distribution Limited Mini Dumper Operator’s Manual MD500E FOR YOUR SAFETY READ AND UNDERSTAND THE ENTIRE MANUAL BEFORE OPERATING THIS MACHINE...
- Page 3 For the warranty to be valid the Warranty Registration Form must be completed and returned to Lumag Distribution Limited within 14 days of the purchase, together with a copy of the purchase invoice. We will use your email to confirm that we have received the completed Warranty Registration Form and contact you about any errors or omissions on the form.
- Page 5 Clutch & Steering Handles Check Function 1 – First service only, 2 = Should be carried out by your Lumag Dealer, 3 = May need to be done more often in dusty areas & 4 = Replace paper element only...
-
Page 10: Table Of Contents
TABLE OF CONTENTS Table of contents-------------------------------------------------------------------------------------------- Congratulations on your purchase-------------------------------------------------------------------------- Safety guidelines and safety information------------------------------------------------------------------- Contents supplied-------------------------------------------------------------------------------------------- 5 Assembly----------------------------------------------------------------------------------------------------- Know your mini dumper------------------------------------------------------------------------------------ Operations--------------------------------------------------------------------------------------------------- Maintenance------------------------------------------------------------------------------------------------- 11 Storage----------------------------------------------------------------------------------------------------- Trouble shooting------------------------------------------------------------------------------------------- Parts schedule--------------------------------------------------------------------------------------------- CONGRATULATIONS AND THANK YOU FOR PURCHASING OUR NEW MODEL OF MINI TRANSPORTER. -
Page 11: Safety Guidelines And Safety Information
Your machine is a piece of power equipment and needs to be used with the care and caution required of all power equipment & tools.Never let an adult,child or pet ride in your machine due to the risk of possible harm or injury. UNDER NO CIRCUMSTANCES allow your young children 16 years of age or younger to operate the machine.Youth 16-18 years of age should ONLY be allowed to use this machine with adult supervision.Failure to use caution while operating the machine could cause injury to others and damage to... - Page 12 Never allow people,children or pets to ride in your machine.Doing so may cause injury or harm to them. Never modify the electrical system.Alterations may cause serious injury and could ruin or permanently damage the components.Use of your machine components in any other products or applications could cause overhearing,fire or explosion resulting in harm,damage or injury to others of property.
- Page 13 Never touch the drive motor of axels after prolonged machine use.It is normal for the drive components to get warm to the touch,even not,after prolonged use.Failure to remember this can result in injury. Never operate your machine or allow others to operate it while under the influence of drugs or alcohol.
-
Page 14: Contents Supplied
CONTENTS SUPPLIED The machine comes partially assembled and is shipped in carefully packed package. After all the parts have been removed from the package, you should have: 1.Main Frame 2.Electrical box 3.Handle bar 4.Tool box 5.Wheels 6.Universal wheels ASSEMBLY 1.Mount the universal wheels using the φ20x300 shaft and separately x2 washer φ16 and bolt M16 . - Page 15 4.Mount the electrical box using x4 bolt M5x12 and φ5 bigger and small washer. 5.Mount the handle bar using separately X4 bolt M8x40 and washer φ8. 6.Fasten the brake cable and parking cable to the position showed in left picture using bolt M6x45 and φ6 washer and nut M6.
-
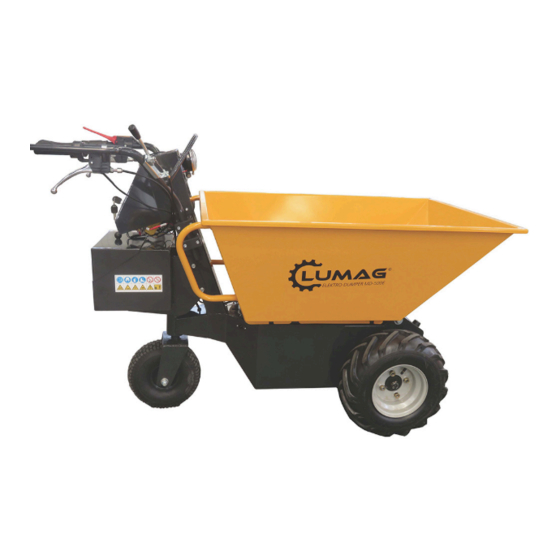
Page 16: Know Your Mini Dumper
7.Fasten the tipping cable according to left picture using the fixed bolt. 8.Assemble the batteries refer to attachment 2. KNOW YOUR MINI DUMPER Parking Handle Pull back this handle when you want to park the machine to make sure it won’t move any more . Safety Handle... - Page 17 Squeeze this handle before you want machine to move,if you want to cut off the power,release this handle,but this may fail to stop the machine to move,especially on a down slope ,you need to squeeze the Brake Handle or pull back the Parking Handle . F&R Optional Button Press “F”...
-
Page 18: Operations
OPERATIONS This machine is similar to any other power driven tools,although very easy to operate it will take some familiarity with the controls and balance to master it fully.Before your any operations to it,it’s a good idea to get well familiar with the controlling of it,look through the whole operation manual firstly. Using the machine on or near steep inclines may cause it to be uncontrollable and cause injury to yourself &others and/or damage to property,the suggested and safe slope is 20%.And at all times keep your feet firmly on the ground and two hands on the handle bar to maintain controls. - Page 19 2.Squeeze the Safety Handle ,release the Parking Handle and press the F&R Optional Button to “F” position(take moving forward for example),then slowly turn the Power Control Handle rightly. You can move the machine with power off,just release the Parking Handle,then you can pull or push it to a large open outside area,but this is only suggested when machine is no-load.If slowly loaded,cannot move anymore ,keep your mind to turn the Power Control Handle...
-
Page 20: Maintenance
unlock,then dumper box can be pull back. MAINTENANCE Charger:Regularly examine the charger for damage to the cord,plug,housing or other parts that may result in the risk of fire,electric shock or injury.In the event of any damage,do not use the charger until the damage has been properly repaired. -
Page 21: Storage
outlets that sell batteries are required to take all batteries for disposal.Or check with your local municipality for the disposal location nearest you for instructions on proper disposal. Battery must be upright while charging.If power flow to the the wall outlet is controlled by a switch,make sure the switch is on.Use the machine charger only in a wall outlet.Never plug the charges into a ceiling outlet. -
Page 22: Trouble Shooting
TROUBLE SHOOTING Problem Possible Cause Solution Machine does not run. Charge the battery.A new battery should have been charged for at least 12 hours before using the machine for the first time.After first- Machine was running but time use,recharge the battery until the green charge light illuminates. suddenly stopped. -
Page 23: Parts Schedule
PARTS SCHEDULE ARTS SCHEDULE... - Page 24 Unit 10, Hatchmoor Industrial Estate, Hatherleigh, Okehampton, Devon EX20 3LP www.lumag-gb.co.uk 01837 811741 Lumag Distribution Limited Company Number: 09267547 VAT Number: GB154566788 Hatherleigh Plant and Tool Hire is a trading name of Lumag Distribution LTD...
Need help?
Do you have a question about the MD500E and is the answer not in the manual?
Questions and answers