
Subscribe to Our Youtube Channel
Related Manuals for Secufirst LCA230


Summary of Contents for Secufirst LCA230
- Page 1 Always safe Wireless Lighting Camera Installation and Operating Instructions Model: LCA230 Version 1.1 PLEASE READ THESE INSTRUCTIONS CAREFULLY BEFORE USING THIS PRODUCT AND KEEP THIS MANUAL FOR FUTURE REFERENCE.
-
Page 2: Table Of Contents
Always safe CONTENTS OVERVIEW .......................2 Please Read Before You Start ...................3 Wireless Device Operating Range ................3 Important Safety Precautions ..................3 KIT CONTENT ....................5 SAFETY AND INSTALLATION TIPS ..............6 PRODUCT OVERVIEW ..................7 INSTALL YOUR DEIVCE ..................8 ETHERNET CONNECTION (OPTIONAL) ............8 CAMERA SETUP INSTRUCTION ..............9 APP DOWNLOAD AND INSTALL ..............12 APP SETUP ....................12 Wired Setup ......................12... -
Page 3: Overview
Always safe OVERVIEW The outdoor camera which is equipped with powerful LED light illuminates. The light can be switched on manually in the app or set to switch on when motion is detected. You can also control the camera via the app remotely from anywhere. * Make sure the camera is operating with sufficient internet bandwidth, 1Mbps (upload/ download speed) is suggested. -
Page 4: Please Read Before You Start
Always safe PLEASE READ BEFORE YOU START Always use discretion when installing CCTV equipment, especially when there is perceived policy. Enquire relevant local regulations applicable to the lawful installation of video recording/surveillance. Third party consent may be required. WIRELESS DEVICES OPERATING RANGE Ensure the signal reception viewed from the wireless camera(s) is the best possible reception between the camera(s) and the Wi-Fi router. - Page 5 Always safe FCC Compliance Statement: This Products with CE Marking comply device complies with Part 15 of the with EMC Directive (2004/108/EC); FCC rules. Operation is subjected to Low Voltage Directive (2006/95/ the following two conditions: (1) this E C ) ; R E D ( 2 0 1 4 / 5 3 / E U ) ; R O H S device may not cause harmful interference, and (2) this Directive (2011/65/EU) issued by the Commission device must accept any interference received, including...
-
Page 6: Kit Content
Always safe KIT CONTENT WAPP-LSE Bcacker HexKey Antenna ScrewPack Positioning Card ResetPin QuickStart Guide Tools Required: (not included) ‧ Electric drill ‧ 5mm masonry drill bit ‧ 15mm masonry drill bit ‧ No. 2 Philips screwdriver ‧ Level (recommended tool) For best system performance: iOS: iPhone6 / iPad2 / Mini iPad with iOS 10.0 or above. -
Page 7: Safety And Installation Tips
SAFETY AND INSTALLATION TIPS Do not attempt to open the units with the power adaptor plug connected to avoid any risk of personal injury. When installing CCTV camera(s), always follow manufacturer's advice when using power tools, steps, ladders, etc. and wear suitable protective equipment (e.g. safety goggles) when drilling holes. -
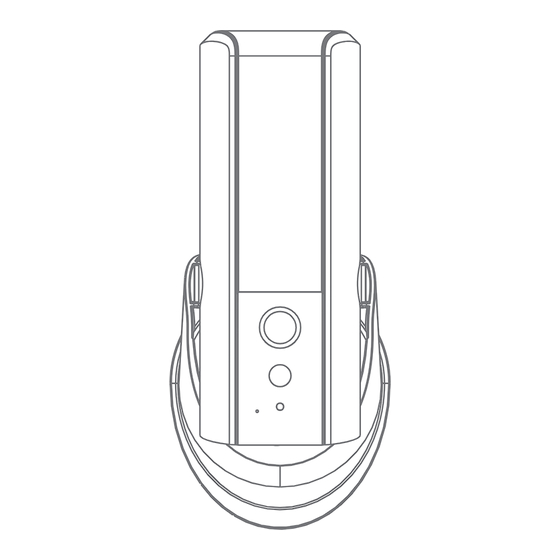
Page 8: Product Overview
PRODUCT OVERVIEW Antenna LED Light FHD Camera Motion Sensor Light Sensor Microphone Wall-Mount Bracket Speaker ResetButton PowerLEDIndicator LinkLEDIndicator Memory Card MicroUSB Port for Slot “only” Wi-Fisetup Note: Press the reset button for 5 Seconds, until the LED starts blinking. The system will restore to factory default and you may set up the camera again. -
Page 9: Install Your Deivce
INSTALL YOUR DEIVCE For optimal performance install the lighting camera at a hight between 2.5 and 4 meters. Disconnect power at fuse or circuit breaker before proceeding to the installtion. Motion Detection 90° 2.5mHeight ETHERNET CONNECTION (OPTIONAL) (1) Follow the below illustration to connect the ethernet cable if not using the Wi-Fi connection. I/OPinConnector RX+/RX-/TX+/TX-:EthernetCableI/O* *Ethernetcablenotincludedinthepackage. -
Page 10: Camera Setup Instruction
CAMERA SETUP INSTRUCTION (1) Please make sure you have turn off the power from the breaker before this step. (2) A) Make a small hole in the rubber pad to have AC power wire run into the junction box base. B) Lead the wires to the front of the base, screw the wires firmly to the terminal blocks. - Page 11 Always safe (3) Fasten the junction box to the wall. Make sure that the UP sign is at the top. (4) Connect the power cable to the junction box. (5) Place the device on the the junction box. (6) Fasten the screw by using the philipps screw driver. Connectto here...
- Page 12 Always safe (7) Adjust the tilting angle of camera by adjusting the screws on both side. (8) Lossen the screw on the back using hex key provided to adjust the pan angle. Screw it firmly when you done. (9) Once completed, turn on the power from the breaker and the lighting camera will power up. Wait for 1 minute for camera to connet to internet.
-
Page 13: App Download And Install
Always safe APP DOWNLOAD AND INSTALL Please download and install the "SecuFirst HD” APP to your device. For iOS For Android APP SETUP Wired Setup Please connect Lighting camera to your home router by included Ethernet cable. I/OPin Connector RX+/RX-/TX+/TX-:EthernetCable I/O* *Ethernet cablenot includedinthepackage. - Page 14 Always safe Setup Steps 1. Launch the “SecuFirst HD” App. Press “ ” to add your device in list. 2. Select “Wired Setup”, It will search and obtain your device ID information. 3. Name your new device. 4. Enter your own new security and admin password, then press “Save”.
-
Page 15: Wireless Setup
Always safe Wireless Setup The device broadcasts “HD-xxxxxxxx” as a hotspot. Please go to Wi-Fi setting page in your mobile device, select the “HD-xxxxxxxx” and enter the default password “12345678”. Wi-Fi Hotspot (iOS) (Android) - Page 16 Always safe Setup Steps 1. Launch the “SecuFirst HD” App. Press “ ” to add your device in list. 2. Select “Wireless Setup”, It will search and obtain your device ID information. 3. Name your new device. 4. Enter your own new security and admin password, then press “Save”.
-
Page 17: Home Page / Device List
Always safe Home Page / Device List 1. ADD Device: To add the new devices in list. 2. Edit Setting: To access “Setting”, “Delete” & “Event”. 3. Reconnect: Refresh connection of all the devices in list. 4. 4 Way: Quad-View for 4 cameras available in device list. 5. -
Page 18: Pin Lock
Always safe PIN Lock 1. Enable/ Disable PIN Lock: You will be required for entering PIN when you launch APP. 2. Enter your PIN Code: 4 digits number for setup your PIN. Note: If you forget your PIN, please remove your APP and reinstall it. -
Page 19: Live View
Always safe Live View 1. Live View 2. System Arm/Disarm 3. Light Brightness Adjust Bar 4. Light Mode On/Auto/Off 5. Snapshot: Tap to take snapshot of the live video. The captured snapshots will store in your mobile device. 6. Mute/Unmute: Mute or unmute the live audio. 7. -
Page 20: Edit Setting
Always safe Edit Setting 1. Setting: Tap to access Basic and Advance setting, Please refer to “Basic & Advance Setting” Section. 2. Delete: Tap to delete the device. 3. Event: Tap to review recording clips, please refer to “Event” section. -
Page 21: Basic Setting
Always safe Basic Setting 1. Search: Auto search for available devices under your LAN (Local Area Network). 2. Cancel: Back to previous step. 3. OK: Save all the modifications you edited. 4. System Name: Name your device. 5. DID: Device Identification for making remote connection. 6. -
Page 22: Advance Setting
Always safe Advance Setting Base settings 1. Admin Password: The Admin Password is a specific security code for the administrator to change the advanced settings. The default admin password is 123456. Please use this function to change the default admin password into your personal admin password. For your own protection of your system configuration, it requires Admin password every time you access to advance settings. - Page 23 Always safe 2. Device Security Code The Device Security Code is a specific security code to access the camera. The default password of the camera is 123456. Please use this function to change the default password into your personal security code. Note: If you forget your Device Security Code, you have to rest the device.
- Page 24 Always safe 3. Siren Volume: 5 levels of volume and silent mode can be selected. 4. Siren Duration: 15/30/60 seconds can be selected while alert trigger.
- Page 25 Always safe 5. Time Zone: The drop down list shows all time zones. Select the time zone according to the location of your device. If your date/time is during the daylight saving time period, please also enable the Daylight Saving function to adjust the system time properly. 6.
- Page 26 Always safe 7. Time Stamp: This section allows you to change the time stamp background color and Enable/ Disable the time stamp. 7-1. Enable/ Disable the time stamp 7-2. Tap to change the time stamp background color.
-
Page 27: E-Mail Setting
Always safe E-mail Setting 1. E-Mail Alert Enable: Enable/ Disable E-mail alert. 2. E-Mail: The email setting allows you to configure the email settings, email account and password. Gmail account is as an example. Click the “Use SSL” check box will transmit the data in encryption. This setting requires the Simple Mail Transfer Protocol (SMTP) configuration. -
Page 28: Video Setting
Always safe Video Setting 1. Video Quality: Select the live video quality between Low (Better Streaming), Medium (Better Imagine), and High (HD Video). If live video takes a long time to load or stutters during streaming, this may be caused by a slow or unstable connection to the Internet—try using the \ Low setting that may improve loading times and provide smoother video streaming. -
Page 29: Sensitivity Setting
Always safe Sensitivity Setting 1. Detect Mode: Adjust the PIR detecting range & sensitivity Note: Moving cars, passersby, direct sunlight or reflection may cause unwanted motion detection. To minimize false motion detections, adjust your camera angle slightly downward and ensure the field of view is focused only on the immediate area of concern and excludes as much background activity as possible. - Page 30 Always safe 2. Motion Mask: 2-1. Tap the area where you don’t want to detect the motion. 2-2. 3 icons for quick tapping of bar area. 2-3. Reset button. 2-4. Save setting.
-
Page 31: Push Notify Settings
Always safe Push Notify Settings 1. Notify Enable: Enable/Disable push notification. 2. Notification Name: Customized the name which be shown on your push message. Lighting Auto Mode 1. Lighting Auto Mode: By Trigger/ manual schedule. -
Page 32: Sd Cad Settings
Always safe SD Cad Settings 1. SD Card Format: Please format your SD card before using. The system is optimized to Class 10 memory card. Memory card with lower specification will decrease the recording and playback function efficiency. During format process, all recording & viewing will stop until format process completes. -
Page 33: About Device
Always safe About Device 1. Model: Display your device’s model#. 2. FW Version: Display your device’s firmware version. 3. MCU Version: Display your device’s firmware version. 4. Total Size: Display the capacity of your SD memory card. 5. Free Size: Available capacity of your SD memory card. -
Page 34: Event
Always safe Event The recorded video files on your camera are automatically saved to the memory SD card. You can remotely access the files for playback via your smartphone. Tapthe to access the edit menu. 1. Set Event Filter... - Page 35 Always safe 2. Play Back 2-1. Select the event you would like to play back. 2-2. Download the video clip into your mobile device. 2-3. Delete All: Delete all the video clips in the event list. 2-4. Delete One: Delete individual clip you selected. 2-5.
-
Page 36: Play Back
Always safe Play Back 1. Tap to pause/play video 2. Tap to view full screen 3. Tap to take snapshot of the playback video. The captured snapshots will store in your mobile device. 4. Mute/Unmute: Mute or unmute the audio. -
Page 37: Trouble Shooting
Always safe TROUBLE SHOOTING SOLUTION The APP can not found ‧ Make sure your network supports the DHCP protocol. ‧ Make sure the camera and your mobile device connect to the the camera same Wi-Fi router for the first setting. ‧... - Page 38 Always safe The APP cannot record ‧ Make sure the TF card has been correctly inserted. ‧ Make sure the motion detection function has been enabled. (please any video clips refer to the Sensitivity Setting section). ‧ Please format the TF card when it is used for the first time (please refer to the TF Card Format section) ‧...
-
Page 39: Production Specification
Always safe PRODUCTION SPECIFICATION Networking Parameter Wireless Technology IEEE 802.11 b/g/n Network Connection Ethernet (10/100 Base-T/Base -TX); Wi-Fi Network Protocols TCP/IP, UDP, SMTP, NTP, DHCP, ARP Simultaneous Viewers 3 concurrent sessions Security WPA /WPA2/WPA2-PSK (TKIP, 128 bit AES) Camera Parameter Image Sensor 2 Megapixel, 1/2.7”... -
Page 40: Storage Media Management
Always safe STORAGE MEDIA MANAGEMENT Micro TF Card Capacity Event Minutes (Class 10) 1600 3200 128G 6400 1440 SecuFirst Ericssonstraat 2 5121 ML Rijen Netherlands W: www.secufirst.eu E: info@secufirst.eu...
Need help?
Do you have a question about the LCA230 and is the answer not in the manual?
Questions and answers