Table of Contents
Advertisement
Quick Links
Thank you
for purchasing your new product.
We recommend that you spend some time reading this
instruction manual in order that you fully understand all
the operational features it offers. You will also find some
Hints And Tips to help you resolve any issues.
Read all the safety instructions carefully before use and
keep this instruction manual for future reference.
Unpacking
Remove all items from the packaging. Retain the packaging. If you
dispose of it please do so according to local regulations.
The following items are included: main unit, jug, funnel, filter,
measuring spoon and instruction manual.
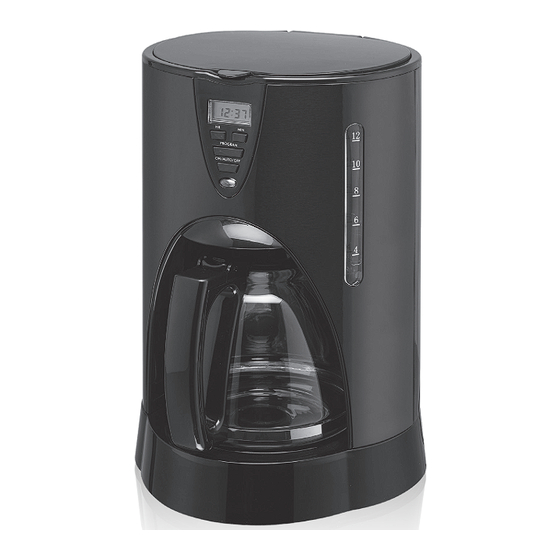
Product Overview
1. Filter
1
2. Funnel
3. Control Panel
2
4. Measuring Spoon
5. Jug Lid
4
6. Jug
5
7. Jug Handle
8. Warming Plate
6
9. Water Tank Cover
10. Water Tank
7
First Time Use
•
Fill the tank with clean water up to the maximum level inside
the tank. Follow the steps in the section "Manual Operation"
(without adding ground coffee) once or twice, then discard the
hot water.
•
Clean the jug, filter and funnel thoroughly with warm water.
You may now use your coffee maker.
1
Jug Use and Care
The jug may break if the following instructions are not followed:
•
Do not set a hot jug on a wet or cold surface.
•
Do not use a cracked jug or a jug with a loose or weakened
handle.
•
Do not clean the jug with cleaners, steel wool pads or other
abrasive materials.
•
Discard the jug immediately if it has boiled dry.
•
Avoid sharp blows, scratches or rough handling.
To reduce the risk of fire or electrical shock, do not
remove any service covers. There are no user serviceable
parts inside. Repairs should be done by qualified
personnel only.
Control Panel
1. HR Button
Press to set hour digit.
2. MIN Button
Press to set minute digit.
3. Display Window
4. PROGRAM Button
9
Press to set clock and timer.
3
5. ON/AUTO/OFF Button
Press repeatedly to select between
ON, AUTO and OFF mode.
10
Automatic Operation
If using the Automatic function, first ensure the unit's
clock has been set correctly.
8
1. Press the PROGRAM button. The display will show the clock.
2. Press the HR or MIN button to adjust the hour and minute
digits. Press the the PROGRAM button to confirm the clock.
3. Select the time you want to start brewing coffee by using the
HR button, then the MIN button. Press the PROGRAM button
to confirm. The display will show the pre-set time.
4. After setting the auto brew start time, prepare coffee by
following the section "Manual Operation" steps 1–4.
Once the unit is unplugged, all the preset clock and
timer will be cleared.
3
1
HR
MIN
2
PROGRAM
4
ON/AUTO/OFF
5
2
5. Press the ON/AUTO/OFF button repeatedly to select AUTO
mode. Green light will show. When the set time for brewing has
arrived, green light will extinguish and red light will show. The
coffee maker has started brewing coffee.
6. When the brewing cycle is complete, the red light will
extinguish. Follow steps 6-7 in the section "Manual
Operation".
Manual Operation
1. Open the water tank cover of the coffee maker and fill with the
correct amount of water. The water level should not exceed the
maximum level indicated.
2. Add ground coffee into the filter. Usually a cup of coffee
needs a level spoonful of ground coffee, but you may adjust
according to your taste.
3. Place the filter with the ground coffee in the funnel and then
place the funnel into the funnel support of the coffee maker,
making sure it is assembled correctly.
4. Place the jug on the warming plate horizontally.
5. Press the ON/AUTO/OFF button to select ON mode. Red light
will show. The coffee maker has started brewing coffee.
6. When the brewing cycle is complete, the red light will
extinguish. Press the ON/AUTO/OFF button repeatedly to set
the unit to OFF mode. You can remove the jug when brewing is
finished (after the coffee stops dripping into the jug).
• You can remove the jug, pour and serve at any
time once the coffee is made. But as the water is
accumulated in the funnel, it may overflow if the jug
is not replaced shortly.
• Do not open the tank cover while the coffee maker is
brewing.
The amount of coffee you get will be less than the water
you have put in the tank, as some water is absorbed by
the ground coffee.
7. The coffee maker will keep your coffee warm for about 30
minutes, then automatically shut off. Always turn the coffee
maker off and unplug when the coffee maker is not in use.
• Keep the lid of the jug closed when pouring.
• The brewed coffee in the jug and the grounds in the
filter are very hot. Handle with care to avoid scalding.
3
Advertisement
Table of Contents

Subscribe to Our Youtube Channel
Related Manuals for Logik LC12DCB17


Summary of Contents for Logik LC12DCB17
- Page 1 Jug Use and Care 5. Press the ON/AUTO/OFF button repeatedly to select AUTO Thank you mode. Green light will show. When the set time for brewing has for purchasing your new product. arrived, green light will extinguish and red light will show. The The jug may break if the following instructions are not followed: We recommend that you spend some time reading this coffee maker has started brewing coffee.
- Page 2 Cleaning and Maintenance Specifications INSTRUCTION MANUAL Unplug the appliance before cleaning. To protect Model LC12DCB17 against electrical shock, do not immerse the mains Voltage Rating 230V 50Hz cable, mains plug or the appliance in water or liquids. Black Filter Coffee Maker...
Need help?
Do you have a question about the LC12DCB17 and is the answer not in the manual?
Questions and answers