Advertisement
Quick Links
Advertisement

Related Manuals for Brickhouse Security Camscura Lux


Summary of Contents for Brickhouse Security Camscura Lux
- Page 1 Camscura Lux Night Vision Hidden Camera User’s Guide BrickHouse Security User’s Guide Page 1...
- Page 2 Record for up to 24 hours on a single charge, or use the AC adapter and eliminate power concerns. All video is recorded to a micro SD card. Use the Camscura Lux Setup Software to customize your settings from your Windows PC or MAC, view your videos using your PC’s media player (MPC Star, VLC, etc.).
- Page 3 In the box you will find the Camscura Lux, a USB Cord, AC Power Adapter, and this User’s Guide. BrickHouse Security User’s Guide Page 3...
- Page 4 BrickHouse Security User’s Guide Page 4...
- Page 5 BrickHouse Security User’s Guide Page 5...
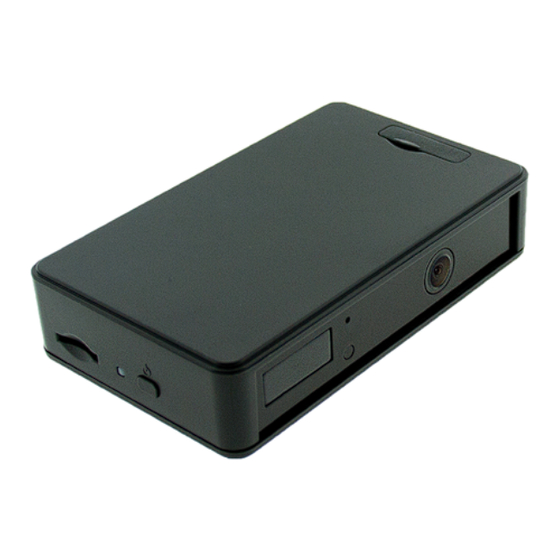
- Page 6 Top of Device Side of Device BrickHouse Security User’s Guide Page 6...
-
Page 7: Getting Started
Before first use, we suggest charging the device for 8 hours. The Camscura Lux records all footage to an SD card (up to 128GB, not in- cluded*). Before inserting a micro SD card, make sure the card is formatted correctly. - Page 8 To install the micro SD card, place the camera on a flat surface with the BrickHouse Security logo facing upwards. The card should be inserted with the gold contacts facing down, away from the logo. BrickHouse Security User’s Guide Page 8...
- Page 9 Type “Camscura Lux” into the search box to find links to software, firmware, video tutorials, and FAQs. The Camscura Lux Setup Software is available for Mac and PC. To install the Camscura Lux Setup Software for PC, download BHS_Cam_Setup_Tool.exe.
- Page 10 Camscura Lux Setup Software The Camscura Lux Setup Software is broken up into 3 sec- tions. When the device is plugged into your PC via USB, the icon along the top will say “DVR Connected” . If it says “DVR Disconnected,”...
- Page 11 DVR Date Time SnapShot displays the timestamp programmed into your Camscura Lux when it was connected to your PC. To load any time changes, click on Sync Date Time to DVR. You should see a notification that reads “Date Time Updated” when complete.
- Page 12 Settings In the Settings section you can create custom recording settings for your Camscura Lux. Video Quality: High, Medium, or Low. The higher the video quality, the more memory it will use. Resolution: 1280 x 720 or 640 x 360 — Refers to the number of dots per unit of area on a screen.
- Page 13 Night mode, the device needs less light to capture video, but its picture can be “blown out” if there is bright light. Enabling Auto Switching: will allow the device to automatically switch between Day and Night modes, depending on current light- ing conditions BrickHouse Security User’s Guide Page 13...
- Page 14 Set to low will pick up normal vibration to trigger recording. Vibration Trigger Standby Mode: Device will be completely off until vibration is detected. Standby mode saves power to the battery and can last up to six months. BrickHouse Security User’s Guide Page 14...
- Page 15 Set to low normal movement will trigger device to record video. *Once you have chosen your settings, click on the Sync Settings to DVR icon. You will receive a Settings Saved notification when they have been loaded. BrickHouse Security User’s Guide Page 15...
- Page 16 When disconnecting the Camscura Lux from your computer, be sure to always choose the Safely Remove Hardware option in the Windows control panel. To disconnect the Camscura Lux from your Mac, locate the device in the “Finder” and hit the eject button. BrickHouse Security User’s Guide...
- Page 17 Camscura Lux to your computer; all settings will be customized through your Camscura Lux Setup Software. Ext-Trigger: In / Contact Type: Open • On the Camscura Lux, put the mode switch to the Custom mode position. • From the Camscura Lux Setup Software, Choose Option >...
- Page 18 Connect the Camscura Lux to the external device (recommended wire AWG26). The connector screw is on the top of Camscura Lux. • Trigger in +(Pin3) should connect to external device Trigger out +. • Trigger in - (Pin4) should connect to external device Trigger out -.
- Page 19 Camscura Lux External Device BrickHouse Security User’s Guide Page 19...
- Page 20 Ext-Trigger: In / Contact Type: Normal Close • On the Camscura Lux, put the mode switch to the Custom mode position. • From the Camscura Lux Setup Software, Choose Option > Custom Mode >Save Option, then choose Settings. • Select Ext-Trigger In Contact Type > Normal Close and press...
- Page 21 Once the external device is connected to the Camscura Lux turn the device on. Standby: If no trigger is detected by the external device, the trigger out of the external device will be kept open. The Camscura will work in standby mode.
- Page 22 Aux-Trigger: Out / Contact Type: Normal Open • On the Camscura Lux, put the mode switch to the Custom mode position. • From the Camscura Lux Setup Software, Choose Option > Custom Mode >Save Option, then choose Settings. • Select Aux-Trigger Out Contact Type > Normal Open and press Sync Settings to DVR.
- Page 23 Once the external device is connected to the Camscura Lux, turn the device on. *Note: Make sure the voltage input to the Camscura Lux trigger out +(Pin5) is under 24V and the current is less than 1A. Ensure the current direction is correct. Otherwise, the device may be damaged.
- Page 24 Aux-Trigger: Out / Contact Type: Normal Close • On the Camscura Lux, put the mode switch to the Custom mode position. • From the Camscura Lux Setup Software, Choose Option > Custom Mode >Save Option, then choose Settings. • Select Aux-Trigger Out Contact Type > Normal Close and press Sync Settings to DVR.
- Page 25 Once the external device is connected to the Camscura Lux turn the device on. Note: Make sure the voltage input to the Camscura Lux trigger out +(Pin5) is under 24V and the current is less than 1A. Ensure the current direction is correct. Otherwise, the device may be damaged.
- Page 26 • Vehicle Recording Mode The Camscura Lux can be used as an in-car camera. Choose from these car camera settings in the Camscura Lux Setup Software. Car-Activated Recording: Auto-starts recording once the car is started, auto-stops recording when car is stopped.
- Page 27 Windows Vista or Windows 7/8. The device should be listed as a Removable Disk under the Devices With Removable Storage section. Open that drive, which will contain a folder called BHS. This folder will contain all your recorded files. BrickHouse Security User’s Guide Page 27...
- Page 28 USB. The upgrade should occur automatically, and a notification will appear on your screen once it has been completed. BrickHouse Security User’s Guide Page 28...
-
Page 29: Troubleshooting
Problem: The time is incorrect. Solution: Charge the device and use the Camscura Lux Setup Software to set the time. If the battery remains drained for 5 days, time settings will be lost. - Page 30 WWW.BRICKHOUSESECURITY.COM BrickHouse Security User’s Guide Page 30...
Need help?
Do you have a question about the Camscura Lux and is the answer not in the manual?
Questions and answers