
Subscribe to Our Youtube Channel
Related Manuals for ScentAir ScentStream SXD2110


Summary of Contents for ScentAir ScentStream SXD2110
- Page 1 ScentStream™ SXD2110 SCENT DELIVERY SYSTEM Installation and Operation Instructions...
-
Page 2: Table Of Contents
TABLE OF CONTENTS Required Tools ......................2 About .......................... 2 System Overview ......................3 Installation........................3 Determine Proper Mounting Location ................ 3 Maximum Distance Between Assemblies ..............4 Control Unit Mounting Procedure ................4 Duct Assembly Mounting Preparation ................ 5 Duct Assembly Mounting Procedure ................ -
Page 3: System Overview
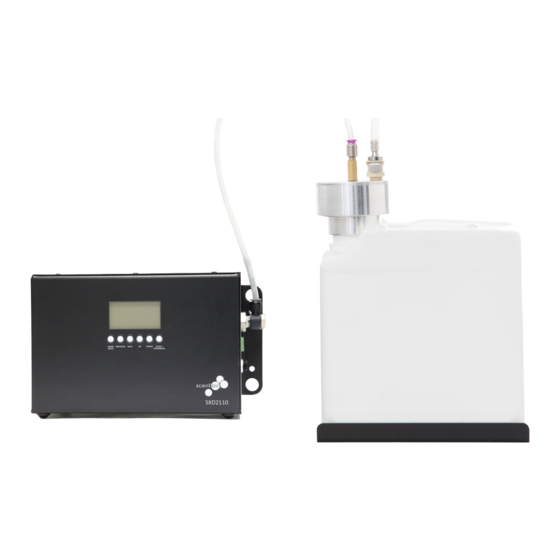
SYSTEM OVERVIEW Control Unit 2L or 5L Fragrance Bottle 25ft./7.6m - 1/4in. Air Supply Tube 9ft./2.4m - 3/8in. Output Tube Collector Assembly w/ 5L Recycle Tube Duct Input Assembly Bottle Holding Tray 4x Blue Shock Absorbent Grommet 8x Large Flat Washer 10. -
Page 4: Maximum Distance Between Assemblies
Maximum Distance Between Assemblies When installing the ScentStream™ there are three (3) basic assemblies which will be permanently mounted to either a wall or the air duct. The system ships with 25ft./7.6m of 1/4IN. AIR SUPPLY TUBE to connect the CONTROL UNIT to the COLLECTOR & BOTTLE ASSEMBLY, and 9ft./2.4m of 3/8IN. -
Page 5: Duct Assembly Mounting Preparation
Use the provided zip tie with screw mount to secure power supply and excess wire to the wall. Connect the 3 wire power cord to the ScentStream™ 12V power supply, and then plug the cord into an AC supply outlet. Plug the power adapter into the DC POWER IN hole on the side of the ScentStream™... -
Page 6: Duct Assembly Mounting Procedure
Duct Assembly Mounting Procedure Determine the location on the air handler or supply duct where the Duct Input Assembly will be mounted - Be sure to consider all criteria: • The collector & bottle assembly will need to be mounted within 8ft./2.4m of the duct input assembly insertion point. - Page 7 FIG. E 3/8in. Output Tube 1/4in. Air Supply Tube Barb Fitting Quick Disconnect Fitting Quick Disconnect Fitting Check Valve Collector Bottle White Bottle Seal After mounting the Collector & Bottle assembly, the tubing must be connected to the collector. • To ensure that no dust or debris is in tubing, turn the control unit on to blow air through the tubing, then turn the control unit off.
-
Page 8: System Control Unit
SYSTEM CONTROL UNIT Button Functions First, connect the SXD2110 system to the closest available power source. Check that the power supply has a lit green light indicating the system is powered. • MODE (EXIT): Moves through the seven (7) set up screens. Each setup screen has the word ”Set”... -
Page 9: System Programming Tree
SYSTEM PROGRAMMING TREE ADJUST CURRENT EVENT SCENT OPTIONS EXIT WITHOUT SAVING SAVE ANY CHANGES PROGRAMMED EVENTS MAIN SCREEN EDIT SELECTED EVENT REVIEW PROGRAMMED EVENTS (1-14) CREATE EVENT DAY OF WEEK 24 HOUR (1-17) CLOCK EVENT SCENT % LEVEL TIME TIME MONTH, DAY &... -
Page 10: System Set-Up
SYSTEM SET-UP Set the Time & Date Use the Time menu to change the time of day as well as the Date. The system uses 24-hour clock notation for all time displays, never AM/PM. • Press any button to activate the screen if the backlight is off. •... -
Page 11: Programmed Events
PROGRAMMED EVENTS Use the Event menu to schedule programmed events to operate the system during specific hours. You may program up to 14 events each of which can be set to occur on multiple days of the week. Events can be added, deleted, reviewed, and changed from this menu. •... -
Page 12: Scent Intensity Screen
Scent Intensity Screen The ScentStream™ regulates the output of fragrance by cycling on and off, so that just the right level of fragrance can be obtained in your space. Below are in-depth descriptions of scent output options available for adjustment. •... -
Page 13: Review & Edit A Set Event
Review & Edit a Set Event • Press any button to activate the screen if the backlight is off. • Press MODE once from the main screen, the words “Set” and “Event” will be shown on the screen. The selected Event number will be shown in this mode. •... -
Page 14: Event Rules
Event Rules The ScentStream™ allows combinations of events with different scent intensity, scent time and scent level. An event can occur inside another event, for instance, you could establish a low scent level for the entire workday MON - FRI from 08:00-17:30 hours as Event 1, then add Event 2 with a high scent level during your busiest hours on MON from 14:00-16:30 hours. -
Page 15: Lockcodes
NOTE: Once a lockcode is set to “ON” the machine will be automatically locked two (2) minutes after any authorized operation. When lockcode is displayed at the main screen pressing any key will bring up the enter lockcode screen described below.. If you forget your lockcode please contact ScentAir. Entering a Lockcode •... -
Page 16: System Override - Manual Operation
SYSTEM OVERRIDE – MANUAL OPERATION Pressing SELECT while the system is operating during a programmed event will temporarily stop the system, displaying Auto, HVAC, OFF and the current Day of the Week and Time. Pressing SELECT when the system is not running will turn it ON using the last setting. Automatic operation will resume at the start of the next event. -
Page 17: Fragrance Changeover Instructions
Materials needed: • One bottle (5L) of new fragrance sealed with screw cap • One bottle partially filled (200ml) with clear cleanout liquid (DPG) from ScentAir (never use water) also sealed with screw cap • Paper towels These instructions are written so that the collectors can be in their as installed location during the cleanout process. - Page 18 14. Temporarily set the collector down on its side on a clean surface, do not touch or allow the white tubing at the collector bottom to contact any surface, it must stay clean. 15. Transfer all the used oil into one of the used bottles, then screw the collector at this location back onto an empty bottle 16.
-
Page 19: Troubleshooting
TROUBLESHOOTING PROBLEM SOLUTION Unit will not turn on • Make sure power is running to the system is via a working outlet • Press SELECT (OVERRIDE) on the system. If unit turns on, then reset clock event settings. • If backlight turns on and there is no information on the LCD display, the LCD is malfunctioning •... - Page 20 For further assistance please contact Technical Services at: 704.504.2320 techservices@scentair.com...
Need help?
Do you have a question about the ScentStream SXD2110 and is the answer not in the manual?
Questions and answers