
Subscribe to Our Youtube Channel
Related Manuals for FujiFilm Instax Square SQ20


Summary of Contents for FujiFilm Instax Square SQ20
- Page 1 使用説明書/困ったときには/安全にご使用いただくために User’s Guide/Trouble shooting/Safety precautions BO14P102-102...
- Page 2 日本語: 3ページから42ページをご覧ください。 ENGLISH: See pages 43 to 81. © 2018 FUJIFILM Corporation. All rights reserved.
-
Page 3: Table Of Contents
日本語 目次 カメラをお使いになる前に ......4 画像を調整、 加工 (エフェク ト) する ..19 各部の名称 ..........5 フィルター ............19 明るさ調整 .............20 液晶モニターの表示 ........6 ビネッ ト ............20 セレクターボタンの使いかた......6 いろいろな撮影 ........21 コマン ドダイヤルの使いかた ......6 AF/AEロックを使用して撮影する ....21 ス トラップを取り付ける ....... 7 セルフタイマーを使用して撮影する ....21 ハン... -
Page 4: カメラをお使いになる前に
カメラをお使いになる前に カメラをお使いになる前に、 以下を確認してください。 カ メラを廃棄するときの注意 この製品に使用しているリチウムイオン電池は、 リサイク 箱の中の付属品がすべてそろって ルできます。 一般ゴミなどと一緒に廃棄はしないでください。 いるか確認してください。 本機が不要となりましたら、 電池の取り外しはお客さま自 身では行わず、 「 お客さま相談窓口」 にご相談ください。 (裏表紙参照) Ÿ ■ 小形充電式電池のリサイクルについて カメラを安全に使用するため 小形充電式電池 (リチウムイオンバッテリ ーまたはニッケル水素電池など) はリサイ に、 「 安全にご使用いただくた クル可能な貴重な資源です。 ご使用済み めに」 (37 ページ) をお読 の電池は、 端子を絶縁するためにセロハン みください。 テープなどをはるか、... -
Page 5: 各部の名称
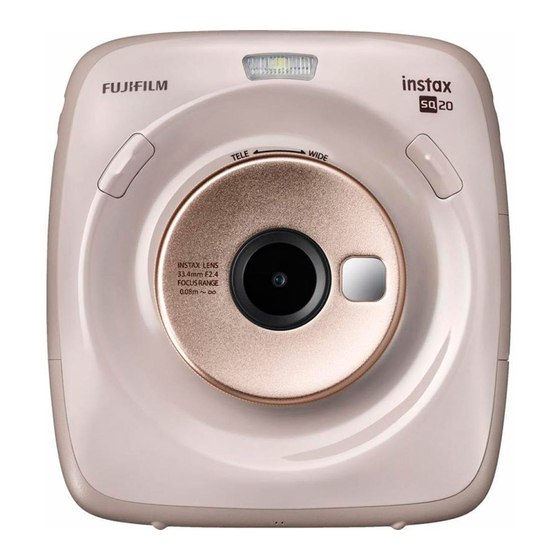
各部の名称 前面 背面 フラッシュ/セルフタ レンズ フィルム ドアロック (再生) ボタン イマーランプ ス トラップフック フィルム排出口 セルフショ ッ トミラー (戻る) ボタン ス トラップフック ズームリング USB端子 (プリン ト) ボタン シャ ッターボタン (右) シャ ッターボタン (左) リセッ トボタン MENU/OKボタン マイクロSDカー ド (明るさ) ボタン スロッ ト カー... -
Page 6: 液晶モニターの表示
液 晶モニターの表示 (戻る) ボタンを押すと表示されます。 撮影するファイル (動画 ・ 静止画) によって表示されないものもあります。 撮影時 再生時 コマNO. 撮影日 ・ 時刻 フラッシュ 動画撮影表示 セレクターボタンの使いかた (22 ページ) (9 ページ) 明るさ調整 日付書き込み (20 ページ) (31 ページ) 上に移動します。 フィルター バッテリー残量表示 左に移動します。 (19 ページ) (9 ページ) ビネッ ト 撮影可能枚数 下に移動します。 (20 ページ) (13 ページ) 露出補正 現在の日付 ・ 時刻 右に移動します。... -
Page 7: ス トラップを取り付ける
ス トラップを取り付ける ハン ドス トラップを取り付ける ショルダース トラップ (別売) を取り付ける 下図のように取り付けます。 下図のように、 ス トラップを左右のス トラップフックに取り • 落下防止のため、 持ち運んだり撮影したりするときは、 付けます。 ハン ドス トラップに手首を通してください。 Ÿ 注意 • ショルダース トラップは肩にかけて使用し、 首にはかけ ないでください。 • ス トラップがフィルム出口にかぶさらないように注意し てください。... -
Page 8: バッテリーを充電する
バ ッテリーを充電する USBケーブルの端子の向きに注意してください。 パソコンから充電するときは : • USBハブやキーボー ドを経由せずに、 直接カメラとパソ コンを接続してください。 • 充電中にパソコンが休止状態 (スリープ状態) になると、 充電が中止されます。 充電を続ける場合は、 パソコンの 休止状態 (スリープ状態) を解除したあと、 USBケーブ ルを接続しなおしてください。 • パソコンの仕様や設定、 または状態によって、 バッテリー を充電できないことがあります。 注意 • バッテリーを取り外すことはできません。 カメラとご使用のスマー トフォンなどのUSB電源アダプ • 工場出荷時にバッテリーはフル充電されていません。 ご タを、 付属のUSBケーブルで接続し、 USB電源アダプタ 使用になる前に必ず充電してください。 を屋内のコンセン トにつなぎます。 • バッテリーについてのご注意は 「電源についてのご注意」 • 定格出力がDC 5.0V、 1000mAのUSB電源アダプ (38 ページ)... -
Page 9: 電源を入れる/切る
電 源を入れる/切る 背面の電源スイッチで静止画または動画を選びます。 静止画を撮影する場合 電源を切る場合 電源スイッチを 「OFF」 に合わせます。 バ ッテリー残量の確認方法 撮影画面または再生画面で (戻る) ボタンを押すと、 液晶モニターにバッテリー残量が表示されます。 表示 バッテリーの残量 残量が十分にあります。 残量が半分以下です。 充電することを 動画を撮影する場合 おすすめします (8 ページ) 。 残量が不足しています。 できるだけ早 く充電してください (8 ページ) 。 R バッテリー残量が不足すると、 液晶モニターの右下に もアイコン ( ) が表示されます。 バッテリー残量が完全になくなると、 液晶モニター全 体にアイコン... -
Page 10: 初期設定を行う
初 期設定を行う ご購入後初めて電源を入れたときは、 使用する言語や日時などは設定されていません。 以下の手順で、 使用する言語や日 時などの初期設定を行います。 この設定は後から設定することもできます。 後から設定する場合や設定をやり直したい場合は、 31 ページを参照して ください。 ⁄ 年、 月、 日、 時、 分を設定し、 MENU/OKボタン 電源を入れると、 言語設定画面が表示されます。 または を押します。 Ÿ 使用する言語を選び、 MENU/OKボタンまたは を押します。 で設定する項目 (年、 月、 日、 時、 分) を 選び、 で設定する数字を選びます。 言語が設定され、 日時設定画面が表示されます。 MENU/OKボタンを押します。 年月日の並び順を設定し、 MENU/OKボタン または... -
Page 11: シャ ッターボタンの機能設定について
シ ャッターボタンの機能設定について 左右それぞれのシャ ッターボタンの機能を、 以下の組み合わせから選ぶことができます。 静止画を撮影する場合 : シャ ッターボタン (右) シャ ッターボタン (左) シャ ッターボタン シャ ッターボタン シャ ッターボタン 撮影モー ド切り替えボタン 機能 シャ ッターボタン 無効 撮影モー ド切り替えボタン シャ ッターボタン 無効 シャ ッターボタン 動画を撮影する場合 : シャ ッターボタン (右) シャ ッターボタン (左) シャ... -
Page 12: フィルムパックを入れる/取り出す
フィルムパックを入れる/取り出す 注意 フィルムを使い切るまでは、 フィルムドアを開けな フィルム ドアロックがカ いで下さい。 途中で開けると、 フィルムが感光して チッと止まるまで押し込 白くなり、 写真が写りません。 んで、 フィルム ドアを閉 • フィルムパックを入れるときは、 フィルムパック背面の2カ めます。 所の長方形の穴は絶対に押さないでください。 ⁄ • 有効期限を過ぎたフィルムは絶対に使用しないでくださ い (故障の原因となります) 。 富士フイルム インスタン トフィルム instax SQUARE をご使用ください。 instax miniフィルムやinstax WIDE フィルム ドアを閉めると、 自 フィルムはご使用になれませんので、 ご注意ください。 動的にフィルムカバー (黒 フィルムパックについて 色) が排出されるので取り除 • フィルムパックには1枚の黒色のフィルムカバーと10枚 きます。 のフィルムが収納されています。... -
Page 13: 基本的な撮影と再生
基本的な撮影と再生 撮 影する ¤ ここでは、 撮影の基本的な操作を説明します。 シャ ッターボタンを半押ししたまま、 さらに深く押し 込みます (全押しします) 。 電源スイッチを (静止画) に合わせます。 写真が撮影され、 画像が内蔵メモリーに保存さ れます。 • 撮影した画像をプリン トする手順は、 17 ペー ジを参照してください。 • 自動プリン トがオンに設定されている場合は、 撮 影画像がプリン トされます (29 ページ) 。 • 撮影するときは脇を締め、 カメラを両手でしっかりと 持ってください。 Ÿ • シャ ッターボタンを押すときは、 撮影レンズに触れな カメラを構えます。 いように注意してください。 • シャ... -
Page 14: 撮影した画像を再生する
基本的な撮影と再生 (続き) 撮影した画像を再生する 再 生画面の表示を変更する 撮影した画像を液晶モニターで再生できます。 画像を拡大して表示したり、 液晶モニターに表示する画像 のコマ数を変更したりすることができます。 電源スイッチを (静止画) に合わせます。 ■画像を拡大して表示する コマン ドダイヤルを時計回りに回すと、 画像を拡大して 表示します。 通常表示 拡大表示 Ÿ (再生) ボタンを押します。 6789 • ボタンで、 表示する範囲を移動でき ます。 • MENU/OKボタンまたは (戻る) ボタンを押すと、 拡大表示がキャンセルされます。 • 画像を拡大した状態でプリン トすることもできます (17 ページ) 。 ■表示する画像のコマ数を変更する 最後に撮影した画像が表示されます。 コマン ドダイヤルを反時計回りに回すと、 画像が1コマ 表示から、... -
Page 15: 動画の撮影と再生
動画の撮影と再生 動 画を撮影する ここでは、 動画の撮影の基本的な操作を説明します。 シャ ッターボタンを全押しします。 電源スイッチを (動画) に合わせます。 以下の画面が表示され、 動画の撮影が始まります。 Ÿ カメラを構えます。 • 撮影中もズームリングでズーム操作をすること ができます。 • 画面左に経過時間がバーで表示されます。 • レ トロ、 フィルム風フレーム、 残像のいずれかの フィルターを選んでいる場合は、 動画のファイ ル自体にフィルターの効果を反映しながら撮影 します。 ¤ もう一度、 シャ ッターボタンを全押しします。 必要に応じてエフェク トの設定をします。 動画の撮影が終了します。 (19 ページ〜20 ページ) • 撮影するときは脇を締め、 カメラを両手でしっかりと ■動画撮影専用のエフェク ト 持ってください。 動画撮影専用のエフェク トとして、 「 レ トロ」 、 「 フィルム風 • シャ... -
Page 16: 撮影した動画を再生する
動画の撮影と再生 (続き) ⁄ 撮影した動画を再生する を押します。 撮影した動画を液晶モニターで再生できます。 電源スイッチを (動画) に合わせます。 動画が再生されます。 動画再生中の操作について • 再生を一時停止する場合は、 を押します。 もう一度 を押すと、 再生を再開します。 Ÿ (再生) ボタンを押します。 • 一時停止中に または を押す、 またはコマン ド ダイヤルを回すと、 動画をコマ送りすることができま す。 MENU/OKボタンを押すと、 表示されている画像 (フレーム) を画像ファイルとして保存することがで きます。 • 再生が終了すると、 最初に表示されたサムネイル画像 が表示されます。 表 示する画像のコマ数を変更する 最後に撮影した動画のサムネイル画像が表示さ れます。 動画のサムネイル画像が表示されているときに、... -
Page 17: プリン トする
プ リン トする 撮影した画像は、 以下の手順でプリン トできます。 • 動 画から画像を切り出してプリン トする場合 : または を押して、 再生したい動画を選び 電源スイッチを (静止画) または (動画) に ます。 合わせます。 を押すと、 前の動画のサムネイル画像が表示 Ÿ されます。 (再生) ボタンを押します。 を押すと、 次の動画のサムネイル画像が表示 されます。 2 を押して、 動画を再生します。 最後に撮影した画像が表示されます。 プリン トしたい画像を選びます。 • 静止画をプリン トする場合 : 3 ... - Page 18 プ リン トする (続き) ⁄ ■ フィルム残量表示について 必要に応じて画像を調整、 加工します。 (19 ページ〜20 ページ) フィルム残量は画面右の ドッ トで表示します。 プリン トが1枚終了するごとに、 ドッ トが1つずつグレー 表示になります。 (プリン ト) ボタンを押します。 以下の画面が表示されます。 • フィルム残量が2枚になると、 ドッ トが赤く表示 ¤ MENU/OKボタンを押します。 されます。 プリン トが始まります。 R 静止画像の場合は、 画像を拡大してプリン トしたり、 4コ • プリン トをキャンセルするには、 (戻る) ボタン マ、...
-
Page 19: 画像を調整、 加工 (エフェク ト) する
画 像を調整、 加工 (エフェク ト) する 撮影または再生画面を表示中に、 背面のボタンで画像エフェク トのメニューを直接選んで、 画像を調整 ・ 加工することが できます。 フ ィルター 種類 効果 Marmalade 強い赤味と共に、 中心を明るく、 周辺 以下の手順でフィルターの種類を選びます。 を暗くする効果があり、 写真に年月を 撮影または再生画面で、 (フィルター) ボタンを 経て日焼けした印象を加えます。 押します。 Martini 少しのヴィンテージ感を加えると共 以下の画面が表示されます。 に、 肌色がより滑らかに再現されます。 Sepia 時間が経ち色あせた写真を再現しま す。 レ トロ感やノスタルジックな雰囲 気を演出したい場合に適しています。... -
Page 20: 明るさ調整
画 像を調整、 加工 (エフェク ト) する (続き) 明 るさ調整 ビ ネッ ト 以下の手順で画像の明るさを調整します。 画像の四隅の明るさを調整します。 以下の手順で明るさ を調整します。 撮影または再生画面で、(明るさ) ボタンを押し ます。 撮影または再生画面で、(ビネッ ト) ボタンを押 します。 以下の画面が表示されます。 以下の画面が表示されます。 Ÿ コマン ドダイヤルで明るさを調整します。 Ÿ コマン ドダイヤルで画像の四隅の明るさを調整 コマン ドダイヤルを時計回りに回すと明るくなり、 します。 反時計回りに回すと暗くなります。 コマン ドダイヤルを時計回りに回すと画像の四隅 が暗くなり、... -
Page 21: いろいろな撮影
いろいろな撮影 A F/AEロックを使用して撮影する セ ルフタイマーを使用して撮影する 静止画を撮影するときに、 シャ ッターボタンを半押しし続 撮影者を含めた集合写真や、 シャ ッターボタンを押すとき けてピン トを固定することを 「AFロック」 、 明るさを決めて にカメラが動くのを防ぐための撮影に使用します。 固定することを 「AEロック」 といいます。 被写体を画面の 撮影画面で、 MENU/OKボタンを押します。 中央以外に配置して撮影したいときに便利です。 シャ ッターボタンを半押しして、 ピン トを合わせたい 被写体にピン トを合わせます。 シャ ッターボタンを半押しすると、 AFとAEがロッ クされます。 Ÿ シャ ッターボタンを半押ししたまま構図を変えます。 撮影メニューが表示されます。 Ÿ... -
Page 22: フラッシュを使用して撮影する
いろいろな撮影 (続き) フ ラッシュを使用して撮影する 自 分自身を撮影する (セルフィー) 夜や暗い室内などで撮影をするときは、 フラッシュを使用 セルフショ ッ トミラーを使用して、 自分自身を撮影するこ して撮影してください。 とができます。 撮影画面で、 MENU/OKボタンを押します。 しっかりとカメラを持って、 レンズの先から 30cm〜50cmになるように構えます。 撮影メニューが表示されます。 • 暗い所では特に手ブレしやすいので、 カメラをしっ Ÿ フラッシュを選び、 MENU/OKボタンを押します。 かりと持ってください。 Ÿ フラッシュの設定を選び、 MENU/OKボタンを 押します。 フラッシュの設定の詳細は 「フラッシュの設定」 を セルフショ ッ トミラーで構図を 参照してください。 確認し、... -
Page 23: 撮影モー ドを切り替えて撮影する
撮 影モードを切り替えて撮影する 被写体や撮影の目的に応じて、 いろいろな設定を選ぶことができます。 撮 影モー ドの選び方 撮 影モー ド 以下の手順で撮影モー ドを選びます。 スタンダード 撮影画面で、 MENU/OKボタンを押します。 通常の撮影に使用します。 周辺が暗いときは、 自動でフラッシュが発光します。 フラッシュを発光しないように設定することもできます (22 ページ) 。 バルブ撮影 シャ ッターボタンを押している間、 シャ ッターが開きます。 夜景などの撮影に使用します。 このモー ドを使用するとき は、 テーブルなどにカメラを固定してください。 撮影メニューが表示されます。 • 周囲の明るさに応じて、 シャ ッターボタンを押す時間を Ÿ 撮影モードを選び、 MENU/OKボタンまたは 調整してください。... - Page 24 撮影モードを切り替えて撮影する (続き) ■二重露光 ■分割撮影 撮影モードで二重露光を選び、 MENU/OKボタンを押 撮影モードで分割撮影を選び、 MENU/OKボタンを押 したあと、 以下の手順で撮影します。 したあと、 以下の手順で撮影します。 1枚目の画像を撮影します。 または を押す、 またはコマン ドダイヤルを 回して分割パターンを選び、 MENU/OKボタン を押します。 Ÿ Ÿ MENU/OKボタンを押して、 2枚目の画像を撮影 それぞれのフレームの撮影を行います。 します。 • 撮影をやり直す場合は、 を押してください。 • (戻る) ボタンを押すと、 撮影画面に戻ります。 MENU/OKボタンを押します。 • 撮影をやり直す場合は、 を押してください。 • (戻る) ボタンを押すと、 撮影画面に戻ります。 • 撮影を途中で止める場合は、...
- Page 25 撮影モードを切り替えて撮影する ■時間差撮影 ■コラージュ 撮影モードで時間差撮影を選び、 MENU/OKボタンを 撮影モードでコラージュ撮影を選び、 MENU/OKボタ 押すと、 以下の画面が表示されます。 ンを押したあと、 以下の手順で撮影します。 または を押してコラージュパターンを 選び、 MENU/OKボタンを押します。 Ÿ それぞれのフレームの撮影を行います。 4枚の画像が時間差で表示されます。 右下、 左下、 右上、 左上の順に、 直近の画像になります。 液晶モニターに4枚の画像が表示されたら、 シャ ッ • 撮影を途中で止める場合は、 (戻る) ボタンを押し、 ターボタンを押して撮影します。 表示されたメッセージを確認してMENU/OKボタン を押してください。 コラージュパターンの選択画面に • を押して、 コマ間の時間差を調節することが 戻ります。 できます。...
-
Page 26: プリン ト履歴からプリン トする (リプリン ト
プ リン ト履歴からプリン トする (リプリン ト) 過去にプリン トした画像を呼び出して、 そのときの設定 (画像エフェク トなど) を保持してプリン トすることができます。 以下 の手順で操作します。 (再生) ボタンを押します。 (プリン ト) ボタンを押します。 ¤ MENU/OKボタンを押します。 プリン トが始まります。 • プリン トをキャンセルするには、 (戻る) ボタン を押します。 フィルムを排出する音が止まってから、 送り出され たフィルムの先端を持って取り出します。 最後に撮影した画像が表示されます。 Ÿ MENU/OKボタンを押します。 再生メニューが表示されます。 プリン ト履歴を選び、 MENU/OKボタンを押します。 画像を選ぶ画面が表示されます。... -
Page 27: メモリーカー ドを使用する
メ モリーカードを使用する 本機は内蔵メモリーに約50枚の静止画を保存できますが、 メモリーカー ドを使用すると、 より多くの画像を保存できます。 メモリーカードについての注意 メモリーカー ドを入れる • このカメラに対応しているメモリーカー ドはmicro SDカ カー ドスロッ トカバーを開けます。 ー ドまたはmicro SDHCカー ドです。 指定以外のメモリー カー ドをご使用になると、 カメラの故障の原因になります。 • メモリーカー ドは小さいため、 乳幼児が誤って飲み込 む可能性があります。 乳幼児の手の届かない場所に保 管してください。 万が一、 乳幼児が飲み込んだ場合は、 Ÿ 図のように正しい向きで、 「 カチッ」 と音がするまで ただちに医師と相談してください。 メモリーカー ドを奥まで差し込みます。 • メモリーカー ドのフォーマッ ト中や、 データの記録/消 去中は、... -
Page 28: 画像をパソコンに転送する
画像をパソコンに転送する カメラをパソコンに接続して、 画像を転送します。 パソコンを起動します。 注意 • 画像ファイルを転送するときは、 カメラのバッテリー Ÿ 切れに注意してください。 通信中にバッテリーが切れ カメラの電源をオフにします。 ると、 ファイルが壊れる場合があります。 • カメラとパソコンの通信中は、 カメラの電源をオフに したり、 USBケーブルを抜いたり しないでください。 付属のUSBケーブルで、 カメラとパソコンを ファイルが壊れたり、 消えたりする場合があります。 接続します。 • メモリーカー ドを交換する場合は、 必ずカメラとパソ コンの接続を解除したあとに行ってください。 • パソコンでの 「コピー中」 という表示が消えてすぐにカ メラを取り外したり、 USBケーブルを抜いたり しない でください。 大きなサイズのデータを転送した場合、 パソコンの表示が消えてもカメラのアクセスがしばら く行われている場合があります。 • パソコンの画像ファイルをカメラに転送することは できません。 USBケーブルの端子の向きに注意して、 接続 端子の奥までしっかりと差し込んでください。... -
Page 29: 撮影メニューを使用する
撮 影メニューを使用する 以下の手順で撮影メニューを設定 ・ 変更します。 セルフタイマー (静止画のみ) 撮影画面で、 MENU/OKボタンを押します。 セルフタイマーを使用して撮影するときの設定をします (21 ページ) 。 AF補助光 (静止画のみ) ONを選ぶと、 シャ ッターボタンを半押ししてからピン ト が合うまでの間AF補助光が発光し、 暗い被写体のピン トを合わせやすく します。 設定 : ON/OFF メニューが表示されます。 • シーンによっては、 発光してもピン トが合いづらいこ Ÿ 変更する項目を選び、 設定を変更します。 とがあります。 • 被写体に近づいた撮影では、 AF補助光の効果が十分 に得られない場合があります。 MENU/OKボタンを押します。 • 人の目に近づけて発光させないでください。 変更した内容に設定されます。 露出補正... -
Page 30: 再生メニューを使用する
再生メニューを使用する 以下の手順で再生メニューを設定 ・ 変更します。 消去 画像を1コマづつ消去したり、 全コマまとめて消去します。 再生画面で、 MENU/OKボタンを押します。 設定 : 1コマ/全コマ 画像回転 (静止画のみ) 画像を90度単位で回転して表示します。 コマン ドダイヤルで操作します。 画像コピー 画像を内蔵のメモリーからメモリーカー ドへ、 またはメ メニューが表示されます。 モリーカー ドから内蔵のメモリーにコピーします。 Ÿ 以下の手順で行います。 変更する項目を選び、 設定を変更します。 1 MENU/OKボタンまたは を押します。 2 コピー先を選び、 MENU/OKボタンまたは を押 MENU/OKボタンを押します。 します。 3 1コマまたは全コマを選び、 MENU/OKボタンまた 変更した内容に設定されます。 は を押します。 ⁄... -
Page 31: セッ トアップメニューを使用する
セ ッ トアップメニューを使用する 以下の手順でセッ トアップメニューを設定 ・ 変更します。 操作音量 操作音、 シャ ッター音、 起動音の音量を設定します。 撮影画面または再生画面で、 MENU/OKボタン を押します。 設定 : OFF/1/2/3 音を消したい場合は、 OFFを選びます。 シャ ッターボタン設定 左右のシャ ッターボタンの機能を設定します (11 ページ) 。 自動電源OFF メニューが表示されます。 カメラを操作しなかったときに、 自動で電源がオフにな Ÿ るまでの時間を設定します。 変更する項目を選び、 設定を変更します。 設定 : 5分/2分/OFF MENU/OKボタンを押します。 リセッ ト 変更した内容に設定されます。... - Page 32 仕様 カメラ機能 撮像素子 1/5型CMOS 原色フィルター採用 記録画素数 1920×1920ピクセル 記録メディア 内蔵メモリー、 microSD/microSDHCメモリーカー ド 記録枚数 内蔵メモリー : 静止画約50枚、 動画約30秒 microSD/microSDHCメモリーカー ド : 1GBあたり約1000枚 動画記録時間 microSD/microSDHCメモリーカー ド : 1GBあたり合計約3分 記録方式 静止画 : DCF準拠 Exif Ver.2.3 JPEG準拠、 PIM対応 動画 : 800x800x15fps H.264 (音声なし) 焦点距離 33.4mm固定 (35mmフィルム換算) 絞り F2.4 オー トフォーカス シングルAF (TTLコン...
- Page 33 仕様 プリン ト機能 使用フィルム 富士フイルム インスタン トフィルム instax SQUARE (別売) フィルム枚数 10枚/パック フィルムサイズ 86mm×72mm 画面サイズ 62mm×62mm プリン ト画素数 800×800 ドッ ト プリン ト解像度 12.5 ドッ ト/mm (318dpi、 80μm ドッ トピッチ) プリン ト階調 RGB各色256階調 プリン ト可能画像フォーマッ ト JPEG (画像編集 ・ 加工ソフ トで保存したJPEGファイルの一部は、 表示 ・ プリン トで きない場合があります。...
-
Page 34: このようなときは
このようなときは 故障とお考えになる前に、 もう一度お調べください。 処置を行っても改善されない場合は、 弊社サービスセンターに修理を ご依頼ください。 または下記のウェブサイ トにアクセスしてください。 富士フイルムホームページ : http://fujifi lm.jp/ 使用中このようなときは… このようなときは 考えられる原因 処置 電源が入らない。 ● バッテリーが消耗している。 ● カメラを充電してください。 バッテリーの消耗が ● 非常に寒いところでカメラを使用し ● 撮影前にカメラを温かく しておいてください。 早い。 ている。 使用中に電源が切 ● バッテリー残量が少なくなっている。 ● カメラを充電してください。 れた。 充電が始まらない。 ● USB電源アダプタのプラグが、 正し ● プラグを正しくコンセン トに接続してください。 くコンセン トに接続されていない。 充電に時間がかかり ● 非常に寒いところで充電している。 ● 低温時は、 充電に時間がかかる場合があります。 すぎる。... - Page 35 このようなときは このようなときは 考えられる原因 処置 ピン トが合わせられ ● ピン トが合いにくい被写体 (21 ● AF/AEロックを使用して撮影してください。 ない。 ページ) を撮影しようとしている。 フラッシュが発光し ● フラッシュの設定で発光禁止が選ば ● 発光禁止以外の設定を選んでください ない。 れている。 (22 ページ) 。 フラッシュが発光したの ① 被写体から離れすぎている。 ① フラッシュ撮影が可能な距離内で撮影してください。 に、 画像が暗い。 ② フラッシュを指などでふさいでいた。 ② カメラを正しく構えてください。 画像がぼやけている。 ① レンズに指紋などの汚れが付いている。 ① レンズを清掃してください。 ② 撮影時にAFフレームが赤く表示さ ② AFフレームが緑色になっていることを確認して撮 れていた。 影してください。 画像に点状のノイズが ● 気温の高い場所でバルブなどの長 ● 撮像素子 (CMOS) の特性によるもので、 故障で 写っている。...
- Page 36 このようなときは (続き) プリントがこのようなときは… このようなときは 考えられる原因 処置 日付が正しく印刷され ● 日付が正しく設定されていない。 ● 日時設定をやり直してください ない。 (10 ページ) 。 出来上がったプリン トの ● フィルムが残っている途中で裏ぶた ● フィルムを使い切るまで、 裏ぶたを開けないでくだ 一部または全部が白く を開けた。 さい。 フィルムが残っている状態で裏ぶたを開けると なっている。 フィルムが感光して、 感光した部分が白くなります。 画面にむらがある。 ① プリン トされた直後に圧力がかかった。 ① プリン トを振る、 曲げる、 折る、 押さえるなどしない ② プリン トがスムーズに送り出されな でください。 かった。 ② プリン ト出口をふさがないでください。 プリン トの下側に黒い ● 振動や落下などの衝撃で、...
-
Page 37: 安全にご使用いただくために
安 全にご使用いただくために ● この製品および付属品は、 写真撮影 ・ プリン ト以外の目的に使用しないでください。 ● 製品の安全性には十分配慮しておりますが、 下記の内容をよくお読みの上、 正しくご使用ください。 ● この説明書はお読みになった後で、 いつでも見られるところに必ず保管してください。 警 告 注 意 この表示を無視して誤った取り扱いをすると、 人が死亡また この表示を無視して誤った取り扱いをすると、 人が傷害を は重傷を負う可能性が想定される内容を示しています。 負う可能性が想定される内容または、 物的損害の発生が 想定される内容を示しています。 警 告 カメラ (バッテリー) が熱くなる、 煙が出る、 焦げ臭いなどの異常を感じたときは、 ただちに電源を切って、 USBケーブル を抜いてください。 発火ややけどの原因となります。 (USBケーブルを抜く際、 やけどには十分ご注意ください) カメラを水中に落としたり、 内部に水または金属や異物などが入ったときは、 ただちにUSBケーブルを外してください。 発熱 ・ 発火の原因となります。 引火性の高いガスが充満している場所や、... - Page 38 取扱上のお願い カメラの取り扱い 1 カメラは精密機械ですから、 水にぬらしたり、 落としたり してショ ックを与えないでください。 また、 砂の掛かりやすいとこ ろには置かないでください。 2 市販のス トラップをご使用になる場合は、 ス トラップの強度をご確認の上、 ご使用ください。 携帯電話、 PHS用ス トラップ は軽量機器用ですので、 ご使用の際は特にご注意ください。 3 長期間お使いにならないときは、 湿気、 熱、 ほこりの影響の少ないところに保管してください。 4 汚れをふき取るのにシンナー、 アルコールなどの溶剤は使用しないでください。 5 フィルム室に汚れやほこりがあると、 プリン トの仕上がりに影響します。 フィルム室に汚れやほこりがつかないようにご注 意ください。 6 閉めきった自動車の中や、 高温の場所、 湿気のある場所、 海岸などに長時間放置しないでください。 7 ナフタリンなど防虫剤のガスは、 カメラにもフィルムにも有害ですから、 たんすなどへの収納は避けてください。 8 このカメラはマイクロコンピューターによって制御されているため、 ごくまれにカメラが誤作動する場合があります。 この ようなときは、...
- Page 39 ■ 保存上のご注意 • 充電された状態で長期間保存すると、 特性が劣化することがあります。 しばらく使わない場合は、 使い切った状態で保存 してください。 • 涼しいところで保存してください。 - 周囲の温度が+15℃〜+25℃くらいの乾燥したところをおすすめします。 - 暑いところや極端に寒いところは避けてください。 ■ 使用上のご注意 • 長時間高温の場所に置かないでください。 また、 長時間使用していると、 カメラ本体やバッテリーが熱を帯びますが、 故障 ではありません。 ■ ラジオ、 テレビなどへの電波障害についてのご注意 この装置は、 クラスB情報技術装置です。 この装置は、 家庭環境で使用することを目的としていますが、 この装置がラジオ やテレビジョン受信機に近接して使用されると、 受信障害を引き起こすことがあります。 取扱説明書に従って正しい取り 扱いをして下さい。 本製品を飛行機や病院の中で使用しないでください。 使用した場合、 飛行機や病院の制御装置などの誤作動の原因にな ることがあります。 VCCI-B ■ 本製品が取得している認証関連のマークは、...
- Page 40 フィルム、 プリン トの取り扱い フィルム、 プリン トの取り扱いかたについては、 富士フイルム インスタン トフィルム instax SQUAREの取扱説明を参照し てください。 1 フィルムは、 涼しい場所に保管してください。 特に閉め切った自動車の中などの極端に高温の場所に長時間放置しないで ください。 2 フィルムに穴をあけたり、 破いたり、 切ったり しないでください。 フィルムが損傷した場合は、 使用しないでください。 3 カメラに入れたフィルムは、 できるだけ早くプリン トしてください。 4 フィルムを極端に温度の低い場所や高い場所に置いてしまった場合は、 通常の温度になじんでからプリン トしてください。 5 フィルムは有効期限内にお使いください。 6 空港の預け入れ荷物検査などでの強いX線照射を避けてください。 未使用のフィルムにカブリなどの影響が出る場合が あります。 手荷物としての機内持ち込みをおすすめします (詳しくは各空港でご確認ください) 。 7 プリン トは強い光を避け、 涼しく乾燥した場所に保存してください。 フィルムや出来上がった写真を取り扱うときの注意 詳細は、 富士フイルム インスタン トフィルム instax SQUAREの取扱説明を参照してください。...
-
Page 41: アフターサービスについて
アフターサービスについて お手持ちの製品が故障した場合には、次の要領で修理させていただきます。 ご購入店または富士フイルム フィルムカメラお客さま相談窓口にお申し出ください。 それ以外の責は、ご容赦いただきます。なお、保証、使い方などのご不明な点につきましても、 富士フイルム フィルムカメラお客さま相談窓口をご利用ください。 ●無料修理 故障した製品についてはご購入年月日、購入店名の記入された、ご購入日より 1 年以内の保証書が添付されて いる場合には、保証書に記載されている内容の範囲内で、無料修理させていただきます。 *詳しくは、製品保証規定をご覧ください。 ●有料修理 保証期間を過ぎた修理は、原則として有料となります。保証期間内であっても、製品保証規定の「2.」の場合は すべて有料となります。また運賃諸掛かりは、お客様にてご負担願います。 ●修理不能 浸(冠)水、強度の衝撃、その他で損傷がひどく、故障前の性能に復元できないと思われるもの、および部品の 手当が困難なものなどは修理できない場合もありますので、富士フイルム フィルムカメラお客さま相談窓口に お問い合わせください。 ●修理部品の保有期間 この製品の補修用部品は、製造打ち切り後 5 年を目安に保有しておりますので、この期間中は原則として修理を お引き受けいたします。 ●修理ご依頼に際してのご注意 1. 保証規定による修理をお申し出になる場合には、必ず保証書を添えてください。 2. ご購入店や弊社サービスステーションで、ご指定の修理箇所、故障内容を詳しくご説明ください。故障の状態に よっては、事故となったフィルムなどを添えてくださると修理作業の参考になります。 3. 修理箇所のご指定がないときは、弊社では各部点検をはじめ品質、性能上必要と思われるすべての箇所を修理し ますので、料金が高くなることがあります。 4. 修理に関係のない付属品類は、紛失などの事故を避けるため、修理品から取り外してお手もとに保管してくださ い。 5. 修理のために製品を郵送される場合は、ご購入時の外箱などに入れてしっかり包装し、必ず書留小包でお送りく ださい。 6. 修理期間は故障内容により多少違いますが、普通修理品の場合は弊社サービスステーションで、お預かりしてか ら通常 7 〜 10 日位をご予定ください。 ●海外旅行中の故障... - Page 42 個人情報の取扱について 当社は、お客様の住所・氏名・電話番号等の個人情報を大切に保護するため、個人情報保護に関する法令を遵守する とともに、電話問い合わせ時あるいは修理依頼時にご提供いただいたお客様の個人情報を次のように取扱います。 1. お客様の個人情報は、お客様のお問い合わせに対する当社からの回答、修理サービスの提供およびその後のユー ザーサポートの目的にのみ利用いたします。 2. 弊社指定の宅配業者、修理業務担当会社、その他の協力会社に当社が作業を委託する場合、委託作業実施のため に必要な範囲内でお客様の個人情報を開示することがございます。開示にあたりましては、盗難・漏洩等の事故を 防止し、また当社より委託した作業以外の目的に使用しないよう、適切な監督を行います。 3. ご提供いただいたお客様の個人情報に関するお問い合わせ等は、富士フイルム フィルムカメラお客さま相談窓口 あるいは修理依頼先サービスステーション宛にお願いいたします。...
- Page 43 ENGLISH Contents Before Use ..........44 Printing .............57 Part Names ..........45 Adjusting/Processing Images (Eff ect) ...59 Filter ...............59 Display on the LCD Monitor ....46 Adjusting the Brightness .......60 Using the selector buttons ......46 Vignette ..............60 Using the command dial ........46 More on Photography ......61 Attaching the Strap ......47 Using AF/AE Lock ..........61 Attaching the Hand Strap ......47...
-
Page 44: Before Use
Before Use Before using the camera, check the following. Notes on Disposing of the Camera A built-in lithium ion battery is used for this camera. Make sure supplied accessories are When you dispose of the camera, follow your local regulations and dispose of it properly. included in the package. -
Page 45: Part Names
Part Names Front Rear Flash/Self timer lamp Lens Film door lock (Playback) button Self-portrait mirror Film ejection slot Strap hook (Selfie) (Back) button USB port Strap hook Zoom ring (Print) button Reset button MENU/OK button Shutter button (Right) Shutter button (Left) Micro SD card slot (Brightness) button Card slot cover... -
Page 46: Display On The Lcd Monitor
Display on the LCD Monitor Pressing the (Back) button displays information below. Some items are not shown depending on the file type to shoot. Playback Shooting Frame number Shooting date/time Flash mode Movie shooting (Page 62) (Page 49) Using the selector buttons Brightness adjustment Date/time print (Page 60) -
Page 47: Attaching The Strap
Attaching the Strap Attaching the Hand Strap Attaching the Shoulder Strap (Purchased Separately) Attach the strap as illustrated below. • When you carry or use the camera, put the strap around Attach the shoulder strap to the strap hook on each side as your wrist so that the camera does not drop. -
Page 48: Charging The Battery
Charging the Battery Be careful of the orientation. Charging from a PC: • Connect the camera and PC directly. Do not connect them via a keyboard or USB hub. • If the PC enters the sleep mode while charging is in progress, charging will stop. -
Page 49: Turning The Camera On/Off
Turning the Camera on/off To turn the camera on, use the power switch on the back and select still picture or movie. When you shoot a still picture: When you turn the camera off: Slide the power switch to “OFF”. Checking Remaining Battery Life Pressing the (Back) button on the shooting/playback... -
Page 50: Performing Initial Settings
Performing Initial Settings The language, date, and time are not specified when the camera is turned on for the first time. Follow the procedure below to specify them. You can specify these settings at any time. See page 71 if you perform these settings later or change them. -
Page 51: Function Setting For The Shutter Button
Function Setting for the Shutter Button Assign a function to each of the shutter buttons from the combinations on the table below. When you shoot a still picture: Shutter button (Right) Shutter button (Left) Shutter button Shutter button Shutter button Shooting mode switching button Function Shutter button... -
Page 52: Loading/Removing The Instax Square Film Pack
The instax mini film or instax WIDE film cannot be used. Notes on the film pack The film cover (black) is • Each FUJIFILM Instant Film “instax SQUARE” pack contains ejected automatically when 1 black film protective cover and 10 film sheets. -
Page 53: Basic Photography And Playback
Basic Photography and Playback Taking a Picture This section describes basic operation for photography. ¤ Lightly press the shutter button the rest of the way Slide the power switch to (still picture). down to take the picture. The picture is taken and it is saved in the camera’s memory. -
Page 54: Viewing Images
Basic Photography and Playback (Continued) Viewing Images Changing the Playback Display Images can be viewed on the monitor. You can zoom in on the image on the monitor or change the number of images displayed at a time. Slide the power switch to (still picture). -
Page 55: Shooting A Movie And Playback
Shooting a Movie and Playback Shooting a Movie This section describes basic operation for shooting a movie. Press the shutter button fully. Slide the power switch to (movie). The screen below appears and movie shooting starts. Ÿ Hold the camera. •... -
Page 56: Playing Back Movies
Shooting a Movie and Playback (Continued) ⁄ Playing back Movies Press Movies can be played back on the monitor. Slide the power switch to (movie). The movie playback starts. Operations during movie playback • Press to pause playback. Pressing again Ÿ... -
Page 57: Printing
Printing Print an image following the steps below. • When you print an image captured from a movie file: Slide the power switch to (still picture) or 1 Press to select a movie to play back. (movie). Pressing displays a previous thumbnail. Ÿ... - Page 58 2 when the image to print is displayed. (Page • For details on taking out the film, refer to the When the film has been instructions and warnings on the FUJIFILM Instant ejected (the camera stops Film “instax SQUARE” pack.
-
Page 59: Adjusting/Processing Images (Eff Ect)
Adjusting/Processing Images (Eff ect) You can select an effect menu directly by pressing a button on the rear to adjust the image effect while the shooting/ playback screen is displayed. Filter Type Details Follow the steps below to select a filter. Immerse Adds saturation and shadows. -
Page 60: Adjusting The Brightness
Adjusting/Processing Images (Eff ect) (Continued) Adjusting the Brightness Vignette Follow the steps below to adjust the brightness. Adjust the brightness of four corners on the image. Follow the steps below to adjust the brightness. Press the (Brightness) button while shooting/ Press the (Vignette) button while shooting/ playback screen is displayed. -
Page 61: More On Photography
More on Photography Using AF/AE Lock Using the Self Timer When you take a still picture, use “AF/AE lock“ to lock focus/ Use the self timer to include a photographer in a group exposure by pressing the shutter button halfway. AF/ photo or to reduce blur when the shutter button is pressed. -
Page 62: Using The Flash
More on Photography (Continued) Using the Flash Taking a Self Portrait (Selfie) You can take a self portrait using the self portrait mirror. Use the flash when shooting at night or indoors under low light. Press the MENU/OK button on the shooting screen. -
Page 63: Changing The Shooting Mode
Changing the Shooting Mode Select a shooting mode according to the subject or purpose. Selecting a Shooting Mode Shooting Mode Follow the steps below to select a shooting mode. STANDARD Press the MENU/OK button on the shooting screen. Select for normal photography. The flash fires automatically when the camera recognizes it is dark. - Page 64 Changing the Shooting Mode (Continued) ■Double exposure ■Split Select DOUBLE EXPOSURE for SHOOTING MODE, Select SPLIT for SHOOTING MODE, press the MENU/ press the MENU/OK button, and then follow the OK button, and then follow the procedure below. procedure below. Press , or turn the command dial to select Shoot the first subject.
- Page 65 Changing the Shooting Mode ■Collage ■Time Shift Collage Select COLLAGE for SHOOTING MODE, press the Select TIMESHIFT COLLAGE for SHOOTING MODE, MENU/OK button, and then follow the procedure press the MENU/OK button, and then follow the below. procedure below. Press to select a collage pattern, and press the MENU/OK button.
-
Page 66: Printing From Print History (Reprint)
Printing from Print History (Reprint) Print an image with the same settings (e.g. image effect) as those specified when you printed the image in the past. Follow the steps below for operation. Press the (Print) button. Press the (Playback) button. ¤... -
Page 67: Using A Memory Card
Using a Memory Card This camera can save approximately 50 still images in the memory. However, using a memory card enables you to save more images. Inserting the Memory Card Caution on the memory card • Micro SD/micro SDHC cards have been approved Open the card slot cover. -
Page 68: Copying Images To The Computer
Copying Images to the Computer Connect the camera to the computer and copy images. Start up the computer. Caution • Do not cause the battery to run out while copying the Ÿ images; otherwise, the images may be damaged. Turn the camera off. •... -
Page 69: Shooting Menu
Shooting Menu Follow the steps below to specify/change the shooting SELF-TIMER (still picture only) menu. Select a setting when using the self timer. (Page 61) Press the MENU/OK button on the shooting screen. AF ILLUMINATOR (still picture only) If you select ON, the AF-assist illuminator lights up while focusing to assist auto focus when it is dark. -
Page 70: Playback Menu
Playback Menu Follow the steps below to specify/change the playback ERASE menu. Delete an image one by one or delete all at one time. Press the MENU/OK button on the playback screen. Option: FRAME/ALL FRAMES IMAGE ROTATE (still picture only) Rotate an image by 90 degrees. -
Page 71: Setup Menu
Setup Menu Follow the steps below to specify/change the setup OPERATION VOL. menu. Adjust the volume of the operation, shutter, or startup Press the MENU/OK button on the shooting/ sound. playback screen. Option: OFF/1/2/3 Select OFF to disable sounds. SHUTTER BUTTON SETTINGS Assign the function for the left/right shutter button. -
Page 72: Specifications
SPECIFICATIONS Camera Image sensor 1/5-in., CMOS with primary color fi lter Eff ective pixels 1920 x 1920 Storage media Built-in memory, microSD/microSDHC memory card Recording capacity (still picture) Built-in memory: Approx. 50 fi les (still picture), Approx. 30 seconds (movie) microSD/microSDHC memory card: Approx. - Page 73 SPECIFICATIONS Printer Film FUJIFILM Instant Film “instax SQUARE” (Purchased separately) Photo capacity 10 prints/pack Film size 86 mm x 72 mm/3.4 in. x 2.8 in. Image size 62 mm x 62 mm/2.4 in. x 2.4 in. Supported image size 800 x 800 dots Printing solution 12.5 dots/mm (318 dpi, 80 μm dot pitch)
-
Page 74: Trouble Shooting
TROUBLE SHOOTING Review below if you think the camera has some trouble. If you cannot find the solution, contact a FUJIFILM authorized distributor. Or visit our website below. FUJIFILM website : http://fujifilm.com/ During operation Problem Possible Causes Solution The camera cannot be ●... - Page 75 ② Charge the camera fully. The film pack cannot ① The fi lm pack is not for your camera. ① Use FUJIFILM Instant Film “instax SQUARE” only. ② The fi lm pack is not being loaded (No other fi lms can be used.) be loaded, or cannot be ②...
- Page 76 TROUBLE SHOOTING (Continued) Printed pictures Problem Possible Causes Solution The correct date is not ● The date setting is not correct. ● Perform date setting again. (Page 71) printed. Part or whole finished ● The fi lm door was opened before ●...
-
Page 77: Important Safety Notice
If anything is wrong with the camera, never attempt to repair it by yourself. You may be injured. If this product is dropped or damaged so that the inside is showing, do not touch it. Contact your FUJIFILM dealer. Do not touch any parts or projecting parts inside the back cover. You may be injured. - Page 78 • Connect the equipment into an outlet on a circuit different from that to which the receiver is connected • Consult the dealer or an experienced radio/TV technician for help Changes or modifications not expressly approved by FUJIFILM responsible for compliance could void the user’s authority to operate the equipment.
- Page 79 COMMON SENSE CAMERA CARE CAMERA CARE 1 Your camera is a precision instrument. Do not get it wet or drop it. Also, do not expose it to sand. 2 Do not use a strap made for cellular phones or other similar electronic products. These straps are usually too weak to hold your camera securely.
- Page 80 INSTAX SQUARE FILM AND PRINT CARE See FUJIFILM Instant Film “instax SQUARE” for film use instructions. Follow all instructions for safe and proper use. 1 Keep the film in a cool place. Do not leave the film in a place where the temperature is extremely high (e.g., in a closed car) for many hours.
- Page 81 Cautions on handling the fi lm and prints For details, refer to the instructions and warnings on FUJIFILM Instant Film “instax SQUARE”. Information for traceability in Europe Information for FUJIFILM in the United Manufacturer: FUJIFILM Corporation States Address, City: 7-3, Akasaka 9-Chome, FUJIFILM North America Corp.
- Page 82 MEMO...
- Page 83 MEMO...
- Page 84 本製品のお問合せ/修理に関するお問い合わせ先 ●富士フイルム フィルムカメラお客さま相談窓口 TEL 050-3786-1640/FAX 050-3786-2050 受付時間 : 月曜日〜金曜日 9 : 30〜17 : 30 (土日祝日、 年末年始を除く) ▶ 各窓口の受付時間 ・ サービス内容は、 予告なく変更する場合があります。 最新の情報は弊社ホームページでご確認ください。 ▶ 富士フイルムグループでは、 お客さまからのお問い合わせ内容を正確に把握するために録音させていただくことがあります。 ▶ FAXでの受け付けは24時間行っておりますが、 返信応答は電話の受付時間と同じです。 ▶ 修理品を持参または送付される場合は、 下記サイトをご覧ください。 http://fujifilm.jp/support/filmandcamera/repairservice/index.html ●本製品以外の富士フイルム製品のお問合せ先 富士フイルム株式会社 お客様コミュニケーションセンター TEL 050-3786-1711 受付時間:月曜日〜金曜日 9:30〜17:30(土日祝日、年末年始を除く) *各窓口の受付時間、サービス内容は予告なく変更する場合があります。最新の情報は弊社ホームページでご確認 ください。 富士フイルムホームページ:http://fujifilm.jp/...
Need help?
Do you have a question about the Instax Square SQ20 and is the answer not in the manual?
Questions and answers