
Related Manuals for Saeco 10002683


Summary of Contents for Saeco 10002683
- Page 1 TABLE OF CONTENTS Operation and maintenance manual Before using the machine, please read the attached operating instructions. Carefully read the safety rules FOR HOUSEHOLD USE ONLY...
-
Page 2: Important Safeguards
IMPORTANT SAFEGUARDS When using electrical appliances, basic safety precautions should always be followed, including the following: 1. Read all instructions. 2. Do not touch hot surfaces. Use handles or knobs. 3. To protect against fire, electric shock and injury to person do not immerse cord, plugs, or machine in water or other liquid. - Page 3 This appliance is for household use only. Any servicing, other than cleaning and user maintenance, should be performed by an authorized service centre. Do not immerse machine in water. To reduce the risk of fire or electric shock, do not disassemble the machine.
-
Page 4: Table Of Contents
TABLE OF CONTENTS GENERAL INFORMATION ...3 MACHINE ...4 ...4 ACCESSORIES INSTALLATION ...5 ...5 STARTING THE MACHINE ...6 MANUAL PRIMING OF THE WATER CIRCUIT ...6 SETTING THE LANGUAGE AND THE CLOCK ...7 INTENZA WATER FILTER DISPLAY ...8 ...8 CHOOSE COFFEE AROMA ADJUSTMENTS ...9 ...9 COFFEE INTENSITIY... -
Page 5: General Information
GENERAL INFORMATION The coffee machine is intended for preparing espresso by using either coffee beans or ground coffee. It includes an automatic device for preparing milk beverage and a hot water dispenser. The machine is elegantly designed for domestic use and is not suitable for continuous heavy duty or professional use. -
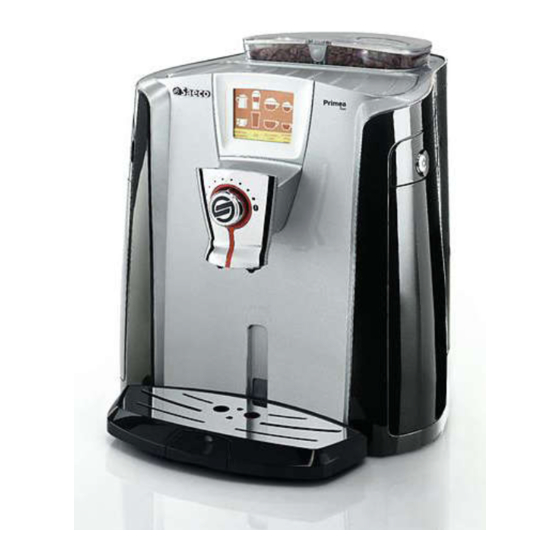
Page 6: Machine
MACHINE Open button of double coffee bean hopper Cup warming plate TOUCH SCREEN Display Dispensing head Drip tray + grill and fl oat Compartment for milk container Milk compartment open button Hot water spout Water tank ACCESSORIES Grinder adjustment key Lubricant for the Cleaning detergent brew group... -
Page 7: Installation
STARTING THE MACHINE Make sure that the main power button is not switched to the “ON” position. Press the button to open the cover. Fill hopper “A” with coffee beans (see page 10). Remove the water tank. We recommend installing the water fi... -
Page 8: Manual Priming Of The Water Circuit
INSTALLATION MANUAL PRIMING OF THE WATER CIRCUIT Manually prime the water circuit only when display (2) appears. Note: fi rst make sure that the water tank is full. Important: before performing the circuit priming, position the SBS system (see page 9) as shown on the display. -
Page 9: Intenza Water Filter
INTENZA WATER FILTER To improve the quality of the water you use, and extend the life of your machine at the same time, it is recommended that you install the water fi lter. After installation, go to the water fi lter initialization program (see programming). -
Page 10: Display
DISPLAY It is possible to change the type of display and choose between " icon format" and "text format" ICON FORMAT show icon my custom explanation coffee Go to the "text Beverage format" menu programming • To get the desired beverage, press the corresponding symbol on the display. The machine automatically performs all the necessary operations (see page 11). -
Page 11: Adjustments
COFFEE INTENSITIY The SBS system has been carefully designed to give your coffee the intense taste you desire. Simply turn the dial and you will notice that the coffee goes from mild intensity to strong intensity. SBS – SAECO BREWING SYSTEM SBS adjusts the intensity of the brewed coffee, and can even be adjusted while brewing. -
Page 12: Coffee Mixing
COFFEE MIXING DOUBLE COFFEE BEAN HOPPER The Primea Cappuccino Duo has two coffee bean hoppers which will enable you to use one single type of coffee or mix two different types together. Thanks to the two ceramic coffee grinders - one for each hopper - you’ll be able to use the two blends separately. -
Page 13: Selection Of A Single Blend Or Blend Mix
SELECTION OF A SINGLE BLEND OR BLEND MIX All coffee products may be dispensed by using one single coffee blend, or by mixing the two blends together, according to your taste. After a coffee beverage has been selected, the machine goes to screen 2, thus enabling the user to decide which blend to use (the blend in hopper A or B), or if the two different coffee types are to be mixed, and in which proportion. -
Page 14: Beverage Dispensing
BEVERAGE DISPENSING DISPENSING COFFEE, HOT WATER AND MILK CAN BE INTERRUPTED AT ANY TIME BY SELECTING THE "STOP ... DISPENSING" BUTTON. Check that all the containers are clean. To do this operation, follow the instructions in the "Cleaning and Maintenance" (see page 41). To brew 2 cups, the machine dispenses half of the entered quantity and briefl... -
Page 15: Dispensing Beverages With Ground Coffee
DISPENSING BEVERAGES WITH GROUND COFFEE Pre-ground coffee must be poured into the appropriate compartment positioned next to the coffee bean hopper. Pour in only coffee ground for espresso machines and never coffee beans or instant coffee. (see the "Beverage programming" chapter on page 17). WARNING: PUT PRE-GROUND COFFEE IN THE COMPARTMENT ONLY WHEN YOU WISH TO DISPENSE THIS TYPE OF BEVERAGE. -
Page 16: Latte Macchiato
BEVERAGE DISPENSING THE DISPENSED MILK CAN REACH HIGH TEMPERATURES: THERE IS A DANGER OF SCALDING. DO NOT TOUCH IT WITH BARE HANDS. THE MILK USED MUST HAVE BEEN PROPERLY PRESERVED. DO NOT USE IT AFTER THE EXPIRATION DATE ON THE PACK AGE. WHEN YOU HAVE FINISHED PREPARING BEVERAGES CONTAINING MILK, PROCEED WITH CLEANING THE CONTAINER AND THE MACHINE'S CIRCUIT. - Page 17 If the user wishes to continue preparing other drinks the machine will keep the “milk rinsing” signal active. After 20 minutes of inactivity, the machine requires the user to perform a rinsing cycle as described in Step 9. If the machine is turned off immediately after dispensing a milk beverage, the next time the machine is turned on it will require the user to perform a rinsing cycle.
-
Page 18: Espresso Macchiato
BEVERAGE DISPENSING ESPRESSO MACCHIATO program- show icon my custom ming explanation coffee menu Press the icon once for 1 cup and twice for 2 cups. espresso macchiato stop stop coffee milk dispensing dispensing Once the coffee has been brewed, the machine automatically prepares the hot milk. -
Page 19: Beverage Programming
DISPENSING HOT MILK Fill the milk container program- show icon my custom ming explanation coffee menu Press the hot milk icon once. BEVERAGE PROGRAMMING MENU Each beverage can be programmed according to your individual taste. Customization is shown on the display with the addition of an asterisk. -
Page 20: Programming Milk Beverages
BEVERAGE PROGRAMMING A:75% light espresso start! B:25% medium preground strong restore save back settings settings start! Pressing allows the machine to brew coffee. custom coffee espresso amount stop coffee dispensing espresso save back settings Once the brew cycle fi nishes, press "save settings"... - Page 21 A:75% light my latte macchiato start! B:25% medium preground strong restore save back settings settings start! Pressing allows the machine to start the brewing cycle. custom custom my latte coffee milk macchiato amount amount stop stop milk coffee dispensing dispensing To dispense an amount of milk greater than that preset by the manufacturer, press “custom milk amount”...
-
Page 22: Programming The Machine
PROGRAMMING THE MACHINE Some of the machine’s functions can be programmed to customize operations according to your own requirements. Programming the machine operations (see page 20) Special functions (see page 40) Maintenance (cleaning the machine) (see page 29) After having set each of the following menus, press - "go back"... -
Page 23: Language Menu
“LANGUAGE” MENU For changing the language of the display. language “CUP ILLUMINATION” MENU This function allows activating/ deactivating the dispensing area illumination. illumination turn off illumination. “WATER FILTER” MENU The water fi lter purifi es water and allows you to taste the full aroma of coffee. water fi... -
Page 24: Water Hardness Menu
PROGRAMMING THE MACHINE «WATER HARDNESS» MENU - INTENZA AROMA SYSTEM With the “Water hardness” function you can adjust your machine and the Intenza water fi lter to the level of hardness of the water you use, so that the machine will request descaling at the right moment. The water hardness in the Intenza water fi... -
Page 25: Cup Warming Plate Menu
“CUP WARMING PLATE” MENU To activate the cup warming plate on the upper part of the machine. warmer keep the cup warming plate off when the machine is in stand-by. “ACOUSTIC TONES AND ALARMS” MENU To activate/deactivate the machine’s acoustic tones. Pressing the button does not immediately change the status. alerts &... -
Page 26: Beverage Settings
PROGRAMMING THE MACHINE BEVERAGE SETTINGS To adjust the general brew parameters of the various beverages containing coffee, press the “beverage settings” button on the main menu. choose the blend to be used adjust the coffee prebrewing The current programming status is indicated according to each parameter. ADJUSTMENT OF THE COFFEE BREW TEMPERATURE To set the temperature for preparing coffee, press the “temperature”... -
Page 27: Aroma Adjustment For Coffee Brewing
“AROMA” ADJUSTMENT FOR COFFEE BREWING To set the “Aroma” function, that is to say the quantity of coffee to be ground, and to set the use of pre-ground coffee. You can have your beverage with the quantity of coffee you desire or you can choose to prepare it with decaffeinated coffee by using the “preground”... -
Page 28: Additional Functions
PROGRAMMING THE MACHINE ADDITIONAL FUNCTIONS There are some additional functions of the machine. Pressing the “extras” button allows you to access the menu and the following message will appear on the display. access the menu where some of the most famous recipes in the world are kept. - Page 29 If, for example, you want to taste a typical American coffee, you must press the “American coffee” button. In this case, the following message appears in the display. american coffee back After brewing the desired beverage, it can be saved on one of the icons of the main menu. return to the recipe preparation menu To save the beverage you just made, the display shows the icon that allows this function.
-
Page 30: Demo Mode
PROGRAMMING THE MACHINE “DEMO” MODE This function shows the machine’s potential. Note: When this function is activated, the machine is in stand-by and all the functions are disabled. The “demo” mode is saved even when the machine is turned off by the main switch. -
Page 31: Maintenance
MAINTENANCE To clean/maintain all of the machine’s internal circuits, press the “maintenance” button on the main menu. lock the Touch Screen (to preform cleaning of the display). begin washing the milk circuits. begin rinsing the milk circuits. MILK CIRCUIT RINSE CYCLE To rinse the machine’s internal circuits used for preparing milk. -
Page 32: Milk Circuit Wash Cycle
PROGRAMMING THE MACHINE MILK CIRCUIT WASH CYCLE To rinse the machine’s internal circuits used for preparing milk. This cycle is proposed after 14 days from the fi rst dispensing of a milk-based beverage. After 14 days, the “milk cleaning” message starts fl ashing (see page 15). Perform the wash cycle as described in this section. Push the “milk cleaning”... - Page 33 Fill the milk container with fresh water up to the «max» level. milk cleaning cycle add cleaner to milk conteiner Close the compartment. Press the button. Possible detergent or water residues may remain in the container during wash and rinse cycles. In any case, empty the container from any liquids before fi...
- Page 34 PROGRAMMING THE MACHINE milk cleaning cycle rinsing... Wait… milk cleaning cycle fill milk container with cold water Rinse the container and fi ll it with fresh water. milk cleaning cycle rinse the milk container When the rinse cycle has fi nished the above message will appear.
-
Page 35: Coffee Circuit Cleaning Cycle (Brew Group Wash Cycle)
COFFEE CIRCUIT CLEANING CYCLE (BREW GROUP WASH CYCLE) To clean the machine’s internal circuit used for brewing coffee. It is advisable to perform this wash cycle after 500 coffee brewing cycles, or monthly. Packages of Saeco detergent tablets may be purchased at your local dealer or by Authorized Service Centres. Note: before performing this function make sure that: 1. -
Page 36: Descaling
PROGRAMMING THE MACHINE DESCALING To perform the automatic descaling cycle. Descaling is necessary every 3-4 months, according to the water hardness, when water comes out more slowly than normal or when the machine indicates it. The machine must be turned on and will automatically manage the distribution of the descaling agent. A PERSON MUST BE PRESENT DURING THE OPERATION. - Page 37 In order to run a descaling cycle before the machine indicates the necessity to do so, press the button "descaling cycle" and then "start descaling" to start the descaling cycle. descaling start descaling cycle descaling cycle please wait insert the water tank with fresh water When the solution is fi...
-
Page 38: Clock Settings
PROGRAMMING THE MACHINE CLOCK SETTINGS To adjust the current date and time, the timer for stand-by (energy savings) and the times for automatically turning on and turning off the machine. Press the "clock settings" button on the main menu. set the parameters for stand-by after the last brew. -
Page 39: Automatic Timer Settings
Time format To set the time view mode. This setting adjusts all clock functions to either “am/pm” or “24 hour” formats. To set the time view mode, press the “time format” button. The modifi catino is immediately applied and in small writing appears ‘am/pm”... - Page 40 PROGRAMMING THE MACHINE Setting an interval for turning on the machine In order to program an interval for turning on the machine, press the button for the interval that you wish to set. setting 2 on 12:00 pm off 14:00 pm For every day, choose the intervals for turning on Arrow through the days of the week, and for each day, select the automatic timer intervals you wish to activate.
-
Page 41: Energy Saving Settings
ENERGY SAVING SETTINGS To set after what duration of time, from the last dispensed beverage, the machine will go into stand-by mode. The default setting is "after 3 hours". energy saving setting after after 15 min 30 min standby setting after after 3 hours... -
Page 42: Special
PROGRAMMING THE MACHINE SPECIAL This menu allows you to access special functions present on the machine. Press the "specials" button on the main menu. FACTORY SETTINGS The function for restoring all the factory settings is contained in this menu. This function is particularly important for restoring the original settings. -
Page 43: Cleaning And Maintenance
MAINTENANCE DURING OPERATION During normal operation, the “empty dreg drawer” message may appear. This operation must be performed when the machine is on. Remove the grounds drawer, empty and wash. GENERAL MACHINE CLEANING The cleaning described below must be performed once a week. Note: Always use fresh water. -
Page 44: Milk Container Maintenance And Cleaning
CLEANING AND MAINTENANCE MILK CONTAINER MAINTENANCE AND CLEANING The milk container and the cappuccinatore have been designed to optimize the milk froth. Thorough cleaning and maintenance of the milk container and cappuccinatore will allow you to savour excellent milk-based beverages. It is recommended to rinse the cappuccinatore before the fi... - Page 45 THOROUGH MAINTENANCE OF THE CAPPUCCINATORE Thoroughly wash the cappuccinatore at least once a week. The components may be washed with household detergents. Remove the cappuccinatore. Remove the cap from the lower part. O-RING REPLACEMENT When both parts of the cappuccinatore move too freely, replace the O-ring with the ones supplied. Remove the O-ring with a sharp object Separate the upper part of the...
-
Page 46: Cleaning The Brew Group
CLEANING AND MAINTENANCE CLEANING THE BREW GROUP The Brew Group must be cleaned at least once a week. Lubricate the Brew Group after approximately 500 brewing cycles. The grease for the lubrication of the Brew Group may be purchased by Authorized Service Centres. -
Page 47: Grinder Maintenance
GRINDER MAINTENANCE After approximately 2000 grinding cycles, the grinder needs a slight adjustment to ensure it is running in peak condition. WARNING! This operation should be carried out carefully and by an experienced user. The screw could fall into the grinder;... -
Page 48: Error Codes
ERROR CODES GUIDE MESSAGE THAT APPEARS restart the machine call assistance insert drip tray close coffee bean container add ground coffee insert brew group refi ll coffee container A refi ll coffee container B refi ll both coffee containers insert dreg drawer empty dreg drawer close side door refi... -
Page 49: Technical Data
GUIDE MESSAGE THAT APPEARS change water fi lter the cleaning cycle has not been completed correctly fi ll milk in to the milk container close milk drawer rinse the milk tank descale the machine energy saving TECHNICAL DATA Nominal voltage Power rating Power supply Shell material... -
Page 50: Safety Rules
SAFETY RULES IN CASE OF EMERGENCY Immediately unplug the cord from the outlet. ONLY USE THE APPLIANCE • Indoors. • For preparing coffee, hot water and for foaming milk. • For domestic use. • This appliance is not intended for use by persons (including children) with reduced physical, sensory or mental capabilities, or lack of experience and knowledge, unless they have been given supervision or instruction concerning use of the appliance by a person responsible for their safety. -
Page 51: Replacement Parts
• Never direct the jet of hot water and/or steam towards yourself or others. Danger of scalding. • Do not insert objects through the appliance’s openings. (Danger! Electrical Current!). • Do not pull out the plug by yanking on the power cord or touching it with wet hands. •... - Page 52 SAECO INTERNATIONAL GROUP S.P.A - Via Torretta, 240 - 40041 Gaggio Montano (Bo) - Italy declare under our responsability that the product: to which this declaration relates is in conformity with the following standards or other normative documents : • Safety of household and electrical appliances - General requirements EN 60335-1(2002) + A1(2004) + A2(2006) + A11(2004) + A12(2006) •...
- Page 53 Saeco International Group S.p.A. Via Torretta, 240 I-40041 Gaggio Montano, Bologna Tel: + 39 0534 771111 Fax: + 39 0534 31025 www.saeco.com The manufacturer reserves the right to change the features of the product without prior notice. © Saeco International Group S.p.A.