Table of Contents
Advertisement
Quick Links
REV A - 12/7/2018
PART#
DESCRIPTION
A
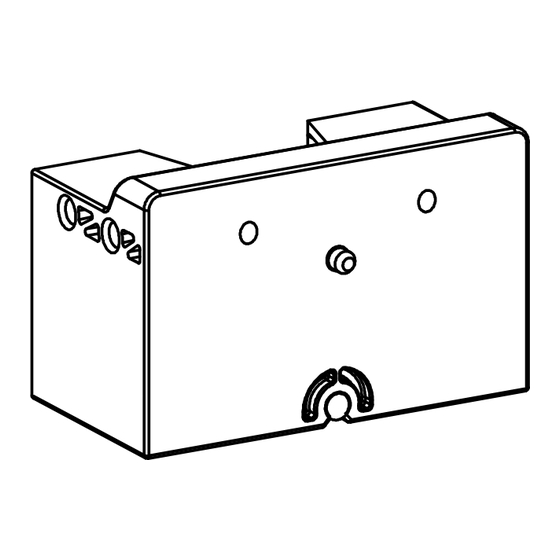
Front Mounting Block w/ (1) attached screw
B
Plastic Fasteners (1L, 1R)
C
Metal Mounting Bracket
D
#8 x 5/8" Truss Head Screw
E
#7 x 1 1/4" Fillister Head Screw
F
6mm x 13mm Euro Flathead Screw
Deluxe Roll-Out Tray
Front Clips (attached to above tray)
Runner (1L,1R)
(See Diagram #1a)
First, install metal mounting bracket into
each plastic fastener plate (L&R) by
inserting top edge of metal bracket under
tabs of plastic fastener plate and
snapping into place.
(See Diagram #1b)
Insert completed assembly into vertical
row holes on back panel at desired
height and secure with (2) #8 x 5/8"
Truss Head Screw.
Repeat for other side.
This assembly supports the back end of
the runner system.
(See diagram #2a)
Locate the 5mm peg on the backside of
the front mounting block and insert into
the side panel vertical row hole directly
behind the cabinet frame stile at the
same level as the rear mounting bracket.
(See diagram #2b)
Secure front mounting block to cabinet
side panel using pre-mounted #6 x
14mm pan head Euro screw. Insert (1)
#7x1 1/4" Fillister head screw into top
front hole of front mounting block and
tighten into the backside of cabinet
frame stile.
Repeat for other side.
This assembly will support the front end
of the runner system.
(See diagram #3a)
Select corresponding (L&R) runners
(Letters are printed on backside of
runners) Slide slotted end under tabs of
metal mounting bracket. Push back
runner until top front screw hole aligns
with front hole on the mounting block.
(See diagram #3b)
Secure runner to front mounting block
with (1) #6 x 13mm Euro flathead
screws.
Repeat for other side.
(See diagram #4a)
Attach roll-out drawer onto cabinet
runners. Some pressure is required for
the initial insertion of the tray, the cabinet
runners will self adjust to their smooth
action position. Please note some added
pressure might be applied to either the
outer or inner side of the cabinet runner
during the initial roll-out drawer insertion.
It is extremely important that the cabinet
is installed squarely in order to achieve
the smooth action feature of the roll-out
tray system.
**See page 2 for installing a Center Stile
DXROT block
INS0176
P/N: 9862037
DELUXE ROLL-OUT TRAY
TRADITIONAL MOUNTING INSTRUCTIONS
QTY
2
2
2
4
2
2
1
1 PAIR
2
Plastic Fastener
(Part # B)
Metal Mounting Bracket
(Part # C)
Diagram #1a
(Left & Right)
Front Mounting Block
w/ attachment screw (Part # A)
5mm Peg
Diagram #2a
(Back Side Shown)
Rear Fastener Assembly
Metal Mounting Bracket
(Part #C)
Tabs
Slotted End Runner
Diagram #3a
(Left Side Shown)
Deluxe Roll-Out Tray
B
A
Front Mounting
Plastic Fastener
Block
Plate (Left & Right)
Rear Fastener Assembly
(Left & Right)
Front Mounting Block
w/ attachment screw (Part # A)
Cabinet Frame Stile
Front Mounting Block
(Part #A)
Diagram #3b
(Left Side Shown)
Left Runner
Front Mounting Block
Diagram #4a
D
Truss Head Screw
E
Fillister Head Screw
C
F
Metal Mounting
Euro Flathead Screw
Bracket
Cabinet Back Panel
Cabinet Side Panel
Vertical Side Panel
Hole
#8 Truss Head Screw
(Part # D)
Diagram #1b
(Left & Right)
Fillister Head Screw
(Part # E
Pre-mounted 6mm x 13mm
Pan Head Euro Screw
Diagram #2b
(Left Side Shown)
Runner
6mm Euro Flathead
Screw (Part #C)
Assembled Components
(Left Side Shown)
Left Rear
Fastener Assembly
Right Rear
Fastener Assembly
Right Runner
Page 1 of 2
Advertisement
Table of Contents

Subscribe to Our Youtube Channel
Summary of Contents for KraftMaid DELUXE ROLL-OUT TRAY
- Page 1 REV A - 12/7/2018 DELUXE ROLL-OUT TRAY TRADITIONAL MOUNTING INSTRUCTIONS PARTS LIST PART# DESCRIPTION Truss Head Screw Front Mounting Block w/ (1) attached screw Plastic Fasteners (1L, 1R) Metal Mounting Bracket #8 x 5/8" Truss Head Screw Fillister Head Screw #7 x 1 1/4"...
- Page 2 REV A - 12/7/2018 DELUXE ROLL-OUT TRAY CENTER STILE MOUNTING INSTRUCTIONS PARTS LIST PART# DESCRIPTION Center Stile Block w/ (1) attached screw #7 x 1 1/4" Fillister Head Screw 6mm x 13mm Euro Flathead Screw Fillister Head Screw Deluxe Roll-Out Tray...
Need help?
Do you have a question about the DELUXE ROLL-OUT TRAY and is the answer not in the manual?
Questions and answers