Table of Contents
Advertisement
Quick Links
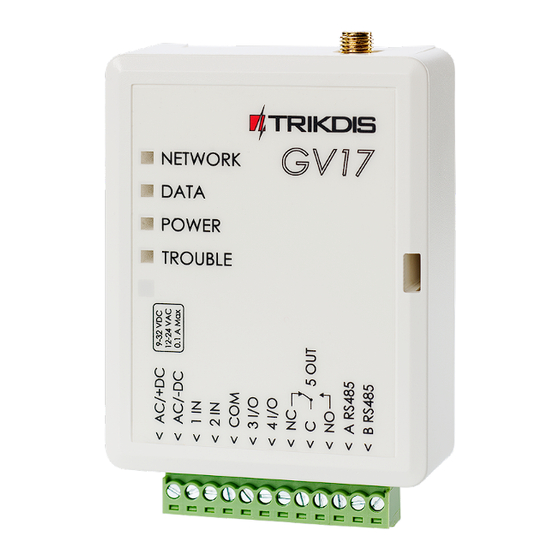
GSM gate controller GV17
Short installation manual
You can use GV17 controller to remotely control gates, barriers and
other equipment.
Control the system with Protegus app, phone call or SMS.
This manual describes how to install GV17 without configuring it via USB.
If needed, using TrikdisConfig program or Protegus application you can:
-
Add and delete users (up to 990) and administrators (up to 7).
-
Check the events log.
Additionally, using TrikdisConfig program you can:
-
Set a schedule when users can control the system;
-
Set a counter for how many times certain users can control the
system;
-
Customize what SMS text will be sent after an input or output
is activated or restored.
-
Set dual purpose contacts to operate in input or output mode;
-
Set input type (NC, NO, EOL) and output type (pulse, level);
-
Turn on event reporting to security company receiver;
-
Etc.
Find the configuration program TrikdisConfig and product specifications
in
GV17 page on trikdis.com
Installation and wiring
Remove the upper cover, pull out
the terminal block connector.
Place the PCB board back into the casing. Insert the terminal block.
Screw the GSM antenna to the antenna connector.
Place a Nano size SIM card to the SIM card slot.
!! It is necessary to disable the SIM card PIN code request before
inserting the SIM to GV17! You can do this using a mobile phone.
Alternatively, you can enter the SIM card PIN via TrikdisConfig
program using a USB.
Take out the PCB board from
the casing. Fix the casing to
chosen place with self-tapping
screws.
Advertisement
Table of Contents

Subscribe to Our Youtube Channel
Related Manuals for Trikdis GV17


Summary of Contents for Trikdis GV17
- Page 1 Place a Nano size SIM card to the SIM card slot. !! It is necessary to disable the SIM card PIN code request before inserting the SIM to GV17! You can do this using a mobile phone. Alternatively, you can enter the SIM card PIN via TrikdisConfig...
- Page 2 The intermediate relay K1 is turned on when the gates are open and it activates the GV17‘s 1IN input. The state of the GV17‘s 1IN input gives precise information about the state of the gates (when the gates are closed and when they are open).
- Page 3 Remote control via Protegus application !! Internet connection is necessary for communication with Protegus. Make sure that internet access is enabled for the SIM inserted into GV17. 1. Turn on the internet access for the controller To enable connection with Protegus, send an SMS in such format to...
- Page 4 Download and run the Protegus application or use the version online www.protegus.eu/login: Log in or sign in. Click on Add new system and type in GV17 Unique ID number. You can find this number on the device or the packaging sticker. 3. Control the system via Protegus application...
- Page 5 User‘s phone number NAME User‘s name or email address After adding the first user‘s phone number to GV17 phone number list, the controller will only respond to calls from the listed phone numbers. The controller will ignore other calls. 3. Give the system administrator‘s rights to another user The administrator‘s rights can be given to other users.
- Page 6 Command Data Description Change password. E.g.:PSW 123456 654123 password TXTA Object name Set object name. E.g.:TXTA 123456 House TXTE N1=<TEXT> Set SMS text about input or output activation. …… N1…N5 – number of the terminal contact. N5=<TEXT> E.g.: TXTE 123456 N1=Alarm in the living room TXTR N1=<TEXT>...
- Page 7 Change Protegus Cloud password. password E.g.: CONNECT 123456 Code=123456 Remote configuration via TrikdisConfig If needed, you can configure the GV17 with program TrikdisConfig remotely: Download TrikdisConfig from www.trikdis.com. Make sure that the controller is connected to the internet and the communication with Protegus is enabled (see part III.
Need help?
Do you have a question about the GV17 and is the answer not in the manual?
Questions and answers