
Related Manuals for Novacor Diasys Integra Access

Summary of Contents for Novacor Diasys Integra Access
- Page 1 Diasys Integra Access English NOVACOR SA. 4 passage Saint-Antoine 92508 Rueil-Malmaison cedex - France Manual Diasys Integra Access ©1999 NOVACOR SA. All rights reserved...
-
Page 2: Table Of Contents
Optional accessories 4.1. The Diasys Integra Access recorder 4.2. The battery charger 4.3. The cuff and the connecting tube to the Diasys Integra Access 5. Preparing the Diasys Integra Access for monitoring 5.1. Preparing the battery 5.1.1. The battery charger 5.1.2. - Page 3 8.5. Replacing the safeguard battery 8.6. Storing and dispatching 8.7. Preventative maintenance 8.8. Electrical safety standards 8.9. Precautions of use 8.10. Physical specifications 8.11. Technical specifications 8.12. Accessories • 3 Diasys Integra Access - Manual - GB - Rev 2...
-
Page 4: Introduction
If a computer is used, recording conditions and criteria can be fixed, and the results of the procedure can be selected, organised, stored and printed out in a fully customised report. 4 • Diasys Integra Access - Manual - GB - Rev 2... -
Page 5: Guarantee
Although NOVACOR manufactures products to the highest standards, it cannot be held responsible for the validity or the accuracy of the measurements made by its units. • 5 Diasys Integra Access - Manual - GB - Rev 2... -
Page 6: User Information
Diasys Integra Access, DiasySoft, and their respective logos, are registered trademarks of NOVACOR S.A. Macintosh is a registered trademark of Apple Computer International. MS-DOS and Windows are registered trademarks of Microsoft Corporation. 6 • Diasys Integra Access - Manual - GB - Rev 2... -
Page 7: How The Diasys Integra Access Functions
The patient’s arm must stay still during measurement. The Diasys Integra Access also has an optional integrated position sensor enabling the unit to detect whether the patient is vertical (awake) or horizontal (resting). • 7 Diasys Integra Access - Manual - GB - Rev 2... -
Page 8: Description Of The Equipment
• DiasySoft software, customised according to the programming options required and the user’s language and access key, • Printer, • Diasys-Printer or Diasys-Computer linking cabl,e • Diasys-Modem linking cable. 8 • Diasys Integra Access - Manual - GB - Rev 2... -
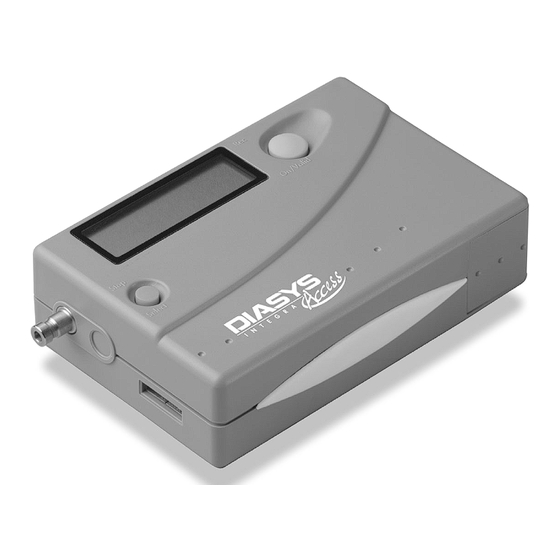
Page 9: The Diasys Integra Access Recorder
(Rec) Air connector On/Valid Stop Select RS232 connector for printer or modem P mode: next choice (Select) Battery cover M mode: stop measurements (Stop) • 9 Diasys Integra Access - Manual - GB - Rev 2... -
Page 10: The Battery Charger
Diasys to ensure optimum performance and long-life. The charger is connected to the mains outlet via a transformer and has two lights on the front panel. 10 • Diasys Integra Access - Manual - GB - Rev 2... -
Page 11: The Cuff And The Connecting Tube To The Diasys Integra Access
The Diasys Integra Access cuff offers features specially designed for ambulatory recording: • Cone-shaped for better ergonomics • Stabilising flap for optimal positioning, to be used with adhesive pads • Easy handling • Washable material • 11 Diasys Integra Access - Manual - GB - Rev 2... -
Page 12: Preparing The Diasys Integra Access For Monitoring
• Charge the battery • Insert the battery • Program the unit • Place the unit on the patient • Start up the unit and carry out the test measurements 12 • Diasys Integra Access - Manual - GB - Rev 2... -
Page 13: Preparing The Battery
• That the battery is being discharged, when discharge prior to charge has been programmed (see chapter 5.1.3): blinking light- normal brightness • That the battery is being charged: fixed light - normal brightness • 13 Diasys Integra Access - Manual - GB - Rev 2... - Page 14 • Never use the charger with any batteries other than those supplied by NOVACOR. • External power sources must comply with EN 60-601 standards. 14 • Diasys Integra Access - Manual - GB - Rev 2...
-
Page 15: The Battery
• Place the battery in the charger, taking care to match the + and - signs with those on the charger. • Insert the battery into its slot. • 15 Diasys Integra Access - Manual - GB - Rev 2... -
Page 16: End Of Charge
• Do not start a recording using a battery only part- charged, the unit may stop during a measurement. 16 • Diasys Integra Access - Manual - GB - Rev 2... -
Page 17: Inserting The Battery Into The Recorder
• Do not store the Diasys with a discharged battery inside. Do not leave a recharged battery in the Diasys for more than 2 weeks without using it. • 17 Diasys Integra Access - Manual - GB - Rev 2... -
Page 18: Safeguard Battery (Non-Rechargeable Lithium)
We recommend that a recharged battery be inserted each time before programming. If the battery is run down, the Diasys Integra Access will display the message (ER 14), if it is dead, the unit’s keys will be blocked (safeguard mode). - Page 19 Press one of the keys to retrieve the time screen. • 19 Diasys Integra Access - Manual - GB - Rev 2...
-
Page 20: Programming The Time
Press Valid to confirm the time. The date will be displayed. Select On/Valid Note that the AM/PM setting is only proposed if the time is programmed before midday. 20 • Diasys Integra Access - Manual - GB - Rev 2... -
Page 21: Programming The Date
Press: • valid to reprogram the date and the year, or press • select to reprogram just the year. • 21 Diasys Integra Access - Manual - GB - Rev 2... -
Page 22: Programming The Intervals
Night-time 10 - 15 - 20 - 30 - 45 - 60 When the selector is in the Programming mode, press the pink key to scan the unit’s program: Time, Date, Year, measurement Intervals. 22 • Diasys Integra Access - Manual - GB - Rev 2... -
Page 23: Placing The Unit On The Patient
- Take the protections off the adhesive strips. - Apply the adhesive strips on the inside of the cuff, lining the cuff connector up to the edge of the pouch (fig 2). • 23 Diasys Integra Access - Manual - GB - Rev 2... - Page 24 Diasys, preferably already in the protective pouch (fig 4). Stop Select Fig 4 - Connection of the cuff to the Diasys Diasys is shown without pouch for better illustration. 24 • Diasys Integra Access - Manual - GB - Rev 2...
-
Page 25: Recommendations For Placing The Cuff
“MAXI” is printed. Above this limit, a larger cuff should be used. Correct Maximum Cuff too small Fig 6 - Position of the cuff • 25 Diasys Integra Access - Manual - GB - Rev 2... -
Page 26: Changing Arms
- Turn the bladder over. - Put the bladder back in the cuff making sure it is flat, with the tube coming out opposite the stabilising flap. Close the cuff. 26 • Diasys Integra Access - Manual - GB - Rev 2... -
Page 27: Positioning The Diasys Integra Access With The Integrated Position Sensor (Optional)
He can also take the belt off, but must keep the unit down flat (fig 8). Fig 8 - Recommended Diasys position when patient lying down • 27 Diasys Integra Access - Manual - GB - Rev 2... -
Page 28: How The Unit Functions
6.2. Test measurements (Mode selector in measurement position) At the start of the monitoring, the Diasys Integra Access automatically carries out two test measurements in oscillometric mode separated by a two minute interval (with a minimum of 30 seconds between the end of the first and the beginning of the second). -
Page 29: Manually Activated Measurements
A palliative measurement will not, however, be made if the interval between two pre-programmed measurements is less than five minutes. Manual and palliative measurements do not disrupt the sequence of the pre-programmed measurement intervals. • 29 Diasys Integra Access - Manual - GB - Rev 2... -
Page 30: Suspend" Mode
Select On/Valid 6.7. Display of measurements After each measurement the unit displays successively: Standard function: Measurement mode Systolic pressure Diastolyc pressure Heart rate 30 • Diasys Integra Access - Manual - GB - Rev 2... -
Page 31: Stopping Measurements
No more measurements can be made until the pink key has been pressed. Pressing the pink key will trigger two test measurements and the recording will continue normally. • 31 Diasys Integra Access - Manual - GB - Rev 2... -
Page 32: Display Codes
Er 25 Heart rate unstable during measurement Er 26 Error during modem transmission (cf. chapter 7.2) Er 27 Connection to number called impossible during transmission (cf. chapter 7.2) 32 • Diasys Integra Access - Manual - GB - Rev 2... -
Page 33: Reading The Recordings
This is not possible after direct transmission to a printer. Connecting the Diasys to a printer or a computer requires different cable links. Ask your distributor for details. • 33 Diasys Integra Access - Manual - GB - Rev 2... -
Page 34: Modem Data Transmission (Optional)
- disconnect the Diasys from the modem - turn off and switch back on the modem - reconnect the Diasys to the modem to trigger a new transmission 34 • Diasys Integra Access - Manual - GB - Rev 2... - Page 35 (computer with modem and NovaModem open awaiting reception). After transmission the monitoring can continue by simply pressing the pink key. • 35 Diasys Integra Access - Manual - GB - Rev 2...
-
Page 36: Maintenance
8.2. Cleaning Clean the Diasys Integra Access regularly with a soft cloth, lightly moistened with alcohol or a cleaning product not containing solvents or detergents. -
Page 37: Calibration Test
• Press one of the keys or switch the mode selector to the Measurement position to end the test phase. On/Valid Stop Select Calibration test • 37 Diasys Integra Access - Manual - GB - Rev 2... -
Page 38: Replacing The Safeguard Battery
Check that the unit is intact before use (bad transport conditions could damage unit performance). Keep all packaging should the unit need to be transported at a later date. 38 • Diasys Integra Access - Manual - GB - Rev 2... -
Page 39: Preventative Maintenance
• Complies to the EN 60-601-1-2 electromagnetic compatibility standard in force. However, use in particular conditions could be disturbed by interference. • Complies with the EN 1041 standard in force. • 39 Diasys Integra Access - Manual - GB - Rev 2... -
Page 40: Precautions Of Use
(excessive or frequent inflations, permanent pressure in the cuff) and of the possibility to stop a measurement or the recording himself at any time. 40 • Diasys Integra Access - Manual - GB - Rev 2... -
Page 41: Physical Specifications
Signal input/output type type RS 232* measurement ranges systole 295-50 mmHg diastole 180-30 mmHg mean 295-30 mmHg heart rate 240-40 min * : Complies to the EIA-232 E standard • 41 Diasys Integra Access - Manual - GB - Rev 2... -
Page 42: Accessories
Standard adult cuff (bladder included) ACC-0203-00 Standard large adult cuff (bladder included) ACC-0204-00 Adhesive pads for stabilising flap ACC-0600-00 Diasys Integra Access protective pouch ACC-0502-00 Adult cuff protectors (50) ACC-0450-00 42 • Diasys Integra Access - Manual - GB - Rev 2...
Need help?
Do you have a question about the Diasys Integra Access and is the answer not in the manual?
Questions and answers
Error 31 02. What does ik mean