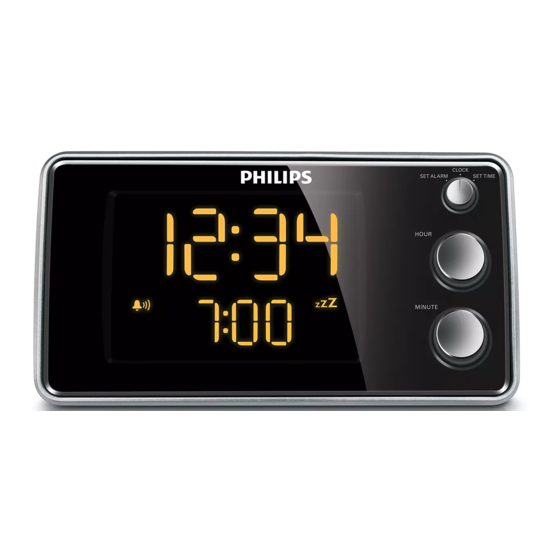
Summary of Contents for Philips AJ3551/12
- Page 1 Clock Radio Register your product and get support at www.philips.com/welcome AJ3551 EN User manual...
- Page 2 Norge Typeskilt fi nnes på apparatens underside. Observer: Nettbryteren er sekundert innkoplet. Den innebygde netdelen er derfor ikke frakoplet nettet så lenge apparatet er tilsluttet nettkontakten. For å redusere faren for brann eller elektrisk støt, skal apparatet ikke utsettes for regn eller fuktighet.
-
Page 3: Important Safety Instructions
Important Safety Important Safety Instructions Read these instructions. Keep these instructions. Heed all warnings. Follow all instructions. Do not use this apparatus near water. Clean only with dry cloth. Do not block any ventilation openings. Install in accordance with the manufacturer’s instructions. Do not install near any heat sources such as radiators, heat registers, stoves, or other apparatus (including amplifi... - Page 4 Use only with the cart, stand, tripod, bracket, or table specifi ed by the manufacturer or sold with the apparatus. When a cart is used, use caution when moving the cart/apparatus combination to avoid injury from tip-over. Unplug this apparatus during lightning storms or when unused for long periods of time.
- Page 5 This product complies with the requirements of the following directives and guidelines: 2004/108/EC + 2006/95/EC Any changes or modifi cations made to this device that are not expressly approved by Philips Consumer Lifestyle may void the user’s authority to operate the equipment. Recycling Your product is designed and manufactured with high quality materials and components, which can be recycled and reused.
- Page 6 When you see the crossed-out wheel bin symbol attached to a product, it means the product is covered by the European Directive 2002/96/EC: Never dispose of your product with other household waste. Please inform yourself about the local rules on the separate collection of electrical and electronic products.
-
Page 7: Your Clock Radio
Congratulations on your purchase, and welcome to Philips! To fully benefi t from the support that Philips offers, register your product at www.philips.com/welcome. Introduction With this unit, you can: • listen to the radio • know the time • set alarm timer to wake you up at certain time. - Page 8 REPEAT ALARM/BRIGHTNESS CONTROL • Repeat the alarm. • Adjust the display brightness. AUTOSCAN • Program radio stations. SLEEP/ALARM RESET • Set the sleep timer. • Reset the alarm timer. BUZZER/RADIO ALARM • Set the alarm mode. MW/FM • Select a waveband. - PRESET + •...
-
Page 9: Get Started
Always follow the instructions in this chapter in sequence. If you contact Philips, you will be asked for the model and serial number of this apparatus. The model number and serial number are on the bottom of the apparatus. Write the numbers here: Model No. -
Page 10: Connect Power
Connect power Caution • Risk of product damage! Ensure that the power voltage corresponds to the voltage printed on the back or underside of the apparatus. • Risk of electric shock! When you unplug the AC adaptor, always pull the plug from the socket. Never pull the cord. -
Page 11: Adjust Volume Level
S et clock In standby mode, rotate SET ALARM/CLOCK/SET TIME to the SET TIME position. The hour and minute digits begin to blink. » Rotate HOUR to set the hour. Rotate MINUTE to set the minute. Rotate the SET ALARM/CLOCK/SET TIME to the CLOCK position to confi... -
Page 12: Listen To Radio
Tune to a radio station • Position the antenna as far as possible from TV, VCR or other radiation source. • For optimal reception, fully extend and adjust the position of the antenna. Press RADIO ON/OFF to turn on the radio. Adjust MW/FM to select MW or FM tuner. -
Page 13: Program Radio Stations Manually
Program radio stations manually You can program a maximum of 20 preset radio stations. Tune to a radio station. Press AUTOSCAN to activate the program mode. The preset number begins to blink. » Press PRESET +/- to select a number. Press AUTOSCAN to confi... -
Page 14: Other Features
Other features Set the alarm timer Ensure that you have set the clock correctly. In standby mode, rotate SET ALARM/CLOCK/SET TIME to the SET ALARM position. The hour and minute digits begin to blink. » Rotate HOUR to set the hour. Rotate MINUTE to set the minute. -
Page 15: Set The Sleep Timer
Activate and deactivate the alarm timer Press ALARM ON/OFF repeatedly to activate or deactivate the alarm timer. Repeat alarm When the alarm rings, press REPEAT ALARM/BRIGHTNESS CONTROL . The alarm repeats ringing minutes later. » • TUNING+/- to adjust interval to repeat alarm. You can press Stop alarm sound When the alarm rings, press SLEEP/ALARM RESET . -
Page 16: Adjust Display Brightness
Press SLEEP repeatedly until [OFF] (off) is displayed. When the sleep timer is deactivated, » display. Adjust display brightness Press REPEAT ALARM/BRIGHTNESS CONTROL repeatedly to select different levels of display brightness. disappears on the... -
Page 17: Product Information
Product information Note • Product information is subject to change without prior notice. Specifi cations Amplifi er Rated Output Power 0.2W RMS... -
Page 18: General Information
Tuner Tuning Range Tuning grid Sensitivity - Mono, 26dB S/N Ratio Search Selectivity Total Harmonic Distortion Signal to Noise Ratio General information AC power Operation Power Consumption Standby Power Consumption Dimensions Weight FM: 87.5 - 108 MHz MW: 531-1602 KHz FM: 50 KHz MW: 9KHz FM: <22 dBu... -
Page 19: Troubleshooting
If you encounter problems when using this apparatus, check the following points before requesting service. If the problem remains unsolved, go to the Philips web site (www.philips.com/welcome). When you contact Philips, ensure that the apparatus is nearby and the model number and serial number are available. No power •... - Page 20 © Royal Philips Electronics N.V. 2009 All rights reserved. Specifi cations are subject to change without notice.Trademarks are the property of Koninklijke Philips Electronics N.V. or their respective owners.


