Aimco Signature Series Instruction Manual
18v cordless precision clutch shut off angle nutrunner
Hide thumbs
Also See for Signature Series:
- Operation manual (12 pages) ,
- Operation manual (8 pages) ,
- Manual (20 pages)
Advertisement
Quick Links
Download this manual
See also:
Operating Manual
Advertisement

Related Manuals for Aimco Signature Series


Summary of Contents for Aimco Signature Series
- Page 1 18V Cordless Precision Clutch Shut Off Angle Nutrunner MODEL NO.: SPC-A21025Q SPC-A21025 SPC-A21038 SPC-A21625Q SPC-A21625 SPC-A21638 SPC-A23038 SPC-A23538 SPC-A25038 SPC-A27038 SPC-A210050...
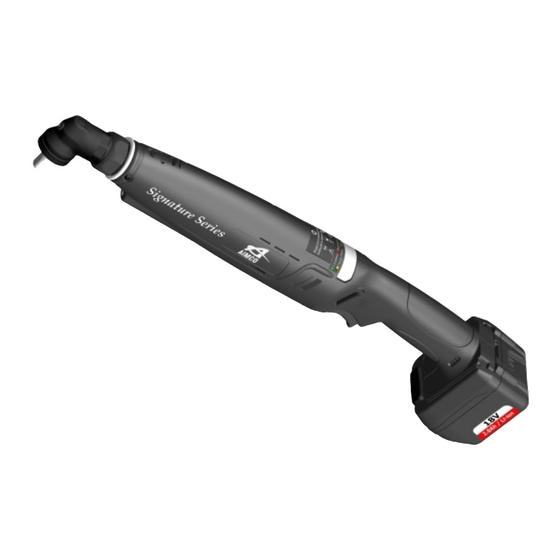
- Page 3 The angled head is indexable for multiple head positions. User can distinguish wrench model with color ring. Covered Torque Adjustment. LED light for workpiece illumination. LED indicator provides simple process information to the operator. The signal is visible from any angle. Easy Press button for simple Forward/Reverse selection.
- Page 4 The angled head is indexable for multiple head positions. 1/4” Hex with quick change chuck. User can distinguish wrench model with color ring. Covered Torque Adjustment. LED light for workpiece illumination. LED indicator provides simple process information to the operator. The signal is visible from any angle.
- Page 5 ● Do not overreach. Keep proper tained tools. footing and balance at all • Use only Signature Series rec- times. Proper footing and bal- ommended accessories ance enables better control on your model tool. Accessories the tool in unexpected situations.
- Page 6 ● Do not operate charger if it has injury. been damaged in any way. Take it ● When servicing an AIMCO Sig- to a qualified service center for nature Series Precision Clutch repair.
- Page 7 ● Do not charge inside a box or gaged before operating the tool. container of any kind. The battery Otherwise, the bit/socket may must placed well- detach and cause property dam- ventilated area during charging. age or personal injury. Use only ●...
- Page 8 Assembly Operations Check for damage to the tool, parts, This product has been carefully or accessories that may have oc- inspected prior to leaving the facto- curred during transport. Take the ry. It should provide you with years time to thoroughly read and under- of satisfying service under normal stand this manual prior to operation.
- Page 9 7. Delivered torque to the applica- 1. Open the cover and use an tion may vary due to the type of open end wrench (or torque ad- joint the tool is tightening. Good justment tool on quick change practice is to perform periodic models) to rotate the square audits of the application.
- Page 10 Steps for Angle Head Position Indexing 1. Use an open end wrench and 2. Adjust the angle head assembly the supplied adjustment wrench to the degree you wished then to loosen the nut by turning in put it back on the tool (in 45° the opposite direction to remove increments for a total of eight the angle head assembly.
- Page 11 TOOL LED INDICATIONS Status of the LED indicator and Action to be Status of the Tool Beep Taken LED lights RED, YELLOW, and The motor is switched GREEN together for one second. None required. A long beep for one second. The application The preset torque is not should be re-...
-
Page 12: Charging The Battery Pack
CHARGING THE BATTERY PACK Li-ion Battery Pack 4. If the power lamp (RED) does NOTE: Your battery pack is not not light immediately or goes out fully charged at the time of pur- soon after charger chase. Be sure to charge battery plugged in, consult a Signature before first use. -
Page 13: Lamp Indications
LAMP INDICATIONS Red Light Charger is plugged into the AC outlet. Ready to charge. Yellow Flashing Light (1) When the temperature of the battery is too low (<0 C(<32 F)), it is in a trickle charge mode until the temperature of the bat- tery goes up to over 0 C(<32 F). -
Page 14: Specifications
SPECIFICATIONS MODEL SPC-A21025Q SPC-A21025 Voltage 18 VDC 18 VDC Drive Size 6.35 mm Hex. (1/4”) 6.35 mm Sq. (1/4”) Torque Range 3 ~ 12 Nm 3 ~ 12 Nm Free Speed 400 ~ 1000 rpm 400 ~ 1000 rpm Weight w/o Battery 1.6 kg (3.5 lb) 1.6 kg (3.5 lb) Vibration (m/s... - Page 15 SPECIFICATIONS MODEL SPC-A21625 SPC-A21638 Voltage 18 VDC 18 VDC Drive Size 6.35 mm Sq. (1/4”) 9.5 mm Sq. (3/8”) Torque Range 5 ~ 18 Nm 5 ~ 18 Nm Free Speed 300 ~ 600 rpm 300 ~ 600 rpm Weight w/o Battery 1.6 kg (3.5 lb) 1.6 kg (3.5 lb) Vibration (m/s...
- Page 16 MODEL SPC-A27038 SPC-A210050 Voltage 18 VDC 18 VDC Drive Size 9.5 mm Sq. (3/8”) 12.7 mm Sq. (1/2”) Torque Range 20 ~ 70 Nm 35 ~ 100 Nm Free Speed 170 rpm 119 rpm Weight w/o Battery 2.9 kg (6.3 lb) 3.4 kg (7.4 lb) Vibration (m/s 2.55...
- Page 17 Lock Nut Screw Collar O-Ring Lock Nut Bevel Gear Assembly Main Bevel Gear Assembly Lock Nut Angle Housing Assembly Specific Part Numbers may be obtained by review oif the correct Signature Series tool breakdown. Consult your Signature Series dealer for details.
- Page 18 Main Bevel Gear Assembly Snap Ring Washer Quick Change Holder Angle Housing Assembly Spring O-Ring Hold Spacer Screw Anvil Collar Specific Part Numbers may be obtained by review of the correct Signature Series tool breakdown. Consult your Signature Series dealer for details.
- Page 19 Description Q'ty Description Q'ty Clutch Assembly Washer Steel Ball Adjust Washer Washer Adjust Nut Washer Snap Ring Spring Specific Part Numbers may be obtained by review of the correct Signature Series tool breakdown. Consult your Signature Series dealer for details.
- Page 20 Gear Cage Gear Plate Snap Ring Assembly Assembly Gear Box Washer Washer Assembly (1) O-ring Planet Gear Planet Gear Specific Part Numbers may be obtained by review of the correct Signature Series tool breakdown. Consult your Signature Series dealer for details.
- Page 21 Connecting Holder Assembly Washer 18V Li-Ion 2.0Ah Sensor & LED Assembly Battery F/R Valve (1set×2pcs) Marking Ring Spring Specific Part Numbers may be obtained by review of the correct Signature Series tool breakdown. Consult your Signature Series dealer for details.
- Page 22 Sensor & LED Assembly Marking Ring F/R Valve (1 set x 2 pcs) Washer Spring Adjust Nut PC Board Cover Specific Part Numbers may be obtained by review of the correct Signature Series tool breakdown. Consult your Signature Series dealer for details.
- Page 24 10000 SE Pine Street Portland, Oregon 97216 Phone: (503) 254-6600 Toll Free: 1-800-852-1368 WWW.AIMCO-GLOBAL.COM ISO 9001: 2015 Certified AIMCO CORPORATION DE MEXICO SA DE CV AIMCO CHINA Ave. Cristobal Colon 14529 Room 607, No. 3998 Hongxin Rd Chihuahua, Chihuahua. 31125 Minhang District, Shanghai...
Need help?
Do you have a question about the Signature Series and is the answer not in the manual?
Questions and answers