Table of Contents
Advertisement
Available languages
Available languages
Quick Links
Advertisement
Chapters
Table of Contents

Subscribe to Our Youtube Channel
Related Manuals for ENKHO 139182.01


Summary of Contents for ENKHO 139182.01
- Page 1 MANUALE D’USO NAVODILA ZA UPORABO USER MANUAL BEDIENUNGSANLEITUNG Robot da cucina kuhinjski roboti food processor Küchenmaschinen CODICE ART. (KODA ART): 139182.01 220-240V ~ 50/60Hz, 500W Emissioni orarie indirette pari a 0,214 kgCO COD. 6315103600 REV. 0 del 28/10/2016...
- Page 2 La sicurezza dei prodotti testati e certificati per te. Robot da cucina Sicurezza verificata Provato nell’uso La società italiana IMQ con il logo IMQ verified attesta la conformità di questo prodotto a quanto dichiarato sulla confezione, secondo requisiti di sostenibilità, sicurezza e qualità. su www.eurospin.it trovi la versione digitale del manuale d’uso Dal lunedì...
-
Page 3: Table Of Contents
INDICE USO PREVISTO ....................4 AVVERTENZE IMPORTANTI ................4 PERICOLO PER I BAMBINI ................4 PERICOLO DOVUTO A ELETTRICITÀ .............5 PERICOLO DI DANNI DERIVANTI DA ALTRE CAUSE ........5 AVVERTENZA RELATIVA A LESIONI ..............5 ATTENZIONE - DANNI MATERIALI ..............5 A PROPOSITO DI QUESTO MANUALE ............6 DESCRIZIONE DELL’APPARECCHIO ..............7 ISTRUZIONI PER L’USO ..................8 PULIZIA DELL’APPARECCHIO.................10... -
Page 4: Uso Previsto
USO PREVISTO Potete usare l'apparecchio per tritare, impastare e montare diversi ingredienti, usando gli ac- cessori in dotazione. L'apparecchio non deve essere usato per tritare materiali non alimentari e ingredienti di consistenza troppo compatta e non friabile (es. cubetti di ghiaccio, carne con ossa, etc). -
Page 5: Pericolo Dovuto A Elettricità
PERICOLO DOVUTO A ELETTRICITÀ • L’uso di prolunghe elettriche non autorizzate dal fabbricante dell’apparecchio può provocare danni e incidenti. • Se il cavo di alimentazione è danneggiato, esso deve essere sostituito dal costruttore o dal suo servizio Assistenza Tecnica o comunque da una persona con qualifica similare, in modo da prevenire ogni rischio. -
Page 6: A Proposito Di Questo Manuale
A PROPOSITO DI QUESTO MANUALE Gli apparecchi sono stati realizzati in conformità con le specifiche Normative europee vigenti e sono protetti in tutte le parti potenzialmente pericolose. Leggere con attenzione queste avver- tenze e usare l’apparecchio solo per l’uso cui è stato destinato per evitare infortuni e danni. Te- nere a portata di mano questo libretto per future consultazioni. -
Page 7: Descrizione Dell'apparecchio
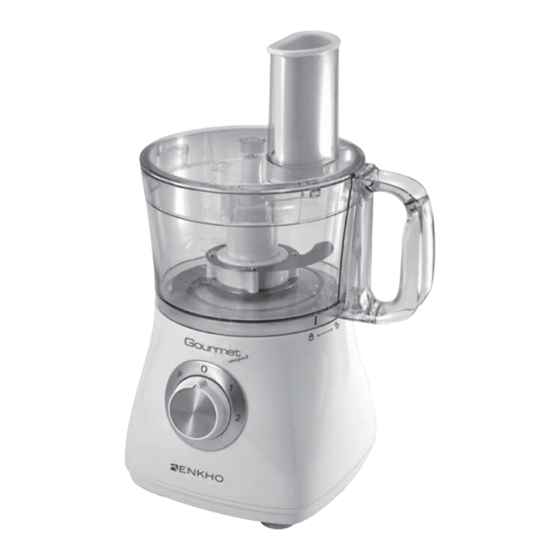
DESCRIZIONE DELL’APPARECCHIO A Manopola di funzionamento B Corpo motore C Perno motore D Supporto lama E Lama per tritare F Lama per impastare G Pressatore H Disco per montare I Porta lama L Lama per julienne M Lama per fette N Lama per bastoncini O Coperchio P Ciotola... -
Page 8: Istruzioni Per L'uso
ISTRUZIONI PER L’USO Montaggio Attenzione! Prima di pulire l’apparecchio e di installare o rimuovere accessori, assicurarsi sia scollegato dalla rete elettrica e che la manopola di funzionamento (A) sia su “0”. Inserire il perno motore (C) nell’apposito alloggiamento sul corpo motore (B) (Fig. 2). Collocare la ciotola (P) sul corpo motore e bloccarla ruotandola in senso orario in modo che l’aletta posta nella parte inferiore del manico si innesti perfettamente a scatto nella fessura sul corpo motore (Fig. - Page 9 Per montare Installare l’apposito accessorio (H) sul supporto lama (D) (Fig. 6). Per affettare Inserire la lama desiderata, lama per fette (M), lama per taglio a julienne (L) o la lama per bastoncini (N) sul disco porta lame (I) in modo che il foro situato sulla lama risulti al centro del disco (Fig.
-
Page 10: Pulizia Dell'apparecchio
Inserire gli ingredienti nella ciotola (P). Se possibile, tagliare gli alimenti solidi a piccoli pezzi (1,5 x 1,5 cm). Non inserrire alimenti otre il livello massimo indicato sulla ciotola. Inserire il coperchio (O) sopra la ciotola (P) allineando la tacca presente all’interno della ciotola col simbolo ( ). -
Page 11: Dati Tecnici
DATI TECNICI Alimentazione: 220-240V Potenza: 500W Frequenza: 50/60Hz Classe di protezione: I GARANZIA L’apparecchio è garantito per un periodo di tre anni dalla data di acquisto. Fa fede la data riportata sullo scontrino/fattura. In caso di difetto preesistente all’acquisto, viene garantita la sostituzione. Non sono coperte da garanzie tutte le parti che dovessero risultare difettose a causa della ne- gligenza o dalla trascuratezza nell’uso. - Page 12 The security of products tested and certified for you. Food processor Tested safety Tried using The Italian Company IMQ having the verified IMQ logo attests conformity of this product with what is stated on the package, according to requirements of sustainability, safety, and quality. on www.eurospin.it you can find the digital version of the manual Dal lunedì...
- Page 13 CONTENT INTENDED USE ....................14 IMPORTANT SAFEGUARDS................14 DANGER FOR CHILDREN ................14 DANGER DUE TO ELECTRICITY ..............14 DANGER OF DAMAGE ORIGINATING FROM OTHER CAUSES ....15 WARNING ABOUT INJURIES .................15 WARNING – MATERIAL DAMAGE ..............15 WITH REGARD TO THIS MANUAL ..............16 DESCRIPTION OF THE APPLIANCE ..............17 INSTRUCTIONS FOR USE ................18 APPLIANCE CLEANING ..................20 TECHNICAL DATA ..................21...
-
Page 14: Intended Use
INTENDED USE You can use the appliance for chopping, kneading and whipping different ingredients, using the accessories supplied. The appliance must not be used for chopping non-food materials and ingre- dients with too compact and brittle consistence (for example, ice cubes, meat with bones, etc). Any other use of the appliance is not intended by the Manufacturer which disclaims all liability for damages of any kind caused by improper use of the appliance itself. -
Page 15: Danger Of Damage Originating From Other Causes
result in damage to property and personal injury. • If the power cord is damaged, it must be replaced by the man- ufacturer or by its Technical Assistance Service or by a similarly qualified person in order to avoid any hazard. •... -
Page 16: With Regard To This Manual
WITH REGARD TO THIS MANUAL The appliances are manufactured in accordance with the specific European standards in force and are protected in all their potentially dangerous parts. Read these warnings carefully and use the appliance only for the use for which it was intended in order to prevent injury and damage. Keep this booklet handy for future reference. -
Page 17: Description Of The Appliance
DESCRIPTION OF THE APPLIANCE A Operation knob B Motor body C Drive shaft D Blade support E Chopping blade F Kneading blade G Pusher H Whipping disc I Blade holder L Julienne knife M Blade for slices N Blade for sticks O Lid P Bowl Note... -
Page 18: Instructions For Use
INSTRUCTIONS FOR USE Assembling Warning! Before cleaning the appliance and installing or removing accessories, make sure it is dis- connected from the mains and that the operating knob (A) is set to "0". Insert the drive shaft (C) into the dedicated housing on the motor body (B) (Fig 2). Place the bowl (P) on the motor body and lock it by turning it clockwise so that the flap on the bottom of the handle engages fully snapping into the slot on the motor body (Fig 3). - Page 19 For whipping Install the dedicated accessory (H) on the blade support (D) (Fig 6). For slicing Insert the desired blade, slicing blade (M), julienne cutting blade (L) or stick cutting blade (N) on the blade holder disc (I) so that the hole on the blade is at the middle of the disc (Fig 7). Install the complete blade holder disc on the motor shaft (C), grabbing it by the eyelets, with the blade facing toward upward (Fig 8).
-
Page 20: Appliance Cleaning
Put the ingredients in the bowl (P). If possible, cut solid foods into small pieces (1.5 x 1.5 cm). Do not put food over the maximum level indicated on the bowl. Insert the lid (O) over the bowl (P) aligning the notch inside the bowl with the symbol ( Lock the cover (O) turning it clockwise until it snaps ( ) (Fig 9). -
Page 21: Technical Data
TECHNICAL DATA Power supply: 220-240 V Power: 500W Frequency: 50/60 Hz Protection class: I WARRANTY The appliance is covered by warranty for a period of three years from the date of purchase shown on the receipt/invoice. If there are defects at the purchase, the appliance replacement is guaranteed. All parts that may be defective due to negligence or careless use are not covered by the war- ranty. - Page 22 Die Sicherheit der für dich geprüften und zertifizierten Produkte. Küchenmaschinen Geprüfte Sicherheit Einsatz getestet Die italienische Firma IMQ mit IMQ verifiziert Logo bescheinigt die Einhaltung dieses Artikels die auf der Verpackung angegeben, je nach Bedarf Nachhaltigkeit, Sicherheit und Qualität. Auf www.eurospin.it ist die digitale Version der Bedienungsanleitung verfügbar Dal lunedì...
- Page 23 INHALTSVERZEICHNIS VORGESEHENER GEBRAUCH ................24 WICHTIGE HINWEISE ..................24 GEFAHR FÜR KINDER ..................24 GEFAHR WEGEN STROM ................25 SCHADENSGEFAHR WEGEN ANDERER URSACHEN ........25 WARNUNG VOR VERLETZUNGEN ..............25 ACHTUNG - SACHSCHÄDEN .................25 ZU DIESER BEDIENUNGSANLEITUNG ............26 GERÄTEBESCHREIBUNG ................27 GEBRAUCHSANWEISUNGEN .................28 PFLEGE DES GERÄTES ..................30 TECHNISCE DATEN..................31 GARANTIE ......................31...
-
Page 24: Vorgesehener Gebrauch
VORGESEHENER GEBRAUCH Das Gerät ist dazu gedacht, um verschiedene Zutaten mit dem mitgelieferten Zubehör zu ha- cken, kneten und schlagen. Mit dem Gerät darf man keine Stoffe hacken, die nicht Lebensmit- teln sind oder zu dichte nicht bröckelige Zutaten sind (z.B. Eiswürfel, Fleisch mit Knochen usw.). Jeder andere Einsatz des Geräts ist nicht vom Hersteller vorgesehen. -
Page 25: Gefahr Wegen Strom
GEFAHR WEGEN STROM • Der Einsatz von nicht vom Hersteller zugelassenen Verlänge- rungskabeln kann Schäden und Unfälle verursachen. • Wenn das Versorgungskabel beschädigt ist, muss es vom Her- steller oder vom seinem Kundendienst, oder auf jedem Fall von einem entsprechend qualifizierten Techniker ersetzt wer- den, um jeden Risiko zu vermeiden. -
Page 26: Zu Dieser Bedienungsanleitung
ZU DIESER BEDIENUNGSANLEITUNG Die Geräte sind entsprechend der spezifischen europäischen Normen hergestellt und alle poten- tiell schädlichen Teilen sind geschützt. Diese Warnhinweise aufmerksam lesen und das Gerät nur zweckmäßig verwenden, um Unfälle und Schäden zu vermeiden. Die Bedienungsanleitung auch für späteres Nachschlagen stets griffbereit aufbewahren. Soll dieses Gerät an andere Personen abgegeben werden, bitte daran denken, auch die Bedienungsanleitung mitzugeben. -
Page 27: Gerätebeschreibung
GERÄTEBESCHREIBUNG A Betriebsknopf B Motorkörper C Motorzapfen D Messerhalter E Hackmesser F Knethacken G Stopfer H Schlagscheibe Messerhalter L Julienne-Messer M Scheibenmesser N Stick-Messer O Deckel P Schüssel Anmerkung Das Gerät ist mit einer Einrichtung versehen, die den Betrieb mit offenem Deckel und mit nicht korrekt eingeschobener Schüssel verhindert. -
Page 28: Gebrauchsanweisungen
GEBRAUCHSANWEISUNGEN Montage Achtung! Vor der Reinigung oder der Installation bzw. Abnehmen des Zubehörs soll man prüfen, dass das Gerät aus dem Versorgungsnetz getrennt ist und dass den Betriebsknopf (A) auf "0" eingestellt ist. Den Motorzapfen (C) in den entsprechenden Sitz auf dem Motorkörper (B) (Abb. 2) einste- cken. - Page 29 Zum Schlagen Das Schlagzubehör (H) auf dem Messerhalter (D) (Abb. 6) montieren. Zum Schneiden (Scheiben) Das gewünschte Messer (Scheibenmesser (M), Julienne-Messer (L) oder Stick-Messer (N)) auf der Messerscheibe (I) montieren, so dass das Messerloch in der Mitte der Scheibe steht (Abb. 7). Die komplette Messerhaltescheibe auf dem Motorzapfen (C) montieren, und sie dabei an den entsprechenden Ösen fassen.
-
Page 30: Pflege Des Gerätes
Die Zutaten in die Schüssel (P) geben. Wenn möglich, die feste Speisen in kleinen Stücken (1,5 x 1,5 cm) schneiden. Beim Füllen der Schüssel, das maximale Niveau der Schüssel nicht überschreiten. Die Schüssel (P) mi dem Decken (O) decken. Dabei achten, dass die Markierung im Schüsse- linneren mit dem Symbol ( ) übereinstimmt. -
Page 31: Technisce Daten
TECHNISCE DATEN Versorgung: 220-240 V Leistung: 500W Frequenz: 50/60 Hz Schutzklasse: I GARANTIE Das Gerät hat eine dreijährige Garantie. Die Garantiezeit läuft ab dem Einkaufsdatum. Ausschlaggebend ist das Datum auf dem Kassenbon/auf der Rechnung. Im Falle eines vor dem Einkauf vorhandenen Mangels wird der Ersatz garantiert. Die Garantie gilt nicht für alle Teile, die Fehler aufgrund von Fahrlässigkeit oder Nachlässigkeit während der Gebrauchs aufweisen. - Page 32 Varnost izdelkov je bila preizkušena in potrjena za vas. kuhinjski roboti Preizkušena varnost Poskusili uporabiti Italijanska družba IMQ z logotipom IMQ verified potrjuje skladnost tega proizvoda z navedbami na embalaži in z zahtevki v zvezi s trajnostjo, varnostjo in kakovostjo. Posredne urne emisije 0,184 kgCO na www.eurospin.it je na voljo digitalna razil uporabniškega...
- Page 33 KAZALO PREDVIDENA UPORABA ................34 VARNOSTNA OPOZORILA ................34 NEVARNOST ZA OTROKE ................34 NEVARNOST ZARADI ELEKTRIÈNE NAPETOSTI ...........34 NEVARNOST POŠKODB ZARADI DRUGIH VZROKOV ........35 OPOZORILO GLEDE POŠKODB ..............35 POZOR – MATERIALNA ŠKODA ..............35 O TEM PRIROÈNIKU ..................36 OPIS APARATA ....................37 NAVODILA ZA UPORABO ................38 ÈIŠÈENJE APARATA ..................40 TEHNIÈNI PODATKI ..................41 GARANCIJA ....................41...
-
Page 34: Predvidena Uporaba
PREDVIDENA UPORABA Z uporabo nastavkov v kompletu z aparatom lahko drobite, sekljate, gnetete in stepate razlièna in nedrobljivo teksturo (na primer kocke ledu, meso s kostmi itd.). Vsak drug naèin uporabe aparata šteje kot nepravilen; proizvajalec ne prevzema nikakršne od- govornosti za škodo vseh vrst, ki je posledica nepravilne uporabe aparata. -
Page 35: Nevarnost Poškodb Zaradi Drugih Vzrokov
• Èe je kabel za napajanje poškodovan, ga mora zamenjati pro- • Pazite, da deli pod napetostjo nikoli ne pridejo v stik z vodo: lahko se ustvari kratek stik! • Aparata ne potapljajte v vodo ali druge tekoèine. • Z mokrimi rokami se ne dotikajte aparata, vtikaèa in napajal- nega kabla NEVARNOST POŠKODB ZARADI DRUGIH VZROKOV •... -
Page 36: O Tem Priroèniku
O TEM PRIROÈNIKU Aparati so izdelani skladno z ustreznimi veljavnimi evropskimi uredbami in standardi; vsi poten- cialno nevarni deli aparatov so zašèiteni. V izogib poškodbam in materialni škodi pozorno pre- berite ta opozorila in uporabljajte aparat samo za namene, za katere je bil zasnovan in izdelan. Navodila shranite na dostopnem mestu za kasnejšo uporabo. -
Page 37: Opis Aparata
OPIS APARATA A Gumb za vklop in izklop B Enota motorja C Os motorja D Podstavek rezila E Rezilo za drobljenje F Rezilo za gnetenje G Dovajalni vstavek H Plošèa za stepanje I Nosilec rezila L Rezilo Julienne M Rezilo za rezanje N Rezilo za sekljanje O Pokrov P Delovna posoda... -
Page 38: Navodila Za Uporabo
NAVODILA ZA UPORABO Pozor! (Sl. 3). 3 Namestite nastavek za rezilo (D) na os motorja (C) v delovni posodi (P) (Sl. 4). Montirajte kovinsko rezilo (E) na nastavek za rezilo (D). nosilcu, in ga potisnite navzdol (Sl. 5). Sl. 2 Sl. - Page 39 Vgradite ustrezno rezilo (H) na nastavek za rezilo (D) (Sl. 6). Vstavite ustrezno rezilo, rezilo za rezanje (M), rezilo Julienne (L) ali rezilo za sekljanje (N) na Primite sklop nosilne plošèe rezil na ustreznih jezièkih in namestite sklop na os motorja (C); rezi- lo mora biti obrnjeno navzgor (Sl.
-
Page 40: Èišèenje Aparata
x 1,5 cm). Delovno posodo napolnite najveè do oznake za najvišji nivo na njej. Namestite pokrov (O) na delovno posodo (P) tako, da bo zareza na notranji steni posode po- ravnana z znakom ( ). Zavrtite pokrov v smeri urnih kazalcev (O), dokler se ne zaskoèi ( (Sl. -
Page 41: Tehnièni Podatki
TEHNIÈNI PODATKI Moè: 500W Razred zašèite: I GARANCIJA Aparat je zajamèen za obdobje treh let od datuma nakupa. V primeru tovarniške napake, nastale pred nakupom, vam bomo izdelek zamenjali. Garancija ne zajema napak in okvar delov aparata, ki so posledica malomarne ali nepazljive uporabe. - Page 44 robot da cucina kuhinjski roboti food processor Küchenmaschinen Importato da/Uvoznik: Spesa Intelligente S.p.A. Distribuito da/ Dobavitelj za: Eurospin Italia S.p.A. Via Campalto 3/D - 37036 San Martino B.A. (VR) - Italy Dobavitelj za Slovenijo: Eurospin Eko d.o.o. Renški Podkarj 64, 5292 Rence - Slovenija Telefon: 05 338 36 00- www.eurospin.it - www.eurospin.si MADE IN CHINA...
Need help?
Do you have a question about the 139182.01 and is the answer not in the manual?
Questions and answers