
Related Manuals for EUTHANEX SMARTBOX EA-32000


Summary of Contents for EUTHANEX SMARTBOX EA-32000
- Page 1 Auto CO Lab Control Unit Model – EA-32000 1-877-559-0159 Toll Free Euthanex Corp. / E-Z Systems 1-610-882-3801 Fax P.O. Box 3544 www.ezsystemsinc.com Palmer, PA 18043...
- Page 2 Table of Contents Disclaimer and Lab Control Unit Overview …………………………………………………………………………….3 Safety Instructions……………………………………………………………………4 System Set-Up..………………………………………………………………………5 Operating the System…………………………………………………………………8 Changing System Presets…..…………………………………………………………9 Flow Rate & Preset Times …………..………………………………………………11 EMC / EMI. This equipment has been tested and found to comply with the limits for a Class A Equipment, pursuant to part 15 of the FCC rules.
- Page 3 The system and its components must only be modified or repaired by Euthanex authorized service technicians. Improper modification or repair may result in danger to personnel, harm or death to animal, and/or equipment damage. The user/owner of this...
- Page 4 The exclamation point within an equilateral triangle is The lightning flash with an arrowhead intended to alert the user to the presence of important symbol within an equilateral triangle, is operating and maintenance (servicing) instructions in intended to alert the user to the presence of the literature accompanying the product.
- Page 5 System Set-Up: 1. Four mounting brackets are utilized to secure the controller unit to the wall. These are on the controller when shipped. 2. Using a Phillips head screwdriver, loosen the screws and move the mount tabs outward as pictured below. Tighten the screws once appropriate position is achieved.
- Page 6 3. With the mounting brackets moved, position the unit in the appropriate location on the wall and mark the four holes. Remove unit from wall and drill the holes. Secure the unit to the wall with appropriate screws. (Wall screws are not included.) 4.
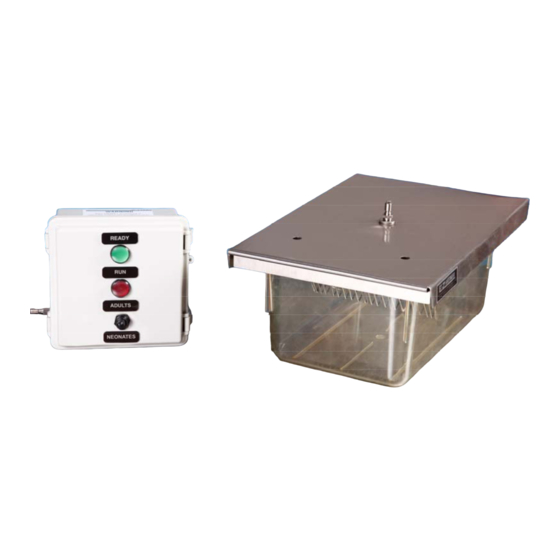
- Page 7 5. Connect the supplied cage hose from the output of the Lab Control Unit to the input valve on the Euthanex Lid. To properly make the connection, pull back the coupler and slide it over the male stem. The coupler will snap back into place and secure the connection.
- Page 8 Operating the Lab Control Unit: 1. Be sure CO source is open, and the regulator/flow-meter is set to the correct flow rate. 2. Move the rocker on/off button located on the bottom of the unit to the “On” position. The green “Ready” light will turn on. 3.
- Page 9 If your location has lockout- tagout protocols please follow them. Preset times were determined based on extensive testing done by Euthanex Corp. and designed to comply with the latest guidelines of the AVMA Panel on Euthanasia. Refer to the Flow Rate to determine AVMA compliant flow rates and the timing presets. The following is the procedure for changing the preset times: 1.
- Page 10 5. “Timer 1” screen will appear. Press “OK” and the first number will begin to flash. Use the Up/Down keys to increase or decrease the value. Use the Right/Left keys to move the cursor to the number you would like to change.
- Page 11 F series IDEC or Siemens: 1. Release the two latches to open the controller door. 2. The clock screen is on the PLC. 3. To change the preset cycle times, press ESC, then OK. The option screen will appear. 4. Press the down button , to move the arrow to: “> Program”. Press OK. 5.
- Page 12 6. Timer select screen appears. This screen is maybe different that the picture based on the program loaded. * Use the up/down keys to move to the value to change. * Press “OK” and the screen will change. Press the right arrow until s large box will be over the timer.
- Page 13 Flow Rate & Preset Times: Default times were chosen to comply with the latest guidelines of the AVMA Panel on Euthanasia and through extensive testing performed by Euthanex Corp. Times are customizable to facility needs. The programmable times may be changed by a designated administrator.
Need help?
Do you have a question about the SMARTBOX EA-32000 and is the answer not in the manual?
Questions and answers