
Subscribe to Our Youtube Channel
Related Manuals for DeDietrich DTG1008 Series


Summary of Contents for DeDietrich DTG1008 Series
- Page 1 GUIDE D’INSTALLATION ET D’UTILISATION GUIDE FOR INSTALLATION AND USE Table de cuisson Cooking hob...
-
Page 2: Table Of Contents
Sommaire Votre table en toute sécurité Comment se présente votre table ? Comment se présente votre clavier de commandes ? Installez facilement votre table Conseils d’encastrement Raccordement électrique Raccordement gaz 11-13 Changement de gaz 14-19 Utilisez votre table en toute simplicité Comment mettre en marche et ajuster la puissance ? Description des commandes (modèle 2 feux) Description des commandes (modèle 1 feu forte puissance) - Page 3 Chère Cliente, Cher Client, Vous venez d'acquérir une table de cuisson DE DIETRICH et nous vous en remercions. Nos équipes de recherche ont conçu pour vous cette nouvelle génération d’appareils, qui par leur qualité, leur esthétique, leurs fonctions et leurs évolutions technologiques en font des produits d’exception, révélateurs de notre savoir-faire.
-
Page 4: Votre Table En Toute Sécurité
otre table en toute sécurité tilisez votre table en toute sécurité - Nous avons conçu votre table de cuisson - Cet appareil n’est pas prévu pour pour une utilisation par des particuliers être utilisé par des personnes (y dans un lieu d’habitation. compris les enfants) dont les capacités physiques sensorielles ou - Dans le souci d’une amélioration... -
Page 5: Comment Se Présente Votre Table
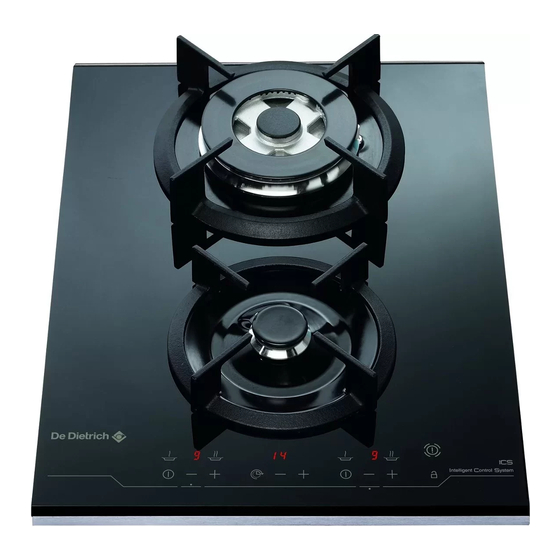
escription de votre appareil tilisez votre table en toute sécurité Table modèle 2 feux gaz à touches sensitives Grille support casserole Fig. 01 Table modèle 1 feu gaz forte puissance à touches sensitives Grille support casserole Chapeau de brûleur Bougie d’allumage Tête de brûleur Thermocouple Injecteur... - Page 6 escription de votre appareil escription de votre clavier de commandes Modèle 2 feux DTG1038*/* Modèle 1 feu DTG1008 */* Touche marche/arrêt du foyer Touche arrêt général Repère foyer Affichage du temps de la minuterie Réglage minuterie Affichage de la puissance du foyer Voyant de verrouillage Réglage de la puissance du foyer Touche verrouillage/déverrouillage...
-
Page 7: Installez Facilement Votre Table
Installez facilement votre table onseils d’encastrement Modèle Largeur Profondeur Epaisseur Suivant meuble Découpe meuble 34 cm 49 cm Dimensions hors tout au-dessus du 38 cm 52 cm 5 cm plan de travail Dimensions hors tout au-dessous 34cm 48 cm 5,1 cm du plan de travail L’installation est réservée aux A ce sujet, la combustion n’étant... - Page 8 Installez facilement votre table onseils d’encastrement (suite) La table de cuisson doit être encastrée dans le plateau d'un meuble support de 3 cm d'épaisseur minimum, fait en matière qui résiste à la chaleur, ou bien revêtu d'une telle matière. Pour ne pas gêner la manoeuvre des ustensiles de cuisson, il ne doit y avoir à...
- Page 9 Installez facilement votre table onseils d’encastrement (suite) Pour assurer l'étanchéité entre le cais- son et le plan de travail, collez le joint mousse sur le pourtour extérieur du cadre. Collez le joint fourni dans la pochette avant l’installation de la table : Joint 1- Retirez les grilles support cassero- le, les chapeaux de brûleur et les têtes...
-
Page 10: Raccordement Électrique
Installez facilement votre table accordement électrique ● Table gaz ECTION DU CABLE À UTILISER Cette table de cuisson doit être rac- 220-240 V~ - 50 Hz cordée sur le réseau 220-240 V nophasé par l’intermédiaire d’une pri- se de courant 2 pôles + terre norma- lisée CEI 60083 ou relié... -
Page 11: Raccordement Gaz
Installez facilement votre table accordement gaz ● Remarques préliminaires Le tuyau de raccordement doit rester visitable sur toute sa longueur et doit être remplacé avant sa date limite d’utilisation (marquée sur le tuyau). Quel que soit le moyen de raccordement choisi, assurez-vous de son étanchéité, après installation, avec de l’eau savonneuse. - Page 12 Installez facilement votre table accordement gaz (suite) ● Raccordements possibles AZ DISTRIBUÉ PAR CANALISATION GAZ NATUREL NATUREL Choisir exclusivement l’un des 3 rac- cordements suivants : - le raccordement en tube rigide (appellation norme gaz G1/2). Réalisez le raccordement à l’extrémité du coude monté...
- Page 13 Installez facilement votre table accordement gaz (suite) ● Raccordements possibles AZ DISTRIBUÉ PAR BOUTEILLE OU RÉ BUTANE/PROPANE SERVOIR GAZ BUTANE PROPANE Détendeur obligatoire Pour la sécurité de l’utilisateur, nous conseillons un raccordement soit en tube rigide si cela est possible, soit avec un tuyau flexible métallique on- duleux (longueur maximum 2 mètres) (fig.
-
Page 14: Changement De Gaz
Installez facilement votre table hangement de gaz ● Remarques préliminaires Cette table de cuisson est livrée A chaque changement de gaz, cochez pré-réglée pour le gaz naturel. la case correspondant au nouveau gaz sur l’étiquette située dans la Les injecteurs nécessaires à l’adapta- pochette (voir tableau... - Page 15 Installez facilement votre table hangement de gaz (suite) ● Passage du gaz naturel en gaz butane/propane. Interrupteur Lors de cette opération À EFFECTUER AVANT , vous devrez successi- TOUT BRANCHEMENT vement : Gaz naturel ➊ Basculer l’interrupteur de Butane/Propane changement de gaz. ❷...
- Page 16 CHANGEMENT DE GAZ SUR LE BRULEUR TRIPLE COURONNE Petit Chapeau de brûleur Petit brûleur central Petit brûleur central Chapeau de brûleur principal Brûleur principal REGLAGE AU GAZ NATUREL REGLAGE AU GAZ BUTANE/PROPANE Petit brûleur central Petit brûleur central Spécifique Butane/Propane Spécifique Gaz Naturel (Livré...
- Page 17 Installez facilement votre table hangement de gaz (suite) ● Passage du gaz naturel en gaz butane/propane (suite). Pour la table 1 feu : en procédant HANGEZ LES INJECTEURS comme suit : • Retirez la grille, le chapeau, et la tête du brûleur.
- Page 18 Installez facilement votre table hangement de gaz (suite) ● Passage du gaz butane/propane en gaz naturel Interrupteur Lors de cette opération À EFFECTUER AVANT , vous devrez successi- TOUT BRANCHEMENT vement : Gaz naturel ➊ Basculer l’interrupteur de Butane/Propane changement de gaz. ❷...
- Page 19 Installez facilement votre table hangement de gaz (suite) ● Passage du gaz butane/propane en gaz naturel (suite). Pour la table 1 feu : en procédant HANGEZ LES INJECTEURS comme suit : • Retirez la grille, le chapeau, et la tête du brûleur.
- Page 20 Installez facilement votre table hangement de gaz (suite) ● Caractéristiques gaz F F R R - - G G B B F F R R - - G G B B F F R R - - G G B B F F R R A A p p p p a a r r e e i i l l d d e e s s t t i i n n é...
- Page 21 Installez facilement votre table epérage des injecteurs tableau ci-dessous indique Exemple : repère injecteur 63 implantations des injecteurs sur votre appareil en fonction du gaz utilisé. Chaque numéro est marqué sur l’injecteur. R R E E P P E E R R A A G G E E D D E E S S I I N N J J E E C C T T E E U U R R S S T T a a b b l l e e 3 3 8 8 c c m m a a v v e e c c f f o o y y e e r r s s a a u u x x i i l l i i a a i i r r e e + + t t r r i i p p l l e e c c o o u u r r o o n n n n e e Gaz butane/...
- Page 22 tilisation de votre appareil escription de votre dessus Modèle 2 feux à commandes électroniques DTG1038*/* Modèle 1 feu à commandes électroniques DTG1008 */* Foyer auxiliaire 0,85 kW (*) Brûleur triple couronne 3,6 kW (*) Brûleur forte puissance 6,1 kW (*) (*) Puissances obtenues en gaz naturel G20...
-
Page 23: Utilisez Votre Table En Toute Simplicité
Utilisez votre table en toute simplicité omment mettre en marche et ajuster la puissance ? • Sélectionnez le brûleur que vous sou- haitez utiliser en posant votre doigt bien droit et bien à plat sur la touche cor- respondante (fig. 1). ➡... -
Page 24: Description Des Commandes (Modèle 2 Feux)
Utilisez votre table en toute simplicité escription des commandes (modèle 2 feux) Touches marche/arrêt Touches de puissance Touches de minuterie ise en marche Appuyez sur la touche de la zone à utiliser. Un affichage 0 0 clignotant et un bip signalent que la zone est allumée. -
Page 25: Description Des Commandes (Modèle 1 Feu Forte Puissance)
Utilisez votre table en toute simplicité escription des commandes (modèle 1 feu forte puissance) Touches marche/arrêt — A l’allumage, vous constaterez que le brûleur central s’allume en Touches de puissance préalable de la couronne extérieure et que toute modification de puissance se fera Touches de minuterie dans la même logique. -
Page 26: Comment Utiliser La Minuterie
Utilisez votre table en toute simplicité omment utiliser la minuterie ? (Modèle 1 feu gaz DTG1008*/*) Une minuterie tournante (durée maximale 99 minutes) est disponible pour l’ensemble des zones de cuisso- ne et s’affecte sur une seule zone de cuisson et s’affecte soit au brûleur central, soit au brûleur complet (brû- leur central + couronne extérieure) Pour utiliser la minuterie :... - Page 27 Utilisez votre table en toute simplicité omment utiliser la minuterie ? (Modèle 2 feux gaz DTG1038*/*) • Une minuterie tournante (durée maxi- male 99 minutes) est disponible pour l’ensemble des zones de cuisson et s’af- fecte sur une seule zone de cuisson ou les deux à...
-
Page 28: Quels Sont Les Récipients Les Plus Adaptés Sur Les Brûleurs Gaz
Utilisez votre table en toute simplicité uels sont les récipients les plus adaptés sur les brûleurs gaz ? • Diamètres de récipients conseillés : Grand brûleur Brûleur moyen Petits brûleurs GRAND RAPIDE RAPIDE SEMI-RAPIDE AUXILIAIRE 18 à 28 cm 16 à 22 cm 12 à... -
Page 29: Comment Entretenir Votre Table
Comment entretenir votre table ? L’entretien de votre table de cuisson est facilité si vous l’effectuez avant son refroidissement complet. Cependant, ne nettoyez jamais votre appareil pendant son fonctionnement. Mettez à zéro toutes les commandes. PRODUITS ET COMMENT ACCESSOIRES A PROCÉDER ? UTILISER Injecteur... -
Page 30: Petites Pannes Et Anomalies
Petites pannes et anomalies Vous avez un doute sur le bon fonctionnement de votre table ..ceci ne signifie pas forcément qu'il y a une panne. Dans tous les cas, vérifiez les points suivants : - L’affichage d’un code erreur bloque automatiquement l’utilisation de la minuterie... - Page 31 Petites pannes et anomalies (suite) Vous avez un doute sur le bon fonctionnement de votre table ..ceci ne signifie pas forcément qu'il y a une panne. Dans tous les cas, vérifiez les points suivants :...
- Page 32 Petites pannes et anomalies (suite) Vous avez un doute sur le bon fonctionnement de votre table ..ceci ne signifie pas forcément qu'il y a une panne. Dans tous les cas, vérifiez les points suivants :...
-
Page 33: Guide De Cuisson Gaz
Guide de cuisson - Pour régler au mieux votre temps de cuisson, n’hésitez pas à passer le récipient d’un brûleur à l’autre (par exemple : du brûleur grand rapide au brûleur semi-rapie : blan- quette, osso-bucco...). - Pour les grillades nécessitant une forte température, choisissez le brûleur grand rapide. - Pour les sauces délicates et le réchauffage de plats cuisinés, utilisez le brûleur semi-rapide. - Page 34 List of contents The safe way to use your hob What your hob looks like What the control panel looks like The easy way to install your hob Fitting recommendations 40-41 Electrical connections Gas connections 43-45 Changing the type of gas supply 46-54 Using your hob in all simplicity Turning on the hob and adjusting the power setting...
- Page 35 Dear Customer, You have just acquired a DE DIETRICH cooking hob and we would like to thank you. Our research teams have designed a new generation of appliances for you which, thanks to their quality, aesthetics and technological advances have resulted in exceptional, products, a testament to our know-how.
-
Page 36: The Safe Way To Use Your Hob
our hob in complete safety - This appliance is not intended to be - We have designed this cooking hob for used by persons (including children) use by private individuals in their homes. with reduced physical, sensory or - As part of our commitment to constantly mental abilities, or persons lacking improving our products, we reserve the experience or awareness, unless using... -
Page 37: What Your Hob Looks Like
escription of your appliance escription of the hob Hob model: 2 gas burners with touch-sensitive controls Pan support Fig. 01 Hob model: 1 high-power burner with touch-sensitive controls Pan support Burner cover Spark igniter Burner head Thermocouple Injector Control panel This Guide to Installation and Use applies to several models. -
Page 38: What The Control Panel Looks Like
escription of your appliance escription of your control panel Model: 2 burner DTG1038*/* Model: 1 burner DTG1008*/* Burner on/off touch control Overall off button Burner reference Timer clock display Burner temperature display Timer adjustment Lock display Burner power adjuster Control panel lock/unlock touch Direct access touch control control. -
Page 39: The Easy Way To Install Your Hob
The easy way to install your hob itting recommendations Model Width Depth Height Depending on Cut-out 34 cm 49 cm cupboard Outside dimensions above 38 cm 52 cm 5 cm the work surface Outside dimensions below 34 cm 48 cm 5,1 cm the work surface. - Page 40 The easy way to install your hob itting recommendations (cont'd) The hob must be built into the worktop of a support cupboard. This worktop must be at least 3 cm thick and heat-resistant or else coated with a heat resistant material. Side-clearance of at least 30 cm should be left to the right and left of the hob.
- Page 41 The easy way to install your hob itting recommendations (cont'd) To make sure that nothing can get between the frame and the worktop, stick the foam seal around the outside of the hob. Fix in place the joint provided in the folder before installing the hob : Seal 1- Remove the pan support grates,...
-
Page 42: Electrical Connections
The easy way to install your hob lectrical connections ● Gas Hob ROSS SECTION OF CABLE TO USE This hob must be connected to a 220- 220-240 V~ - 50 Hz single phase mains supply via a 2-pin + earth plug (CEI 60083 standard) or an all-pole cut-off device that complies with current ins- 3 conductors of... -
Page 43: Gas Connections
The easy way to install your hob as connections ● Preliminary remarks Access to the whole length of the connection hose must be possible and the gas hose must be replaced before its expiry date (indicated on the hose). Whatever means of connections is chosen, make sure that it is gas-tight after installation by using soapy-water. - Page 44 The easy way to install your hob as connections (Cont'd) ● Possible connections AINS GAS NATURAL GAS NATURAL GAS One of the 3 following connections must be used: - connection with a rigid pipe (gas standard G1/2). The connection should be made at the end of the elbow seal on the appliance, or - connection with a reinforced, Meter...
- Page 45 The easy way to install your hob as connections (Cont'd) ● Possible connections O T T L E D O R T A N K G A S B U T A N E BUTANE/PROPANE PROPANE Pressure regulator compulsory For the user's safety, we advise that you make the connection usint a rigid pipe if this is possible, or with a reinforced, braided, flexible gas hose...
-
Page 46: Changing The Type Of Gas Supply
The easy way to install your hob hanging the type of gas supply ● Preliminary remarks Your hob is delivered set for na- Every time you change your gas supply, mark the square on the label tural gas. in the wallet that corresponds to the The injectors for adapting the hob for use new type of gas (See "Gas Rating"... - Page 47 The easy way to install your hob hanging the type of gas supply (cont'd) ● Changing from natural gas to butane/propane gas When carrying out this operation , you should, BEFORE CONNECTING ANYTHING in this order: Switch ➊ Change the setting on the gas sup- ply type switch.
- Page 48 C C H H A A N N G G I I N N G G T T H H E E G G A A S S S S U U P P P P L L Y Y O O N N T T H H E E T T R R I I P P L L E E C C R R O O W W N N B B U U R R N N E E R R Petit Chapeau de brûleur Small burner cover Petit brûleur central...
- Page 49 The easy way to install your hob hanging the type of gas supply (cont'd) ● Changing from natural gas to butane/propane gas (cont'd). OR THE HOB BURNER H A N G E T H E I N J E C T O R S following way: •...
- Page 50 The easy way to install your hob hanging the type of gas supply (cont'd) ● Changing from butane / propane gas to natural gas When carrying out this operation , you should BEFORE CONNECTING ANYTHING Switch successively: ➊ Change the setting on the gas sup- ply tpe switch.
- Page 51 The easy way to install your hob hanging the type of gas supply (cont'd) ● Changing from butane / propane gas to natural gas OR THE SINGLE BURNER HOB H A N G E T H E I N J E C T O R S following way: •...
- Page 52 The easy way to install your hob hanging the type of gas supply (cont'd) ● Gas rating F F R R - - G G B B F F R R - - G G B B F F R R - - G G B B F F R R A A p p p p l l i i a a n n c c e e i i n n t t e e n n d d e e d d t t o o b b e e i i n n s s t t a a l l l l e e d d f f o o r r u u s s e e w w i i t t h h : : B B u u t t a a n n e e...
- Page 53 The easy way to install your hob arkings on the injectors The table below shows where the injectors Example: injector marking 63 are positioned on your appliance according to the type of gas used. Each number is marked on the injector. M M A A R R K K I I N N G G S S O O N N T T H H E E I I N N J J E E C C T T O O R R S S 3 3 8 8 c c m m h h o o b b w w i i t t h h a a u u x x i i l l i i a a r r y y b b u u r r n n e e r r + + t t r r i i p p l l e e r r i i n n g g b b u u r r n n e e r r...
- Page 54 sing your applicance escription of your hob Model 2 burners with electronic controls DTG 1038*/* Model 1 burner with electronic controls DTG 1008 */* Auxiiary burner 0.85 kW (*) Triple-ring burner 3.6 kW (*) High-power burner 6.1 kW (*) (*) Power obtained with G20 natural gas.
-
Page 55: Using Your Hob In All Simplicity
Using your hob in all simplicity urning on the hob and adjusting the power setting • Select the burner that you wish to use by placing your finger squarely on the corresponding control button (fig. 1). ➡ In the display, the selected power Fig. -
Page 56: Description Of Controls (2 Burner Model)
Using your hob in all simplicity escription of controls (2 burner model) On/off buttons Power level buttons Timer buttons witching on Press the button for the cooking zone you want to use. A flashing 0 display and a beep indicates that the cooking zone is on. -
Page 57: Description Of Controls (Model: 1 High-Power Burner)
Using your hob in all simplicity escription of controls (model: 1 high-power burner) On/off buttons Power level buttons Timer buttons witching on --- When switched on, you will note that the central burner ignites before You can either use the central burner on its the outside ring and that any power own (controls on the left ), or you can use... -
Page 58: How To Use The Timer
Using your hob in all simplicity ow to use the timer (Model DTG1008*/*, 1 gas burner) A timer (maximum duration 99 min- utes) is available for all cooking zones and relates to a single cooking zone and may be allocated either to the central burner or to the whole burner (central burner plus outer ring). - Page 59 Using your hob in all simplicity ow to use the timer (Model DTG1038*/*, 2 gas burners) • A timer (maximum duration 99 min- utes) is available for all the cooking zones and relates to one cooking zone or to both at the same time.
-
Page 60: Which Pans Are Best Suited For Use On The Gas Burner
Using your hob in all simplicity hich pans are best suited for use on the gas burner ? • Recommended pan sizes: Big burner Medium burner Small burners EXTRA FAST FAST SEMI-FAST AUXILIARY 18 to 28 cm 16 to 22 cm 12 to 20 cm 8 to 14 cm Adjust the flames so that they do not... -
Page 61: Looking After Your Hob
Looking after your hob? Keeping your hob in good condition is easy if you clean it before it is completely cold. Even so, never clean it when it is in use. Set all the control knobs at zero. ACCESSORIES TO HOW TO PROCEED BE USED Injector... -
Page 62: Minor Troubleshooting
Minor troubleshooting You have doubts about whether your hob is working correctly ..this does not necessarily mean there is a breakdown. Nevertheless, check the following points - When an error code is displayed, this automatically prevents all use of the timer... - Page 63 Minor troubleshooting (cont’d)
- Page 64 Using your hob in all simplicity...
-
Page 65: Gas-Cooking Guide
Cooking guide - To have maximum control over your cooking times, do not be afraid to transfer your saucepan from one burner to another (e.g. from the extra fast burner to the semi-fast burner: blanquettes, osso buccos, etc.). - Choose the extra fast burner for grilling that requires high temperatures. - Use the semi-fast burner for delicate sauces and heating ready-prepared dishes. - Page 68 Service Après-Vente / After Sales Service Pour en savoir plus sur tous les produits de la marque : informations, conseils, les points de vente, les spécialistes après-vente. Pour communiquer : nous sommes à l’écoute de toutes vos remarques, suggestions, propositions auxquelles nous vous répondrons personnellement.
Need help?
Do you have a question about the DTG1008 Series and is the answer not in the manual?
Questions and answers