Advertisement
45°
© UPLIFT Desk • 1-800-349-3839 • info@upliftdesk.com • www.upliftdesk.com
®
UPLIFT Adapt Freestand
UDA100~freestand
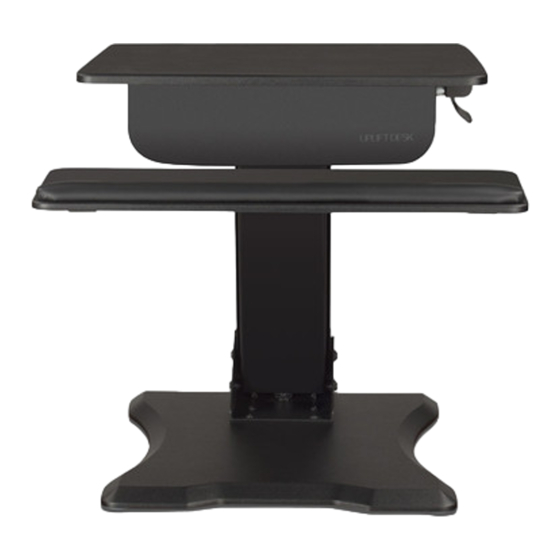
Part B
keyboard tray
Step 1
Press and hold the release paddle in the up position on the UPLIFT
Adapt main assembly (Part A) to raise the worksurface to the highest
position. Release the paddle to lock in place.
Step 2
Line up the holes on the plate of the keyboard tray (Part B) with the
holes on the vertical connector under the main assembly's work sur-
face.
Attach keyboard tray to the main assembly using two M6*10 bolts
(Part E) and tighten using the small Allen wrench (Part D).
Cover the bolts with the adhesive bolt covers (Part F) by placing them,
sticky side down, on the heads of the exposed bolts.
Step 3
Lower the unit until the main support column is at a 45° angle. Using
the larger Allen wrench (Part C) and the tension adjustment bolt on
the rear of the unit, adjust the tension for smooth operation. Turn
clockwise to lessen the tension or counterclockwise to increase it.
You may need to make further adjustments once equipment, such
as monitors and keyboards, are placed on the unit.
Instructions
™
Part A
Adapt Freestand
main assembly
Part C
Allen wrench (large)
Part D
Allen wrench (small)
Part E
M6*10 bolts Qty. 2
Part F
bolt covers Qty. 2
Advertisement
Table of Contents

Related Manuals for Uplift Desk UPLIFT Adapt Freestand


Summary of Contents for Uplift Desk UPLIFT Adapt Freestand
- Page 1 Turn clockwise to lessen the tension or counterclockwise to increase it. You may need to make further adjustments once equipment, such as monitors and keyboards, are placed on the unit. 45° © UPLIFT Desk • 1-800-349-3839 • info@upliftdesk.com • www.upliftdesk.com...
- Page 2 • and may result in property damage or personal injury. © Copyright Notice These instructions are a component of the UPLIFT Adapt Freestand ™ . These instructions are part of the scope of delivery, even if the item is resold.
Need help?
Do you have a question about the UPLIFT Adapt Freestand and is the answer not in the manual?
Questions and answers