Table of Contents
Advertisement
Advertisement
Table of Contents

Related Manuals for Glide 4 Series


Summary of Contents for Glide 4 Series
- Page 1 SERIES 4 POWER WHEELCHAIR OWNER/USER MANUAL (2006-1) For your safety and comfort read carefully and understand all of the features prior to using your new Glide Power Chair. Misuse may result in electrical or mechanical damage. Maximum User Weight 150Kg...
- Page 2 TABLE OF CONTENTS SECTION 1. INTRODUCTION Pg 3 SECTION 2. STANDARD FEATURES Pg 4 SECTION 3. WARNINGS Pg 5 SECTION 4 FOLDING AND UNFOLDING YOUR CHAIR Pg 8 SECTION 5. TRANSPORTING YOUR POWER CHAIR Pg 9 SECTION 6. OPERATING YOUR POWER CHAIR Pg 10 SECTION 7.
-
Page 3: Section 1. Introduction
Please take the time to familiarise yourself with the functions and features of your power chair by reading this Owners Manual. If you have any queries about the functions of the chair you can call Glide Rehabilitation Products or your nearest Glide dealer. -
Page 4: Section 2. Standard Features
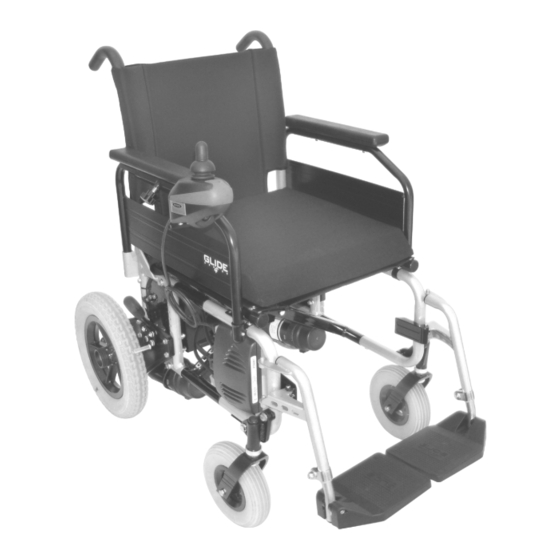
SECTION 2. STANDARD FEATURES The illustration below (Fig 1. below) is a list of the Series 4 standard features. Standard Non - Adjustable Height Armrests Battery Pack (with built in lifting strap) Drive Clutch Attendant Brakes Pneumatic Front Castor Wheels – 200mm x 50mm (8”x1¼” ) Pneumatic Rear Wheels –... -
Page 5: Section 3. Warnings
Environment Conditions WARNING! The Glide Rehabilitation Products Power Chair has been designed and tested with user safety, as it’s prime consideration. This however, does not negate the effect or take into account, circumstances, which put the wheelchair outside the specified operating... - Page 6 It is important that the user takes due care and understands the limitations within the environment that the chair will be operated. As a guide only, the following is a brief list of scenarios that could affect the stability of the chair and need to be considered when driving chair: - Traction could be lost on inclined, wet, grassy surfaces.
- Page 7 If for any reason, your chair behaves in an abnormal manner, shut the wheelchair off immediately. Before continuing, the user must be confident that the system is performing normally. If not, turn chair off and contact your carer or Glide Rehabilitation Products Agent for repair. Controllers...
-
Page 8: Section 4. Folding And Unfolding Your Power Chair
SECTION 4. FOLDING AND UNFOLDING YOUR POWER CHAIR Removal of battery Box Unclip battery lead connector Pull out both locking pins A (see diagram) and twist so they hold in the out position Lift battery box out using lifting strap (velcro lid retaining strap) Folding of Power Chair Lift up Left and Right footplates Remove spreader bar (if fitted) -
Page 9: Section 5. Transporting Your Power Chair
Posture Positioning Belts should not be used as vehicle restraint belts. NOTE: Ensure that your restraint system complies with AS2942 and you fully understand the manufacturer instructions on how your tie down system works and whether it is compatible with the Glide Power Chair... -
Page 10: Section 6. Operating Your Power Chair
SECTION 6. OPERATING YOUR POWER CHAIR CONTROLLER Your new Power Chair has been supplied with the Dynamic Controls control system. You will have been given instruction on how to operate your controller at time of specification. WARNING: Never push the On /Off button or pad on the control box until you are seated correctly in the chair and have your hand on the control box. - Page 11 DRIVE CLUTCH The drive clutch is located in the centre of each driving wheel. It is identified as a large Black Plastic Knob. To ENGAGE, simply turn Black Plastic Knob (drive clutch) in either direction until you here a “click”. Turn chair on and SLOWLY move joystick forward until drive clutch self engages.
- Page 12 FIGURE 3. HOW TO OPERATE YOUR CHAIR. Standard Non - Adjustable Height Armrests Battery Pack (with built in lifting strap) Drive Clutch Attendant Brakes Pneumatic Front Castor Wheels – 200mm x 50mm (8”x1¼” ) Pneumatic Rear Wheels – 203mm x 62mm (12 ½” x 2 ¼”) Swing Away Footrests Dynamic Shark Controller High Torque Motors...
-
Page 13: Section 7. Battery Charging And Maintenance
If acids make contact with skin or clothing, wash immediately with soap and water. All batteries are deemed to be hazardous waste when they are no longer useful and you should contact your local authority for recycling. It is advisable to have a Glide Rehabilitation Products representative replace your batteries. -
Page 14: Section 8. Routine Maintenance
Rehabilitation Products Agent or Glide Rehabilitation Products direct. NOTE: As stated in our warranty, we recommend that your wheelchair be returned to an authorized Glide Rehabilitation Products agent for its free 3 month service check. This is a one off free service calculated from date of purchase. -
Page 15: Section 9. Trouble Shooting
If circuit breaker continually trips for no apparent reason, cease use and contact nearest Glide Rehabilitation Products service agent. Important: Allow 60 seconds before resetting circuit breaker. -
Page 16: Section 10. Dynamic Controls Shark Controller
SECTION 10. DYNAMIC CONTROLS SHARK CONTROLLER CONTROLS DK – SHARK CONTROLLER On/Off Touch Pad – This is a GREY pad located at rear left hand side of the controller – behind the joystick. Turning the Shark ON – Press the power button. All indicators will light briefly and will either show battery charge or Lock Mode. - Page 17 Sleep Mode – Some Shark controllers may be factory supplied with the SLEEP feature that automatically turns off the Shark if no joystick movement is detected within a certain period (programmable). When Wake Style has been set to “Joystick and Buttons”, pressing any button or displacing the joystick will bring the system out of Sleep mode.
-
Page 18: Section 11. Precautions For Controller Use
The controller would have been programmed to suit your individual needs. If changes are required to this original setting it is recommended that you contact an authorised Glide Rehabilitation Products agent. In spite of their sophistication, the controllers cannot take into account circumstances... -
Page 19: Section 12. Transferring To And From Your Chair
SECTION 12. TRANSFERRING TO AND FROM YOUR CHAIR The Glide Rehabilitation Products Power Chair is designed in such a way that transferring in and out can be done with a minimum of fuss. Armrests can either be removable or flipped back (depending on type specified when ordering) allowing easy lateral movement from either side of chair or for the fitting of a patient hoist sling. -
Page 20: Section 13. Environment Precautions
SECTION 13. ENVIRONMENT PRECAUTIONS The Glide Rehabilitation Products Power Chair has been designed and tested with user safety as it’s prime consideration and complies with AS 3695 Standards. Even though the Series 4 has been designed with user safety as it’s prime... -
Page 21: Section 14. Radio Frequency Interference
LED), the user must ensure that the system is behaving normally. If not, the system must be turned Off and a service agent contacted. The Glide Rehabilitation Products Series 4 Power Wheelchair has been tested to and passes EMC requirements stated in EN 12184. -
Page 22: Section 15. Battery Wiring Diagram
SECTION 15. BATTERY WIRING DIAGRAM Recommended Batteries 2 x 12V 24 Amp HR Maintenance Free Rechargeable Sealed Batteries... -
Page 23: Section 16. Spare Parts
SECTION 16. SPARE PARTS TYRES 200mm (8”) Pneumatic Front – P/N 202602 250mm (10”) Pneumatic Front – P/N 202670 203 x 62 (12 ½ x 2 ¼) Rear – P/N 202615 4.10/3.50 – 6 Rear – P/N 202663 TUBES 200mm (8”) Front –... - Page 24 CASTOR ASSEMBLY DIAGRAM...
-
Page 25: Section 17. Warranty
Frame 3-year warranty Frame will be replaced within the first twelve month period. Thereafter, Glide will extend the warrant for further two years and will either replace or repair frame. Upholstery 6 month warranty This will cover against defects in materials or workmanship. - Page 26 The replacement of the Glide Series 4 or the supply of an equivalent wheelchair The repair of the Glide Series 4 The payment of the cost of replacing the Glide Series 4 or of acquiring an equivalent wheelchair The payment of the cost of having the Glide Series 4 repaired...
Need help?
Do you have a question about the 4 Series and is the answer not in the manual?
Questions and answers