GORMAN-RUPP PUMPS 10 Series Installation, Operation, Maintenance Manual With Parts List
Hide thumbs
Also See for 10 Series:
- Installation, operation and maintenance manual (45 pages) ,
- Installation, operation, and maintenance manual with parts list (42 pages) ,
- Manual (39 pages)

Related Manuals for GORMAN-RUPP PUMPS 10 Series


Summary of Contents for GORMAN-RUPP PUMPS 10 Series
- Page 1 OM‐03413‐05 August 22, 2005 Rev. B 02/15/18 INSTALLATION, OPERATION, AND MAINTENANCE MANUAL WITH PARTS LIST 10 SERIES PUMP MODELS 14C20-F3L GORMAN‐RUPP PUMPS www.grpumps.com 2005 Gorman‐Rupp Pumps Printed in U.S.A.
- Page 2 Register your new Gorman‐Rupp pump online at www.grpumps.com Valid serial number and e‐mail address required. The engine exhaust from this product contains chemicals known to the State of California to cause cancer, birth defects or other reproductive harm. RECORD YOUR PUMP MODEL AND SERIAL NUMBER Please record your pump model and serial number in the spaces provided below.
-
Page 3: Table Of Contents
TABLE OF CONTENTS INTRODUCTION ........... PAGE I - 1 SAFETY - SECTION A . - Page 4 TABLE OF CONTENTS (continued) Liquid Temperature And Overheating ........PAGE C - 3 Strainer Check .
-
Page 5: Introduction
10 SERIES OM-03413 INTRODUCTION Thank You for purchasing a Gorman‐Rupp pump. HAZARD AND INSTRUCTION Read this manual carefully to learn how to safely DEFINITIONS install and operate your pump. Failure to do so could result in personal injury or damage to the The following are used to alert maintenance per... -
Page 6: Safety - Section A
10 SERIES OM-03413 SAFETY - SECTION A This information applies to 10 Series en pump or endanger personnel as a result of pump failure. gine driven pumps. Refer to the manual accompanying the engine before at tempting to begin operation. - Page 7 10 SERIES OM-03413 heated pump. Vapor pressure within the pump can cause parts being disen gaged to be ejected with great force. Al low the pump to cool before servicing. Fuel used by internal combustion en gines presents an extreme explosion and fire hazard.
-
Page 8: Installation - Section B
10 SERIES OM-03413 INSTALLATION - SECTION B Review all SAFETY information in Section A. specific application. Since the pressure supplied to the pump is critical to performance and safety, Since pump installations are seldom identical, this be sure to limit the incoming pressure to 50% of... -
Page 9: Preinstallation Inspection
OM-03413 10 SERIES Before installing the battery, clean the positive and PREINSTALLATION INSPECTION negative cable connectors, and the battery termi nals. Secure the battery by tightening the The pump assembly was inspected and tested be holddown brackets. The terminals and clamps fore shipment from the factory. -
Page 10: Clearance
10 SERIES OM-03413 the brake and blocking the wheels before attempt Lines near the pump must be independently sup ported to avoid strain on the pump which could ing to operate the pump. cause excessive vibration, decreased bearing life, To ensure sufficient lubrication and fuel supply to and increased shaft and seal wear. -
Page 11: Sealing
OM-03413 10 SERIES Sealing of the suction pipe. The baffle will allow entrained air to escape from the liquid before it is drawn into Since even a slight leak will affect priming, head, the suction inlet. and capacity, especially when operating with a... -
Page 12: Discharge Lines
10 SERIES OM-03413 In low discharge head applications (less than 30 DISCHARGE LINES feet (9,1 m)), it is recommended that the bypass line be run back to the wet well, and located 6 Siphoning inches below the water level or cut‐off point of the low level pump. -
Page 13: Automatic Air Release Valve
OM-03413 10 SERIES Figures 4 and 5 show a cross‐sectional view of the Automatic Air Release Valve, and a corresponding description of operation. A manual shut‐off valve should not be During the priming cycle, air from the pump casing installed in any bypass line. A manual flows through the bypass line, and passes through the Air Release Valve to the wet well (Figure 4). -
Page 14: Air Release Valve Installation
10 SERIES OM-03413 man‐Rupp distributor or the Gorman‐Rupp Compa pendently mounted in a horizontal position and ny for information about an Automatic Air Release connected to the discharge line of the self‐priming Valve for your specific application. centrifugal pump (see Figure 6). -
Page 15: Operation - Section C
OM-03413 10 SERIES OPERATION - SECTION C Review all SAFETY information in Section A. liquid in the pump casing. The pump will not prime when dry. Extended operation of Follow the instructions on all tags, labels and a dry pump will destroy the seal assembly. -
Page 16: Operation
OM-03413 10 SERIES Liquid Temperature And Overheating The maximum liquid temperature for this pump is F (71 C). Do not apply it at a higher operating Pump speed and operating condition temperature. points must be within the continuous per Overheating can occur if operated with the valves formance range shown on the curve on in the suction or discharge lines closed. - Page 17 OM-03413 10 SERIES Open the suction line, and read the vacuum gauge 4. If the engine speed exceeds the safe operat with the pump primed and at operation speed. ing range. Shut off the pump. The vacuum gauge reading will 5.
- Page 18 OM-03413 10 SERIES to operate properly. Make certain that the bearing lubricant is of the proper viscosity and at the cor rect level (see LUBRICATION in Section E). Bear ing overheating can also be caused by shaft If the pump is equipped with the option...
- Page 19 10 SERIES OM-03413 TROUBLESHOOTING - SECTION D Review all SAFETY information in Section A. Before attempting to open or service the pump: 1. Familiarize yourself with this manual. 2. Shut down the engine and disconnect the positive battery cable to ensure that the pump will remain inoperative.
- Page 20 OM-03413 10 SERIES TROUBLE POSSIBLE CAUSE PROBABLE REMEDY PUMP STOPS OR FAILS Impeller or other wearing parts Replace worn or damaged parts. TO DELIVER RATED worn or damaged. Check that impeller is properly cen tered and rotates freely. FLOW OR PRESSURE (cont.)
-
Page 21: Preventive Maintenance Schedule
10 SERIES OM-03413 equipped) between regularly scheduled inspec PREVENTIVE MAINTENANCE tions can indicate problems that can be corrected Since pump applications are seldom identical, and before system damage or catastrophic failure oc pump wear is directly affected by such things as curs. - Page 22 OM-03413 10 SERIES PUMP MAINTENANCE AND REPAIR - SECTION E MAINTENANCE AND REPAIR OF THE WEARING PARTS OF THE PUMP WILL MAINTAIN PEAK OPERATING PERFORMANCE. STANDARD PERFORMANCE FOR PUMP MODEL 14C20‐F3L Based on 70 F (21 C) clear water at sea level Contact the Gorman‐Rupp Company to verify per...
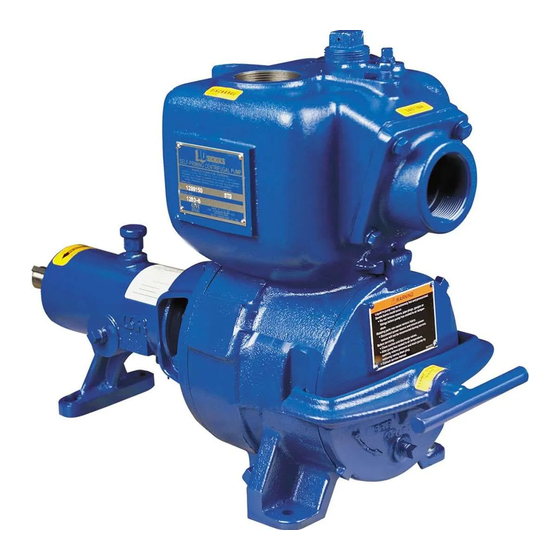
- Page 23 OM-03413 10 SERIES ILLUSTRATION PARTS PAGE Figure 1. Pump Model 14C20‐F3L PAGE E - 2 MAINTENANCE & REPAIR...
- Page 24 OM-03413 10 SERIES PARTS LIST Pump Model 14C20‐F3L (From S/N 1319349 Up) If your pump serial number is followed by an “N”, your pump is NOT a standard production model. Contact the Gorman‐Rupp Company to verify part numbers. ITEM PART NAME...
- Page 25 OM-03413 10 SERIES ILLUSTRATION Figure 2. 14C20‐(SAE 4/10) Pump End Assembly PAGE E - 4 MAINTENANCE & REPAIR...
- Page 26 OM-03413 10 SERIES PARTS LIST 14C20‐(SAE 4/10) Pump End Assembly ITEM PART NAME PART ITEM PART NAME PART NUMBER NUMBER PUMP CASING SEE NOTE BELOW STUD C0606 15991 IMPELLER 9934A 11060 GASKET SET 2474G 18000 1.50" SEAL ASSY 12364D DRIVE SCREW...
- Page 27 OM-03413 10 SERIES ILLUSTRATION Figure 3. 44162-119 Drive Assembly PARTS LIST ITEM PART PART NAME NUMBER COUPLING KIT 48112-001 -BUSHING 24131-345 -COUPLING ASSEMBLY 44165-011 -LOCK WASHER J06 15991 -LOCK WASHER 21171-536 -SOC HD CAP SCREW BD0606-1/2 15991 -SOC HD CAP SCREW...
- Page 28 OM-03413 10 SERIES PUMP AND SEAL DISASSEMBLY AND REASSEMBLY Before attempting to open or service the pump: Review all SAFETY information in Section A. 1. Familiarize yourself with this man ual. Follow the instructions on all tags, label and de...
- Page 29 OM-03413 10 SERIES The wear plate (39) is easily accessible and may be ing. Be sure to screw the eye into the casing until serviced by removing the back cover assembly fully engaged. Support the pump using a suitable (44).
- Page 30 OM-03413 10 SERIES impeller shaft (55) with the “V” notch positioned Impeller Removal over the shaft key. (Figure 2) With the impeller rotation still blocked, see Figure 4 With the impeller loosened, unscrew it from the and use a long piece of heavy bar stock to pry shaft.
- Page 31 OM-03413 10 SERIES Disengage the hardware (24A and 25A) and re races and cause premature bearing fail move the bearing cap (52), gasket (23), oil seal ure. (28A) and bearing shim set (53). Tie and tag the Rotate the bearings by hand to check for rough...
- Page 32 OM-03413 10 SERIES Heat the bearings to a uniform temperature no NOTE higher than 250 F (120 C) and slide the bearings Shaft endplay should be .002 to .010 inch (0,05 to onto the shaft, one at a time, until they are fully 0,25 mm).
- Page 33 OM-03413 10 SERIES the two setscrews in an alternating sequence until tilated area free from excessive heat, the bushing and coupling are fully secured. Torque sparks, and flame. Read and follow all the setscrews to 14.6 ft. lbs. (175 in. lbs. or 2 m.
- Page 34 OM-03413 10 SERIES SEAL PLATE RETAINER SPRING SPRING HOLDER O‐RINGS IMPELLER SHAFT SLEEVE IMPELLER SHAFT STATIONARY ELEMENT IMPELLER OIL SEAL SHIMS BELLOWS DRAIN PLUG ROTATING ELEMENT STATIONARY SEAT Figure 5. Seal Assembly Press the stationary subassembly (consisting of the stationary seat, O‐rings and stationary ele...
- Page 35 OM-03413 10 SERIES LUBRICATION, after the impeller has been in ommended for maximum pump efficiency. This stalled. clearance must be set after installing the back cover, by adding or removing gaskets in the pump Impeller Installation and Adjustment casing gasket set until the impeller just touches the wear plate.
- Page 36 OM-03413 10 SERIES Form‐A‐Gasket' or equivalent compound to the Remove the fill cover assembly (13) and fill the mating surfaces. pump casing with clean liquid. Reinstall the fill cover plate and tighten it. Secure the suction flange (45) to the pump casing Refer to OPERATION, Section C, and start the with the nuts (46).
- Page 37 For Warranty Information, Please Visit www.grpumps.com/warranty or call: U.S.: 419-755-1280 Canada: 519-631-2870 International: +1-419-755-1352 GORMAN‐RUPP PUMPS...
Need help?
Do you have a question about the 10 Series and is the answer not in the manual?
Questions and answers