Valeo REVO-E Workshop Manual
Volvo
Hide thumbs
Also See for REVO-E:
- Evacuation and charging instructions (24 pages) ,
- Installation instructions manual (48 pages)

Subscribe to Our Youtube Channel
Related Manuals for Valeo REVO-E


Summary of Contents for Valeo REVO-E
- Page 1 AIR CONDITIONING REVO -E Heat pump ® Volvo Workshop Manual Rev. 06/2019 Id.No. 11123006A...
-
Page 2: Table Of Contents
Description of assemblies and components REVO-E HP versions on the Volvo 79xx Electric Total overview of the design and components of the REVO-E heat pump Overview of high-voltage cable harnesses / components (400V AC / 600V DC) Cable harnesses overview (high-voltage / low-voltage) in the REVO-E HP... - Page 3 Table of error codes Error codes Inspecting functionality of individual components 5.6.1 General visual inspection Diagnosing the REVO-E units using the Diagnosis Control Test – DCT diagnostic software Diagnosing the frequency converter Wiring diagrams Electrical fuses Wiring diagram REVO-E HP (11120816*)
- Page 4 REVO-E Heat pump Content 9.4.1 Removal of the condenser module 9.3.2 Installation of the condenser module Expansion valves removal/ installation 9.4.1 Positions of the expansion valves and the associated contact sensors 9.4.2 Remove an expansion valve 9.4.3 Install an expansion valve Filter dryer removal/ installation 9.5.1...
-
Page 5: Content And Purpose
Technical information (TI) It may be subject to changes and addenda. The currently This servicing literature is also available for download at valid version is binding. These are found on the Valeo www.valeo-thermalbus.com/eu_en/Service/Downloads/ homepage in the Service / Downloads area. -
Page 6: General Safety Information
REVO-E Heat pump 1 Introduction 1.6.1 General safety information 1.6.2 Working with high-voltage air- conditioning systems Required qualifications High voltage! Warning! High voltage! Caution Warning! Caution Mortal danger! Mortal danger! Only conduct installation, maintenance and repair work if the motor is still and the 24V DC power supply To work on the refrigeration section of the air-condi- as well as the high-voltage has been switched off. -
Page 7: Working With Pressurized Containers
REVO-E Heat pump 1 Introduction – Never warm refrigerant cylinders with an open flame. Potential risk to health Warning! The material may become damaged from the exces- and life! sive temperature, resulting in decomposition of the re- frigerant. – Close empty containers to prevent the entry of mois- –... -
Page 8: Abbreviations
Potential Equalizing safety earthing positiver Temperatur- Positive Temperature koeffizient Coefficient SC600 ECU REVO-E AC electronic control unit REVO-E AC (replaced by SC610) SC610 ECU REVO-E AC electronic control unit REVO-E AC (replaced by SC610) SC620 ECU REVO-E WP ECU REVO-E HP... - Page 9 REVO-E Heat pump 2 Technical specifications Technical specifications The technical specifications, provided that there are no limit values given, comply with the standard tolerances for air-conditioning systems of ±10% for an ambient temper- ature of +20° C and nominal voltage.
-
Page 10: Revo-E Hp Versions On The Volvo 79Xx Electric
REVO-E Heat pump 3 Assemblies and components Description of assemblies and components REVO-E HP versions on the Volvo 79xx Electric REVO-E HP (11120816_) 1st generation - on solobuses REVO-E HP+ (11123865_) 2nd generation - on solobuses und articulated variants For connection to front box... -
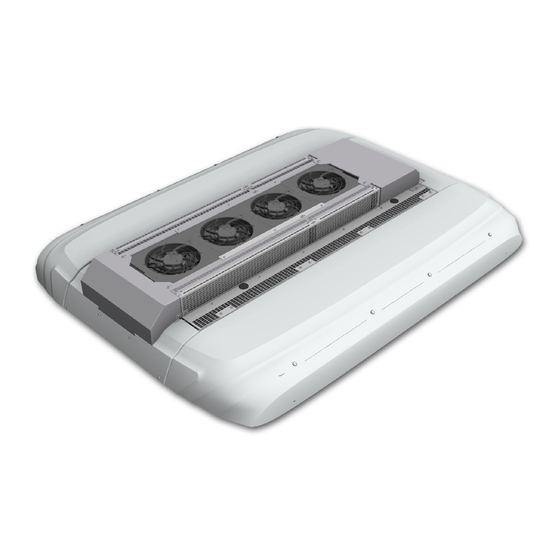
Page 11: Total Overview Of The Design And Components Of The Revo-E Heat Pump
REVO-E Heat pump 3 Assemblies and components Total overview of the design and components of the REVO-E heat pump ) Figure shows 11123865_ ) Red marked components in 11123865_ only Direction of travel Fig. 2 REVO-E Heat pump total overview... -
Page 12: Overview Of High-Voltage Cable Harnesses / Components (400V Ac / 600V Dc)
REVO-E Heat pump 3 Assemblies and components Overview of high-voltage cable harnesses / components (400V AC / 600V DC) Compressor with 3x 400V AC e-motor Frequency converter 600V DC - > 3x400V AC 1 - High-voltage power supply of the frequency converter 600V DC 2 - High-voltage power supply of the compressor 3x 400V AC Fig. -
Page 13: Cable Harnesses Overview (High-Voltage / Low-Voltage) In The Revo-E Hp
HV interface, vehicle - frequency converter frequency converter 600V DC -> 3x400V AC diagnostic cable frequency converter wiring harness control unit SC620 to ADA SC620 control device installed in Volvo E bus Fig. 4 Cable harnesses overview (high-voltage / low-voltage) in the REVO-E HP... -
Page 14: Design / Task And Function Of The Assemblies
REVO-E Heat pump 3 Assemblies and components Design / task and function of the assemblies The REVO-E heat pump features an outer and an inner balances out changes in the refrigerant circuit. heat exchanger. Dryer They consist of aluminum tubes and aluminum fins which... - Page 15 If the e-motor overheats, the frequency converter stops In zero position, the air conditioning mode is active. the compressor immediately (safety function). Solenoid valve hot gas deicing REVO-E HP + Air valves The hot gas deicing solenoid valve is installed on the Regulate the intake of fresh air or use of recirculated air 11123865_ ONLY.
-
Page 16: General Function
Both systems differ only slightly. With the additional func- The electric compressor is located on the roof in an tion "hot gas de-icing", the REVO-E HP + is able to heat exceptionally compact manner, and not on the rear of the the passenger compartment in heat pump mode at signif- vehicle as in previous versions. -
Page 17: Functional Schematic Of The Revo-E Heat Pump
REVO-E Heat pump 4 Function and functional schematics Functional schematic of the REVO-E heat pump Tasks of the SC620 – Power supply clamp 30 (main switch of battery) – Implementing climatic and heat pump requirements – Ignition on (clamp 15) –... -
Page 18: Functional Schematic Of The Revo-E Heat Pump Volvo 7900 Electric
REVO-E Heat pump 4 Function and functional schematics Functional schematic of the REVO-E heat pump Volvo 7900 Electric On single buses, the ADA and SC620 are connected to system and implements the particular requirements. one another using a Valeo cable harness. -
Page 19: Work Modes Of The Revo-E Heat Pump In The Volvo 7900 Electric
Work modes of the REVO-E heat pump in the Volvo 7900 Electric There are 9 different operating modes. The well-known 6 operating modes of the REVO-E air- conditioning system (see WM REVO-E) are extended by three working modes. In the following explanations, only the new working modes are considered. -
Page 20: Heating And Ventilation Mode (Hv Mode)
REVO-E Heat pump 4 Function and functional schematics 4.4.1 Heating and Ventilation Mode (HV Mode) Requirements: CAN messages from the BEA body to SC620 for defined – Clamp 30 active speed of double radial blowers and position of air flaps –... -
Page 21: Heating And Ventilation Mode Ready For Cooling
REVO-E Heat pump 4 Function and functional schematics 4.4.2 Heating and Ventilation Mode Ready for cooling Requirements: – Clamp 30 / 15 active Preconditions for Cooling Mode filled shortly before or – Vehicle hybrid system active after this, however cool request not sent by BEA body. -
Page 22: Heating And Ventilation Mode Ready For Heat Pump Mode
REVO-E Heat pump 4 Function and functional schematics 4.4.3 Heating and Ventilation Mode Ready for Heat Pump Mode Requirements: – Clamp 30 / 15 active Preconditions for Heat Pump Mode filled shortly before or – Vehicle hybrid system active after this, however cool request not sent by BEA body. -
Page 23: Cooling Mode
REVO-E Heat pump 4 Function and functional schematics 4.4.4 Cooling Mode – environmental temperature > 5°C The Cooling Mode is requested by the BEA body system Requirements: in order to cool down the air in the passenger cabin. The –... - Page 24 REVO-E Heat pump 4 Function and functional schematics Task of the SC620: – Control the speed of the double radial blowers / axial fans – Activation and speed setting of the compressor (via frequency converter) In Cooling mode Mode, the BEA body is not able to influ- ence the speed of the double radial blowers.
-
Page 25: Heat Pump Mode
REVO-E Heat pump 4 Function and functional schematics 4.4.5 Heat Pump Mode – HVAC power consumption enabled by “D_AuxiliaryPowerEnabled” signal – no HVIL error Requirements: ∆T temperature passenger compartment > 0K Environmental temperature ≥ -5°C (11123865_) – – Environmental temperature ≥ 3°C (11120816_) –... - Page 26 REVO-E Heat pump 4 Function and functional schematics The Heat Pump Mode is requested by the BEA body system in order to warm up the air in the passenger cabin. The SC620 therefore assumes internal control of the components in the system in order to warm up the air in the passenger cabin to the Delta T value requested by the BEA Body.
-
Page 27: Operating Mode De-Icing) (Version Hp+ Only)
– Start of Heat Pump Mode or 1h Heat Pump Mode op- “D_AuxiliaryPowerEnabled” signal eration – no HVIL error Environmental temperature ≥ -5°C (REVO-E HP+) ∆T temperature passenger compartment > 0K – – – no frequency converter or compressor errors –... -
Page 28: Operating Mode Oil Recovering (Version Hp+ Only)
REVO-E Heat pump 4 Function and functional schematics This mode is only available with the REVO-E HP + (addi- tional solenoid valve) and allows the use of the system up to an outside temperature of -5°C. For component safety, the SC620 starts the De-Icing Mode each time before starting the heat pump function. -
Page 29: Reheat Mode
REVO-E Heat pump 4 Function and functional schematics 4.4.8 Reheat Mode Reheat Mode is requested by the BEA body (air drying in passenger compartment). The SC620 activates the compressor and the axial fans Requirements: for maximum cooling. – Clamp 15 active (ignition) The BEA body system activates the valves of the roof-top –... -
Page 30: Waste Energy Mode
REVO-E Heat pump 4 Function and functional schematics 4.4.9 Waste Energy Mode Requirements: This is achieved by running back the efficiency of the air- – Clamp 15 active (ignition) conditioning system, e.g. by reducing the speed of the – Vehicle hybrid system active axial fans. -
Page 31: Gas Charging Mode
BEA body to the SC620. This activates the compressor, the double radial blowers / Requirements: axial fans of the REVO-E at minimal power. – Clamp 15 active (ignition) Monitoring of the suction pressure is deactivated in –... -
Page 32: Refrigerant Circuit Function Schematic Of The Heat Pump
REVO-E Heat pump 4 Function and functional schematics Refrigerant circuit function schematic of the heat pump The refrigerant circuit of the REVO-E heat pumps can be Die Verdampfer arbeiten im Wärmepumpen-Modus als reversed via a 4-way reversing valve. This changes the... -
Page 33: Refrigerant Circuit Function Schematic Of The Heat Pump In The Cooling Mode
REVO-E Heat pump 4 Function and functional schematics 4.5.1 Refrigerant circuit function schematic of the heat pump in the Cooling Mode Solenoid valve hot gas de-icing (ADA 11123865_only) Expansion valve Solenoid valve Sight glass Muffler Filter dryer High pressure sensor... -
Page 34: Refrigerant Circuit Function Schematic Of The Heat Pump In The Heat Pump Mode
REVO-E Heat pump 4 Function and functional schematics 4.5.2 Refrigerant circuit function schematic of the heat pump in the Heat Pump Mode Solenoid valve hot gas de-icing (ADA 11123865_only) Expansion valve Solenoid valve Sight glass Muffler Filter dryer High pressure sensor... -
Page 35: Way Reversing Valve Function Schematic
REVO-E Heat pump 4 Function and functional schematics 4.5.3 4-way reversing valve function schematic Depending on the position, the 4-way reversing valve activates air conditioning or heat pump operation. 4.5.3.1 Air conditioning mode 4.5.3.2 Heat Pump Mode Fig. 415. Abb. - Page 36 REVO-E Heat pump 4 Function and functional schematics Abb. 416 Function of the 4-way reversing valve - Heat Pump Mode...
- Page 37 REVO-E Heat pump 4 Function and functional schematics 4.5.4 Refrigerant circuit function schematic of the heat pump with hot gas de-icing (11123865_ only) This mode is only available with the 11123865_ (addi- tional solenoid valve) and allows the use of the system up to an outside temperature of -5°C.
-
Page 38: General
/ HP operation => inner This section describes how to look for and eliminate errors heat exchanger) in the REVO-E air-conditioning system. – too much refrigerant In the event of doubt, Chapters 3 and 4 contain the func- Pressure is too low at the high-pressure manometer tional relationships. - Page 39 REVO-E Heat pump 5 Troubleshooting Chapter 4 contains the functional relationships when searching for errors. Recognizing errors is normally limited to localizing the defective components. The following causes of malfunc- tions are not considered and should be verified and elimi- nated if a malfunction occurs for these reasons: •...
-
Page 40: Table Of Error Codes
When using the Diagnosis Control Test DCT diagnostic with the diagnosis software Diagnosis Control Test DCT software, ONLY active errors in the system are empha- (see BA REVO-E Diagnostic). To diagnose the REVO-E sized in red (e.g. F01 – ECU internal). -
Page 41: Error Codes
REVO-E Heat pump 5 Troubleshooting Error codes F01 ECU internal error F04 24V power supply too low System behavior System behavior – System not functioning & display off (GH) / LED not – double radial blowers not functioning blinking –... - Page 42 REVO-E Heat pump 5 Troubleshooting Actions F10 Temperature of recirculated air / passenger cabin – Measured values on sensor NOK => replace sensor too low (T<= -40°C) – Measured values on cable harness (SC620 side) NOK => inspects pin / replace cable harness System behavior –...
- Page 43 REVO-E Heat pump 5 Troubleshooting Actions – Check pressure with pressure gauge and calibrate – Measured values on sensor NOK => replace sensor with sensor values – Measured values on SC620 plug NOK => inspect pins (Attention: sensor values are absolute values) / replace cable harness –...
- Page 44 Note: Compressor controllable using DCT compo- – Eliminate error in frequency converter according to nents test. EPA description (see OI REVO-E Diagnostics) Actions – Unlocking the system: Press and hold for at least 15 F20 “Alternate charging status” signal not received sec.
- Page 45 REVO-E Heat pump 5 Troubleshooting – Eliminate error in frequency converter according to EPA description (see operating instructions of diag- nostics case) Unlock - ignition off and wait 1 min F32 HVIL error System behavior – Cooling Mode not available Necessary inspections –...
-
Page 46: General Visual Inspection
Table 503. – Visually examine all electric lines (high and low volt- Details can be found in “OI REVO-E Diagnostics“ Chap. age) for abrasion 3.5 Diagnosis Control Test. Table 503 Diagnosing the REVO-E units using Measured the Diagnosis Control Test –... -
Page 47: Electrical Fuses
Double radial blower right Double radial blower left Double radial blower left Double radial blower left Axial fan Axial fan Axial fan Wiring diagram REVO-E HP (11120816*) Fig. 601 (pages 1 - 6) includes the wiring diagram for the REVO-E HP... - Page 48 REVO-E Heat pump 6 Wiring plan from SP7 and SP8 PWM signal see sheet 5 These fans will not be used in short Fig. 601 Wiring diagram for REVO-E HP (Sheet 1)
- Page 49 REVO-E Heat pump 6 Wiring plan This fan will not be used in short run Condenser cable harness from X850 / 1 and SP7 PWM signal see sheet 5 Fig. 601 Wiring diagram for REVO-E HP (Sheet 2)
- Page 50 REVO-E Heat pump 6 Wiring plan Interface X133:6 with =<10A Fuse Fig. 601 Wiring diagram for REVO-E HP (Sheet 3)
- Page 51 REVO-E Heat pump 6 Wiring plan Fig. 601 Wiring diagram for REVO-E HP (Sheet 4)
- Page 52 REVO-E Heat pump 6 Wiring plan Fig. 601 Wiring diagram for REVO-E HP (Sheet 5)
- Page 53 Analog Ground Press Sensor Pressure Sensor Return HP GND Pressure Sensor Supply (+5V) HP Return Analog Ground Recirc inlet Sensor Cooling Liquid Temp Sensor Analog Ground Enable Roof Channel Sensor Analog Ground Analog Ground Fig. 601 Wiring diagram for REVO-E HP (Sheet 6)
- Page 54 REVO-E Heat pump 6 Wiring plan Wiring diagram REVO-E HP+ (11123865*) Fig. 602 (pages 1 - 6) includes the wiring diagram for the REVO-E HP+.
- Page 55 REVO-E Heat pump 6 Wiring plan Fig. 602 Wiring diagram for REVO-E HP+ (Sheet 1)
- Page 56 REVO-E Heat pump 6 Wiring plan Fig. 602 Wiring diagram for REVO-E HP+ (Sheet 2)
- Page 57 REVO-E Heat pump 6 Wiring plan Fig. 602 Wiring diagram for REVO-E HP+ (Sheet 3)
- Page 58 REVO-E Heat pump 6 Wiring plan In REVO-E HP+ only! Fig. 602 Wiring diagram for REVO-E HP+ (Sheet 4)
- Page 59 REVO-E Heat pump 6 Wiring plan Fig. 602 Wiring diagram for REVO-E HP+ (Sheet 5)
- Page 60 HP Sensor GND Pressure Sensor Supply (+5V) HP Sensor Return Electromagnetic valve (+) for Recirc inlet Sensor hot gas defrosting NTC4 Analog Ground F/I Enable Roof Channel Sensor Analog Ground Analog Ground Fig. 602 Wiring diagram for REVO-E HP+ (Sheet 6)
- Page 61 REVO-E Heat pump 6 Wiring plan Frequency converter - electrical connections 6.4.1 600V DC power supply including HVIL connector The air-conditioning system is linked to the HVIL monitoring system via the 600V DC wiring harness. Inspect the operating voltage at the connections L1 (Pos1) and L3 (Pos2) with the designated voltage tester (CAT IV), see Fig.
-
Page 62: Pe Connection (Potential Equalizing)
REVO-E Heat pump 6 Wiring plan 6.4.2 400V AC voltage output The PE line as well as the lines to monitor the PTC sensor of the e-motor for the compressor are integrated into this cable in addition to the live wires. -
Page 63: Compressor - Electrical Connections
REVO-E Heat pump 6 Wiring plan Compressor - electrical connections 6.5.1 400V AC voltage supply 1 PE connection 2 Cable gland 3 Cable gland lock nut 4 Position marking cable 5 Phase connections for 400V AC (3) 6 Connection for PTC sensor for electrical... -
Page 64: Safety Information
– Inspect oil level after 10 minutes of running system. Maintenance and upkeep 7.4.1 Changing the fresh air filter Details can be found in the REVO-E maintenance and service plan (for the download link, see 1.5). – Remove filter –... -
Page 65: Inspecting The Oil Level Of The Compressor
REVO-E Heat pump 7 Maintenance 7.4.3 Inspecting the oil level of the compressor 7.4.4 Changing the compressor oil Inspect the oil level after at least 10 minutes of running the NOTE: system. For this procedure, follow the preparation and follow-up Inspect the oil level by opening the rear side of the work described in 7.4. -
Page 66: Safety Information
REVO-E Heat pump 8 Removal/ installation of components (high-volt. syst.) Removal and installation of components (high-voltage system) Safety information Before beginning any work on the high-voltage system, always make sure there is no voltage present at the power supply of the frequency converter, using a voltage tester (CAT IV) suitable for HV systems (Fig. -
Page 67: Frequency Converter Removal/ Installation
REVO-E Heat pump 8 Removal/ installation of components (high-volt. syst.) Frequency converter removal/ installation 8.4.1 Remove the frequency converter 1. Prepare to remove the frequency converter • Loosen the mount for the grounding cable (4). • Loosen the diagnostic cable (3). -
Page 68: Install The Frequency Converter
REVO-E Heat pump 8 Removal/ installation of components (high-volt. syst.) • Remove cable screw for 600V DC cable (tension converter. relief), remove from housing. • Inspect the positioning of the centering cone of the • Remove control lines from terminal strip of the fastening screws. -
Page 69: Refrigerant Compressor Removal/ Installation
REVO-E Heat pump 8 Removal/ installation of components (high-volt. syst.) Refrigerant compressor removal/ installation 8.4.1 Remove the compressor 1. Preparation work, see 8.3. See torque table Attachment A 1 Protective cover of compressor 2 Torx screws (6) 3 High-pressure / fluid connection 4 Low-pressure / suction connection Fig. - Page 70 REVO-E Heat pump 8 Removal/ installation of components (high-volt. syst.) 6 Screw + locknut of mounting bracket 7 Ring screw / transport lug / grounding 8 Screws for compressor fluid lines 9 Low pressure switch (not at 11123865_) 10 Screws for mounting bracket of compressor...
-
Page 71: Comparing The Old/New Oil Level
REVO-E Heat pump 8 Removal/ installation of components (high-volt. syst.) 8.4.2 Comparing the old/new oil level While the air-conditioning system is being operated, some of the compressor oil will spread in the refrigerant circuit. The replacement compressor is already filled with 1.3 l of compressor oil. - Page 72 REVO-E Heat pump 8 Removal/ installation of components (high-volt. syst.) • Insert foam (4, Fig. 811) on both long sides in the compressor pan and affix with compressor pres- sure plate. Fig. 811 Fig. 813 • Align foam (5, Fig.
-
Page 73: Remove The 600V Ac Cable
REVO-E Heat pump 8 Removal/ installation of components (high-volt. syst.) 600V DC/ 400V AC high-voltage cable removal/ installation High voltage! Warning! Caution Mortal danger! Follow the safety information in 1.6. 8.5.1 Remove the 600V AC cable The cable's path is described in 3.3, Fig. -
Page 74: Install The 400V Ac Cable
REVO-E Heat pump 8 Removal/ installation of components (high-volt. syst.) See torque table Attachment A 1 400V AC cable 2 Clamps for 400V AC cable Fig. 815 (exemplarily) 8.5.4 Install the 400V AC cable • Replace the plug-in holder for the 400V AC cable to the crossbars (Fig. -
Page 75: Removal Of The Condenser Module 901
Minimum of 2 persons is required. When working on the refrigerant circuit, the rules for evac- • Do the preparation work according to 9.3. uating and filling the REVO-E apply. Replace the sealing rings from the opened connections and oil them before 2. Removal (Fig. -
Page 76: Installation Of The Condenser Module 902
REVO-E Heat pump 9 Removal/ installation of components 1 Frequency inverter design cover 2 Compressor design cover 3 Protective grille 4 Attachment condenser module 5 Pipe pipe group 4-way reversing valve - outer heat exchanger 6 Pipe collector - outer heat exchanger Fig. -
Page 77: Expansion Valves Removal/ Installation 903
REVO-E Heat pump 9 Removal/ installation of components Expansion valves removal/ installation 9.4.1 Positions of the expansion valves and the associated contact sensors Expansion valve left-hand inner heat exchanger Contact sensor expansion Contact sensor expansion valve left-hand inner heat valve outer heat exchanger... -
Page 78: Remove An Expansion Valve 904
REVO-E Heat pump 9 Removal/ installation of components 9.4.2 Remove an expansion valve 9.4.3 Install an expansion valve • Conduct preparation work according to 9.3. • Apply refrigerator oil to sealing rings. • Remove tar binding (4) and holding clamp (3) from •... -
Page 79: Filter Dryer Removal/ Installation 905
REVO-E Heat pump 9 Removal/ installation of components Filter dryer removal/ installation 9.5.1 Remove the filter dryer • Conduct preparation work according to 9.3. • Loosen cap nuts on filter dryer. While doing so, prevent dryer filter from twisting with suitable tool. -
Page 80: Double Radial Blowers / Axial Fans Removal/ Installation 906
REVO-E Heat pump 9 Removal/ installation of components Double radial blowers / axial fans removal/ installation 9.7.1 Remove a double radial blower 9.7.3 Remove an axial fan • Disconnect electrical connection to the housing • Remove the electrical connection to the housing (4) Fig. -
Page 81: Recirculating Air Flap Actuator Motor Removal/ Installation 907
REVO-E Heat pump 9 Removal/ installation of components Recirculating air flap actuator motor Temperature sensor (duct / recircula- removal/ installation ting air suction) removal/ installation 9.8.1 Remove the actuator motor Position: to the right side before the first double radial blower. -
Page 82: Suction Pressure Sensor Removal/ Installation 908
REVO-E Heat pump 9 Removal/ installation of components 9.10 Suction pressure sensor removal/ 9.10.2 Install the suction pressure sensor installation • Moisten sealing ring with refrigerator oil. • Screw on the sensor, holding the soldering support There is a valve insert built into the soldering support of with a suitable tool. -
Page 83: Pressure Switch Removal/ Installation 909
REVO-E Heat pump 9 Removal/ installation of components 9.12 Pressure switch removal/ installation There are valve inserts built into the screw neck of the pressure switch that automatically close when the sensor is removed from the support. 9.12.1 Remove the pressure switch •... -
Page 84: Solenoid Valve Removal/ Installation 910
REVO-E Heat pump 9 Removal/ installation of components ATTENTION: Always ensure the plug points with the cable side down in order to avoid water entry into the plug! 9.14.3 Remove the screw-in valve • Conduct preparation work according to 9.3. -
Page 85: Attachment A
REVO-E Attachment Attachment A Tightening torques / Sealings Item Designation Tightening Sealing Valeo ID torque (R134a-resistant) in Nm union nut, pressure guard, low pressure guard (as per 8 ± 10% 11120816_) not shown screw M8x50, pressure line compressor 34 ± 10%... - Page 86 REVO-E Attachment Item Designation Tightening Sealing Valeo ID torque (R134a-resistant) in Nm union nut SW19, expansion valve inlet 17 ± 10% O-ring 7,65 x 1,78 80812A union nut SW17, expansion valve compensation line 10 ± 10% O-ring 4,48 x 1,78...
- Page 87 memos...
- Page 88 Valeo Thermal Commercial Vehicles Germany GmbH Friedrichshafener Str. 7 - 82205 Gilching - Germany - Tel. +49 (0)8105 7721-0 - Fax +49 (0)8105 7721-889 www.valeo-thermalbus.com - service-valeobus@valeo.com...
Need help?
Do you have a question about the REVO-E and is the answer not in the manual?
Questions and answers