Table of Contents
Advertisement
Advertisement
Table of Contents

Subscribe to Our Youtube Channel
Related Manuals for Mefu FMJ-1700-F1


Summary of Contents for Mefu FMJ-1700-F1
- Page 1 FMJ-1700-F1 Single-side Hot Laminator Manual...
-
Page 2: Table Of Contents
Catalogue 1 Preface ...........................3 1.1 Description ......................3 1.2 Parameter ......................3 2 Installation ........................4 2.1 Notices........................4 2.2 Steel stand installation ....................4 2.3 Installation of main part ..................5 3 Names of parts ........................6 4 Control panel ........................8 5 General function ......................9 5.1 Power supply ......................9 5.2 Foot switch ......................9 5.3 Emergency stop button ...................9 5.4 Rise up and down of the upper roller ................9... -
Page 3: Preface
1 Preface 1.1 Description This hot laminator has a wide range of application. Capable of 6 meter per minute lamination utilizing cold or hot laminating films with low or high heating, the 1600-F1+ is the ideal commercial laminating solution. Low heating cold lamination with cold films can improve the quality of films, which can absolutely avoid air bubbles and snow points. -
Page 4: Installation
2 Installation 2.1 Notices 1. Carefully check the wooden case before open it, to prevent the machine being damaged during the delivery. 2. Check the accessories (Affix 1) are complete or not. 3. You should have enough tidy and clean space for installation. 4. -
Page 5: Installation Of Main Part
2. As shown below. 1 Left leg 2 Support beam 3 Middle support beam 4 Right leg 2.3 Installation of main part 1. Put the machine on steel stand. Caution: The front and back beam should be the point of effort, when carry or move the machine. 2. -
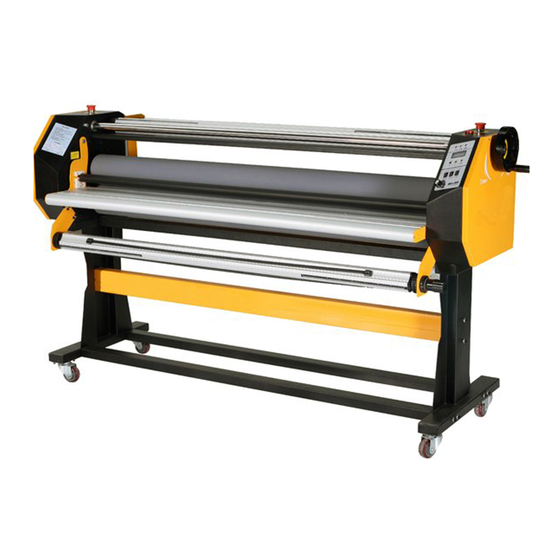
Page 6: Names Of Parts
Right side of the laminator 1.Main part 2.Backing sheet roll 3.Film roll 4.Finish product roll 5.Back support 6.Feeding roll Front support 8.front tray 3 Names of parts... - Page 7 Front of the machine 1.Hand wheel 2.Control panel 3. Front tray 4.Damping grip 5.Feeding roll 6.Emergency stop button 7.Lift link 8.Upper roller 9.Black rubber beam 10.Emergency stop button 11.Heating indictor Back of the machine 1. Emergency stop button 2. Damping grip 3. Damping grip 4. Fuse tube socket 5.
-
Page 8: Control Panel
9.Heating indicator 10.Backing sheet roll 11.Feeding roll 12.Infrared sensor beam 13.Back work table 14.Finished products roll 15.Back junction plate 4 Control panel Hot lamination indicator Cold lamination indicator Prepare indicator Real-time temperature Temperature regulation Hot/cold lamination switch Forward/Backward switch Continuous/Inching switch Speed controller 10. -
Page 9: General Function
5 General function 5.1 Power supply 5.1.1 Power wire Please use the standard main leads and check your power supply are suit for the fixed power of the laminator. 5.1.2 Main switch Press the main switch on the back of the machine, the indicator will light up and power on and vice versa. - Page 10 Caution: Please shut down the power before heating pipe installation. 1.Screw 2.Rubber mat 3.Heating pipe 4.Heating pipe bracket 5.Roller Step 1:Heating pipe installation (See above) 1. Open left and right case cover. 2. Remove the rubber mat from the bracket. 3.
-
Page 11: Feeding Roll, Film Roll, Finished Products Roll And Backing Sheet Roll Installation
5.6 Feeding roll, film roll, finished products roll and backing sheet roll installation 1.Feeding roll, film roll, finished products roll, backing sheet roll can assemble quickly. Put the liner shaft head to liner slot and fix another shaft head of the other side. There are three rubber stirps on each a-alum roll that produce frication and prevent slippery. -
Page 12: Film Roll And Backing Sheet Roll
5.6.3 Film roll and backing sheet roll They are on the top of the machine without power. These two rolls are passive running when laminating. There are two damping grips on the chain box that control the fraction, which can adjust the speed of finished products roll. Clockwise rotate the grip can increase the fraction and vice versa. -
Page 13: Damping System Of Backing Sheet Roll And Finished Products Roll
5.7.2 Damping system of backing sheet roll and finished products roll You can find them in the chain box or the case, which should clean and lubricate at a regulate time. 1.Bearing bush 2.Rion plate 3.Damping mat(Red) 4.Chain 5.Chain sheave 6.Damping mat(Red) 7.Rion plate 8.Spring... -
Page 14: Pressure Regulation Of The Rollers
Steps: 1. Take the grip, spring, plastic lock cover down. You should remove the dowel first when you take the plastic lock cover down. 2. Remove the 3 screws (Picture 2). 3. Remove the chain and replace the rubber mat. 4. -
Page 15: Gap Regulation Of The Rollers
screw on top of the vertical bevel gear, then put all parts back. If the vertical bevel gear of right side is not tight, you should not remove the transversal bevel gear, just following the steps of the left side. 5.8.2 Gap regulation of the rollers 1. -
Page 16: Notices
Notice: Please keep the cold film tension and flat. (For hot films) Drag some hot film out through the rollers, then fix the film on the finished products roll (Just for beginner). Or the machine slowly running at the beginning, someone darg the film at the back of the machine. He can tie the finished products on the finished products roll. -
Page 17: Safety Rules And Notices
7 Safety rules and notices 1. In order to make a full understanding of the machine, please read this manual carefully before operation. 2. The power supply should meet the requirement of the machine. 3. In order not to heart people, please shut down the power, when you repair the machine. -
Page 18: General Problems And Methods
8 General problems and methods Problems Reasons Methods Power or emergency button Check power supply or Control panel dead shut down emergency button fault Fuse burn down Replace Too much pressure between Rises up the upper roller the rollers Too much fraction of the rolls Regulate the fraction Cannot running Loose or fall off of chain wheel... -
Page 19: Appendix
Appendix Table 1: Accessories Term Quantity Notice Foot switch Backing sheet reception roll Feeding roll Film roll Black rubber beam weight Finished products roll Hand wheel Rubber mat Left support of feeding roll Right support of feeding roll Fuse tube 2A/7A Video Table 2: Steel stand packing list...
Need help?
Do you have a question about the FMJ-1700-F1 and is the answer not in the manual?
Questions and answers