Table of Contents
Advertisement
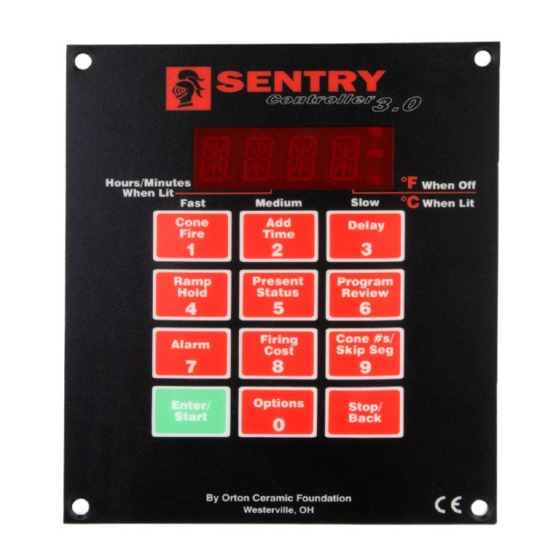
Digital Temperature Controller
Cone-Fire and Ramp-Hold Instructions
Cone-Fire (pg 10-13)
From IDLE, press 1.
Basic firing to a cone num-
ber. Enter cone number,
speed, pre-heat, hold, and
slow cool.
Ramp-Hold (pg 14-18)
From IDLE, press 4.
Select stored program (1 - 4).
Enter rate, temperature, and
hold for each segment.
Edit Ramp-Hold (pg 7)
During firing, press 4.
Change the current segment
rate. Press ENTER. Change
temperature. Press ENTER.
Change the hold. Press ENTER.
The kiln will continue firing.
Alarm (pg 8-9)
From IDLE or during
firing, press 7.
Enter a temperature. When
alarm sounds during firing,
press 7. To silence, press 0,
then Enter.
Enter/Start
1) Press ENTER/Start after
each step in programming a
firing.
2) Press ENTER/Start once
[IDLE]
from
to begin firing.
Firing Cost (pg 9)
Press 8 after the kiln
fires to completion.
The cost of the last firing
will appear. (First enter
electrical cost in the
[CENT]
option and kiln
wattage in the
tion, pg 23.)
IM-204/12-18
Sentry 3.0
Options (Next
Page)
From IDLE, press 0.
Press ENTER for the
option displayed.
Turn the page to explore
the ways you can custom-
ize your controller.
[KW]
op-
Quick Cone-Fire programming . . . page 11
Ramp-Hold programming for the power user . . . page 15
Error messages . . . pages 27 - 29
Confused about display messages? . . . pages 30 - 31
Stop/Back (pg 10)
Press during firing
or programming.
1) Stops a firing.
2) In Options, takes you
[IDLE]
back to
.
3) During programming,
takes you back one step
each time key is
pressed.
Delay (pg 7)
From IDLE, press 3.
Enter time in hours:minutes.
Delays the start of firing.
Add Time (pg 7)
During firing, press 2.
Each additional key press
adds five minutes to a hold.
It works in both Ramp-Hold
and Cone-Fire.
Present Status (pg 8)
During firing, press 5.
Shows the rate of heating or
cooling and the segment
that is currently firing. Works
in both Ramp-Hold and
Cone-Fire.
Program Review (pg 8)
From IDLE or during
firing, press 6.
Shows the program that is
loaded in memory and ready to
fire, or the one that is firing.
Cone Table & Skip
Segment (pg 9)
From IDLE or during fir-
ing, press 9.
1) From IDLE, shows tempera-
ture for the cone # you enter.
2) While firing in Ramp-Hold,
skips to any ramp you select.
3) While firing In Cone-Fire,
skips out of Pre-Heat or Hold.
Advertisement
Table of Contents

Subscribe to Our Youtube Channel
Summary of Contents for Paragon Sentry 3.0
- Page 1 Sentry 3.0 Digital Temperature Controller Cone-Fire and Ramp-Hold Instructions Cone-Fire (pg 10-13) From IDLE, press 1. Basic firing to a cone num- Delay (pg 7) ber. Enter cone number, From IDLE, press 3. speed, pre-heat, hold, and Enter time in hours:minutes.
- Page 2 [ELEC] Electronics Temp. Check the circuit board tem- perature for overheating. Useful in the summer. (Pg 25) New Features With the Sentry 3.0, we [LOCK] Program Lock Make a program tamper-proof. are introducing the amperage test (DIAG Lock individual Ramp-Hold programs.
-
Page 3: Table Of Contents
LOCK / Program Lock... 25 How to replace earlier Paragon con- Pre-Heat PRHT ....12 CFG / Configuration Code . -
Page 4: Safety
Do not operate if the controller itself is hotter Safety Rules than 158°F / 70°C. (See instructions on page 25 for checking circuit board temperature.) Never The warranty on your Sentry controller does not cover allow the firing room temperature to exceed damage from overfiring, regardless of the circumstances. -
Page 5: Basic Pointers
near the kiln to raise the temperature above Chapter 1 freezing. Basic Pointers The circuit board is rated for 176°F / 80°C maximum op- erating temperature. However, the maximum recom- mended temperature is 158°F / 70°C, measured at the con- In This Chapter you will learn to . -
Page 6: Repeat Firings
Repeat Firings tom section. (Two-zone kilns: The middle light does not turn on.) To repeat the last firing, press ENTER from [IDLE] . The kiln will begin firing. This works in both Cone-Fire and Note: Though power output lights are on, mechan- Ramp-Hold. -
Page 7: The Keys
On your new [IDLE] utes. Sentry 3.0, the display will no longer time out dur- First, enter the Cone-Fire or Ramp-Hold program ing programming. You must advance or go back to you are going to fire. -
Page 8: The 5 Key / Present Status
To edit other segments, wait until the firing has progressed to those segments.) If the current segment has already started its hold time, you can edit only the hold time. During firing, press 4. The display will show the rate of the current seg- ment. -
Page 9: The 8 Key / The Firing Cost
Note: By pressing the 8 key during a firing, you can Setting the Alarm From IDLE see how much the cost increases as the firing From [IDLE] , press 7. [ALAR] will appear alternat- progresses. ing with the last alarm temperature entered. Pointer: If you wonder how much Slow Cooling Enter new alarm temperature. -
Page 10: The Enter/Start Key
Pre-Heat has ended. (You can tell by placing a small Chapter 3 mirror near an open peephole.) To skip out of Cone-Fire Hold. Slow Cooling will begin. Cone-Fire (If the firing does not include Slow Cooling, Skip Seg- ment will not end a Hold. Press STOP to end the firing.) In this chapter you will learn to . -
Page 11: Cone-Fire Programming
If you fire the same size load and type of ware regularly, the witness cones let you compare one firing to the next and Cone-Fire Programming alert you when something is wrong. For example, if the wit- Use these instructions for your first firings. Later ness cone bends farther and farther with each consecutive you may prefer “Cone-Fire Shorthand Programming,”... -
Page 12: Speed Spd
Pre-Heat [PRHT] The firing schedules programmed into Cone-Fire mode are listed in Appendix B, pages 32 - 33. Should you ever Moist greenware can explode during firing. This hap- want to customize a Cone-Fire program, make the desired pens when the moisture in the clay rapidly turns to steam changes to a firing schedule and program it in Ramp-Hold and cannot escape from the clay fast enough. -
Page 13: Hold Hold
Note: If you are using a vent fan, such as the Orton The COOL prompt does not appear in the display dur- Vent Master, leave the fan on during Pre-Heat. ing programming until you activate Slow Cooling with The fan will help to remove moisture. (Kilns the Options key. -
Page 14: Ramp-Hold
The heating rate is figured in degrees per hour. The rec- Chapter 4 ommended heating rate for the material you are firing is usually available from your supplier. The heating rate also Ramp-Hold varies depending on the thickness of the material. Note: Some brands of controllers fire to a temper- In this chapter you will learn to . -
Page 15: Ramp-Hold Programming
Step 7 of Ramp-Hold Programming in the red box at Ramp-Hold Programming right shows you how to zero out the segments you don’t Use these instructions for your first firings. Later you need. (Entering a rate of 0 for the first segment you don’t need zeroes out the rest of the segments.) may prefer “Ramp-Hold Shorthand Instructions,”... -
Page 16: Types Of Rates
The diagram at the bottom of the previous page shows cone bends, noting how much Hold time was needed. Pro- three rates. A rate of 1000° per hour will reach 1000° in 1 gram that much Hold time the next time you fire the same hour. -
Page 17: Temperature Overshoot
Cone-Fire Program Customized Suppose you enter a cooling rate that is faster than the kiln can cool? Depending on the rate you enter, you may get in Ramp-Hold an alarm message. (Press ENTER to turn off the alarm.) This is the cone 04 Cone-Fire schedule at standard The controller, of course, cannot speed cooling (Medium) speed with an added slow-cooling segment. -
Page 18: Starting A Firing In A Hot Kiln
and even the color. Vent the lid. Set the alarm to Chapter 5 500°F/260°C. When the alarm sounds, close the lid from the venting position and insert the peephole plugs. Multiple Zone Kilns Set the alarm again, this time to 1350°F/732°C. When it sounds, check the glass through the peephole or kiln window. -
Page 19: Testing Multiple-Zone Elements
Two-Zone Kiln The top light indicates power to the Chapter 6 top section of the kiln. The bottom light indicates power to the bottom section. Ignore the center light. The Options Key Three-Zone Kiln The top light indicates power to the top section, the middle light is power to the middle sec- In this chapter you will learn to . -
Page 20: Ofst / Cone Offset
Sentry 2.0 controller, Cone Offset ad- justed one particular temperature range of cones. The cone did not bend far Cone Offset in the Sentry 3.0 adjusts all the cones enough: Use a positive Cone Off- instead of only a range of cones. -
Page 21: Cool / Slow Cooling
The cone bent too far: Use a After selecting one of the three settings, press negative Cone Offset for a cooler ENTER. Press STOP to return to [IDLE] firing, such as -10 (°F). General Options Note: Do not be overly con- cerned with achieving an ex- act 6 o’clock bend. -
Page 22: F/C / Selecting °F Or °C Display
ting the controller changes the thermocouple se- From , press OPTIONS repeatedly until [IDLE] lection to Type-S. appears. [TCOS] Press ENTER. , or a Thermocouple Offset, From , press OPTIONS repeatedly until [IDLE] will appear. [TC] appears. Using the 1 and 3 keys, enter the new offset. Press Press ENTER. -
Page 23: Rate / Select Preferred Type Of Rate
CENT / Cost Per Kilowatt-Hour from ture Alarm, page 8.) Plug in a loud bell to alert you that the kiln has reached the alarm temperature. Your Electric Bill (for Firing Cost) [NONE] None: Use this setting if your kiln does not The controller can figure the electrical cost of a firing if have the AOP outlet. -
Page 24: Tede / Temperature Deviation
when in many cases there isn’t. Here are four ways to stop the alarm messages from appearing during routine firings: Method 1: Test your kiln to find its fastest firing rate and its slowest cooling rate. Then program the controller using rates within the range of the kiln’s heating/cooling ca- pacity. -
Page 25: Sfty / Maximum Temperature
LOCK / Program Lock Press ENTER. Change the deviation temperature. The higher the number, the less likely you will acti- Tamper-Proof Individual Programs vate the alarms. By default, Program Lock is inactive. When it has been activated, a stored Cone-Fire or Ramp-Hold program can- Press ENTER. -
Page 26: Cfg / Configuration Code
CFG / Configuration Code Reset does the following: From [IDLE] , press OPTIONS repeatedly until [CFG] Resets the LOCK passcode to 3. appears. Press ENTER. The factory configuration code will Selects Type-S thermocouple. appear. Press ENTER. Press STOP to return to [IDLE] Selects °F. -
Page 27: Error Messages
LTDE / Low Temperature Deviation Chapter 7 During a cooling-down ramp or a hold, the temperature is below the set point temperature by more than the de- Error Messages viation setting. (See Temperature Deviation, page 24.) Check for a bad relay, worn or burned out elements, low Error messages are accompanied by an alarm. -
Page 28: Eth / Electronics Too Hot
Pointer: During a Ramp-Hold firing, Present Sta- ETH / Electronics Too Hot tus shows the actual firing rate of the current seg- The circuit board temperature is above 176°F / 80°C. ment instead of the rate you programmed. If you To lower board temperature, use a fan to blow air across think your kiln is heating or cooling too slowly, the kiln switch box into the louvers. -
Page 29: Otl / Over Temperature Limit
The safety lid switch is After a brief power failure, the controller continues broken, or a wire con- firing as before. It shows a normal temperature dis- nected to the safety switch play alternating with [PF] has come loose. After an extended power failure, ] or [PF 1] [PF 2] OTL / Over... -
Page 30: Appendix A: Display Messages
Display Messages AppendixA: Message Definition Page Reference Message Definition Page Reference [°F 1] [°C 1] Target Temperature 15 [ABRT] Abort This prompt, which appears in Ramp-Hold programming, is asking The firing was stopped. for a target temperature. The number is the segment of the pro- [ALAR] Alarm 6, 8, 9, 11, 15... - Page 31 Message Definition Page Reference Message Definition Page Reference [IDLE] Ready to Begin 11, 15 couple, Type-S selected would underfire your kiln, which is better than overfiring it. The K-Type thermocouple is standard on most The Sentry must display the IDLE message before you can begin kilns.) firing or programming.
-
Page 32: Appendix B: Cone-Fire Schedules
Preset Cone-Fire Programs - °F AppendixB: These are the firing schedules programmed in Cone-Fire mode. To customize a schedule, write down your changes. Then load your new schedule into Ramp-Hold. Low Fire Cones °F Segment 1 Segment 2 Cone Rate 1 Temp. 1 Rate 2 Temp. - Page 33 Preset Cone-Fire Programs - °C AppendixB: These are the firing schedules programmed in Cone-Fire mode. To customize a schedule, write down your changes. Then load your new schedule into Ramp-Hold. Low Fire Cones °C Segment 1 Segment 2 Cone Rate 1 Temp. 1 Rate 2 Temp.
-
Page 34: Appendix C: Upgrading In- Structions
Upgrading Instructions AppendixC: Upgrading the DTC 100, 600, 800 & 1000 Series to the Sentry CAUTION: Unplug the kiln or disconnect the power. Remove Cut off the extra terminal(s) and the 4 screws holding the controller faceplate to the jumper wire(s) unless they switch box. - Page 35 Switch Top of Board How to Wire the Sentry Sentry Sensor Controller Factory UART Factory ISP relays Thermocouple power thermocouples Two wires of dissimilar metal join together in the P6 P11 P10 thermocouple tip. When heated, the wires produce a small voltage, which the controller interprets as a temperature.
-
Page 36: Appendix D: Orton Cone Temperature Chart
Temperature Equivalents Appendix D: For Orton Self-Supporting Pyrometric Cones °F °C Cone Self-Supporting Cones Pre-Fire Cone Self-Supporting Cones Pre-Fire Number Color Number Color Heated at: 27° F 108° F 270° F Heated at: 15° C 60° C 150° C Per Hour* Per Hour* Per Hour* Per Hour* Per Hour* Per Hour* —... -
Page 37: Appendix E: Blank Records For Your Kiln Log Book
Ramp-Hold Firing Records AppendixE: Date_______________________________ Date_______________________________ User Program ______ User Program ______ Optional Optional Rate Fan On / Rate Fan On / Target Hold Time Target Hold Time °/Hour °/Hour Temperature Hours.Mins Temperature Hours.Mins RA10 Hd10 RA10 Hd10 RA11 Hd11 RA11 Hd11 RA12... - Page 38 Index FTC, 24, 26 pyrometric cone, 10, 20, 29 FTH, 24, 26 ABRT, 6 FTL, 27 Add Time, 7 RA 1, RA 2, 15 FULL, 16, 18, 24 ALAR, 8, 11, 15 Ramp-Hold, 7, 15 Alarm, 6, 8, 10, 15, 17, 22, 24, 28 rate, 1,15 - 16, 23 - 24, 26 - 27, 29 AOP, 13, 15 - 16, 22, 25 glass, 8, 16 - 17...
-
Page 39: Appendix F: Ramp-Hold Shorthand Instructions
AppendixF: Sentry Ramp-Hold Shorthand Instructions After you press the keys in the left column, the message to the right will appear. (See also page 15.) KEYS TO PRESS DISPLAY COMMENTS PROGRAM AND FIRE THE KILN. IDLE Apply power to kiln Press Enter if IDLE does not appear. -
Page 40: Appendix G: Cone-Fire Short- Hand Instructions
AppendixG: Sentry Cone-Fire Shorthand Programming After you press the key(s) in the left column, the message to the right will appear. Press 1 from . If the 1 key does not [IDLE] respond, your controller does not have Cone-Fire. (See also page 11.) KEYS TO PRESS DISPLAY COMMENTS...
Need help?
Do you have a question about the Sentry 3.0 and is the answer not in the manual?
Questions and answers