MSSC Smart-Jet Blue User Manual
Thermal inkjet coder
Hide thumbs
Also See for Smart-Jet Blue:
- Manual (97 pages) ,
- User manual (83 pages) ,
- User manual (39 pages)
Table of Contents
Advertisement
Quick Links
Advertisement
Table of Contents

Related Manuals for MSSC Smart-Jet Blue


Summary of Contents for MSSC Smart-Jet Blue
-
Page 1: User Manual
T H E R M A L I N K J E T C O D E R USER MANUAL... - Page 2 Revise logs Version Update information Staff Date update V2.0 User manual Tinh Vo February 20, 2019...
-
Page 3: Table Of Contents
SAFETY INFORMATION ............................5 EMERGENCY CASE ..............................6 ENVIRONMENT PROTECTION..........................6 PRODUCT WARRANTY ............................6 ABOUT MACHINE ..............................7 TECHNICAL SPECIFICATIONS ........................... 8 Machine details ..............................8 Keyboard ................................. 8 Android devices ..............................8 Personal computer ............................... 8 MACHINE OVERVIEW ..............................9 Indicator LED ................................ - Page 4 ARDWARE SETUP ................................45 OFTWARE SETUP ................................45 Install application ..............................45 Waiting for complete and Click Finish......................46 Install driver ................................46 Install driver on Windows 8, 10 ......................... 51 OFTWARE SING ................................51 Printer Controller Interface ..........................52 Create new message ............................
-
Page 5: Safety Information
SAFETY INFORMATION Have to STOP machine before plug / unplug cartridge. Avoid using with the high voltage, strong impact to the coder. Limit store the coder in the high dusty working environment. The working temperature of the coder is 5 C –... -
Page 6: Emergency Case
EMERGENCY CASE IN SOME SPECIAL CASE LIKE: APPEAR SMOKE ON PRINTER, PRINT OUT CONTINUOUSLY WITHOUT CONTROL, FIRE, EXPLOSIVE SOUND, ETC. PLEASE REMOVE THE POWER SUPPLY IMMEDIATELY! ENVIRONMENT PROTECTION DON’T THROW PRINTER / INK CARTRIDGE TO RECYCLE BIN PRODUCT WARRANTY Limited warranty. The housing and circuit board for each printer is warranted to be free from defects in materials and workmanship for a period of twelve (12) months from the bill of lading date. -
Page 7: About Machine
ABOUT MACHINE Thank you for purchasing the Smart – Jet Blue Thermal Inkjet Coder, a product of MSSC LLC, US. This printer is designed for packaging printing applications powered by HP Thermal Inkjet Technology. Machine boasts to be able to control via PC connection to print variable data and barcodes, Bluetooth connection via mobile devices running on Android operating systems and wireless keyboard. -
Page 8: Technical Specifications
TECHNICAL SPECIFICATIONS Machine details DESCRIPTION SPECIFICATIONS Smart – Jet Blue Model Display LCD 2.8” automatic rotation Dimensions (LxWxH) 107.5 x 74.5 x 83 mm / 4.23 x 2.93 x 3.27 inches Weight 450g AC 100V – 240V, 50/60Hz, 2.0A - EDACPOWER Power supply AC 100V –... -
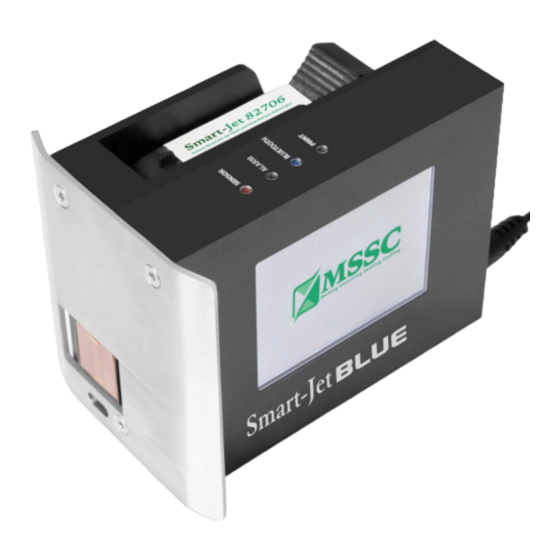
Page 9: Machine Overview
MACHINE OVERVIEW Indicator LED ITEMS DETAIL Default setting is don’t recognize black conveyor Internal sensor: Red light [1] SENSORS External sensor: Green light Sensor is activated when receives signals [2] ALARM Remains ON to indicate error [3] BLUETOOTH/PC Remains ON when being connected [4] PRINT Remains ON when it’s on printing mode Connecting Port... -
Page 10: Keyboard
ITEMS DETAIL [1] USB FLASH USB 2.0 flash for updating firmware, fonts and logo [2] USB KEYBOARD For USB 2.0 wireless keyboard receiver [3] USB PC For PC connection with USB 2.0 cable A-B [4] DB15 EXTENDED Extend port for external sensor, encoder, alarm, etc… [5] 12VDC Power supply Keyboard... - Page 11 Message MENU SUB MENU DESCRIPTION Select kind of font you need to use on Select font messages. Support two kind of font: Uppercase font and Normal font. Select size of messages: support up to Create new Select size 6 sizes. Insert menu (Symbol, Logo, Insert some needed component to Counter, Date, Expired, Time,...
- Page 12 Update Logo Update logo from USB to the machine memory String Set the chain of data to insert into the print Prevents the print head from clogging due to the extended down Auto Jet time between prints. This will be useful when you print on Solvent base ink with decap time is low Channel Select nozzle side on the cartridge: Odd, Even or Auto switch...
-
Page 13: Operation Menu On Computer
Operation menu on computer PRINTER CONTROL Setting all printing parameters for the message before start printing. Be sure to stop the printing mode before setting the parameters. Printer quality Resolution Select your desired resolution. There are 7 levels to select with PC mode. Density Select your desired optical density. - Page 14 Turn OFF Encoder to disable encoder. Input your desired speed at Speed to synchronize with the speed of the conveyor. Max Speed: shows the maximum speed you can achieve with the current resolution and density. NOTES: Ensure your encoder is working if it is ON and can detect the objects. ...
- Page 15 Go to Continue Fixed Length to input the value or select the value by click up or down Printing Status Machine is connected to PC. Machine is disconnected from PC. Displays the current speed of conveyor synchronized by encoder. Displays the number of pages printed (left) per the total pages to print (right).
- Page 16 Pause: Select to temporary stop printing Stop: stop printing. This must be applied before adjusting parameters or editing the message. Please tick check here if you don’t want to repeat data. Settings POD. DESIGNING MESSAGES New template: Create new message with free template design. Edit: Edit width or rename of template.
-
Page 17: Installation Procedures
Text: Insert characters and barcodes. Data Fields: Insert data. Serial Number: Insert counter. Shift Code: insert shift code. Image: Insert image or logo. POD: Insert POD fields. TOOLS Purge: all of nozzle on cartridge will push out some ink. This will help clean all cartridge. -
Page 18: External Sensor
EXTERNAL SENSOR Machine supports NPN, PNP and Push-pull sensor types. Connect sensor using power supply on machine. Connect sensor to machine using external power supply. Below demonstration is for external power supply of 5V. USER MANUAL V2.0 | Updated February 20, 2019... -
Page 19: Encoder
ENCODER An encoder is recommended to ensure the best print quality regardless the inconsistent speed of conveyor. To calculate wheel diameter (D) depend on resolution (R) is: D = R/( x 600) (inches). Example: Encoder has R = 3600 (PPR), D = 1.90985 inches ~ 48.5 mm. -
Page 20: Combine External Sensor And Encoder
COMBINE EXTERNAL SENSOR AND ENCODER In some case you need to use external sensor and encoder to get perfect printing quality. But the machine have one extended port only. Please do as following instruction to take external sensor and encoder work together with machine. See picture for this situation. -
Page 21: Alarm
ALARM Allow users to monitor operation of Machine from distance via the light signals from the Alarm. This table below will show detail of each pin on DB15 port that alarm beacon will be used for: PIN ON DB15 PORT VALUE DESCRIPTION The printer will Stop print because... -
Page 22: Input And Output
No Cartridge Have no cartridges are plugged to printer. The value of Ink Level (Setting Cartridge Ink Level) on machine are lower 5.0 ml. Ink Low We had implementing the HP Smart Card to each cartridge that allow the printer and software automatic recognize the Real volume of ink inside each cartridge. -
Page 23: Setup Machine
Setup machine See Getting Started. NOTES: The machine will function with Water and Solvent base ink series from us only. Trying to use unapproved cartridges may damage the machine and void the warranty. Keyboard setup Insert the receiver of wireless keyboard to USB port (port 2) on machine, remove the ... - Page 24 Select font size Input “Hello” Press “ESC” to exit. Select Press “Insert” to insert more data, “Save” and input name to variable, barcode, logo, … save your messages 2. Create Russian message At main menu press Ctrl + Shift + R to change input languages. After printer re-start Russian is selected.
- Page 25 Input “Hello!” Press “ESC” to exit. Select “Save” and input name to save your messages NOTES: Only Russian message not support insert symbols. Press “Insert” to insert more data, variable, barcode, logo, … 3. On smartphone (Standalone mode) Taps on “messages” Select Message designer USER MANUAL V2.0 | Updated February 20, 2019...
-
Page 26: Firmware Introduction
Select font type Select font size input text to messages line then tap Send button On PC with application (PC mode) See PC application introduction. FIRMWARE INTRODUCTION From the main screen, use and arrow keys to select the desired menu: Message, Operation or Settings. - Page 27 5.92 mm 3.89 mm 2.54 mm 1.69 mm Input message by using the following keys: Arrow keys : move the cursor. Enter : go to the next line. Backspace : delete characters. : escape and save / unsaved messages. ...
- Page 28 Counter Insert product counter into the message. There are Single and Box/Lot. In the input section, press Insert and use or arrow keys to move the cursor to Counter and press Enter. Select your desired object and press Enter. Single Is an independent counter.
- Page 29 Example Printing on certain package a chain of digits, the first 3 digits are the number of the box containing the package; the last 3 digits are the order of the package within the box, let’s say there are 20 packages in the box. Follow below steps to set counter: Step 1 Setup Counter 1 first and insert into the message Counter 1...
- Page 30 Format Select your desired format below to input into the Format section. Otherwise, date will not be displayed in the message. Day: d or dd. Month: M, MM or MMM. Year: yy or yyyy. Julian date: JJJ. ...
- Page 31 Time Insert current time into the messages. Current time must be setup in System clock while doing Settings. In the input section, press Insert, then use or arrow keys to move the cursor to Time and press Enter. Select and input your desired format and press Enter to insert into message. Second: s, ss.
- Page 32 NOTES: If you would like to print static 2D barcode. Please use with update logo support. Create 2D barcode as image, use smartphone or application on PC to load it to machine. Use smartphone: see Update Logo. Use PC: see Use Convert Logo. ...
- Page 33 Taps on “Use this image” Select logo number on Taps on “Generate machine barcode” button. Select “Yes” to open Logo Sender Dynamic barcode Insert dynamic barcode into your messages. Type: select your desired barcode (Code 39, Code 2/5, Code 128, Code 93, UPC-A, ...
- Page 34 First print Second print Third print Four print Shiftcode Insert Shiftcode into the message. From the designing section, use the arrow keys to move the cursor to your desired position in the message and press Insert. Then use or arrow keys to move to Shiftcode and press Enter.
-
Page 35: Operation
Operation Start Change status of machine from stopped to start print. Select Operation Start to begin to print. Your message content along with other setting parameters will be displayed while printing. ITEMS DETAIL Prints Number of prints have been printed Ink levels Current amount of ink in the cartridge (ml) Speed... - Page 36 NOTES: Minimum speed: 1m/min Maximum speed: 228m/min From the Settings menu, use or arrow keys to move the cursor to Encoder, press Enter. Press Enter again at Select to choose Internal or External mode. Press Enter to apply settings.
- Page 37 Delay Delay before print and Delay after print (mm). Delay before print: set the distance since the sensor receives signal to the start of printing. Input value at Value, press Enter to apply settings. Delay after print: set the distance that the print head will delay after it finished the ...
- Page 38 From the Settings menu, go to Update Logo and press Enter. Select your desired logo (1, 2, 3,…, 20) and press Enter to begin updating. Be sure you name them correctly. LOGO1 on your USB will replace LOGO1 on the machine memory and the same for other logos.
- Page 39 Select logo number on Waiting for sending process Open Messages Designer. machine Taps “logo” button Select “Logo exist” Select number logo on Taps send button. Select machine “Send” String Insert a string of data into messages. From the Settings menu, use the arrow keys to go to String and press Enter. Input your strings into the input section.
- Page 40 NOTES: Time for jetting varies from 10 to 60.000 seconds. This function is useful for Solvent base ink. So we recommend that, any user need enable this function with time around 15-30 seconds to help printing quality always perfect. Channel Set nozzles on 2 modes Manual and Auto.
- Page 41 Continuous mode Go to Mode and press Enter to select Continuous mode and use arrow keys to move to other settings. Input value at Fix length to set distance between the prints. Valid values vary from 5 to 10,000mm. Invalid values results in error. Immediate: print continue without sensor signal.
- Page 42 NOTES: Fonts being updated will replace the existing ones on the machine memory. Machine prints true fonts while working with PC. Font 1 to 5 and 11 is Normal font. Font 6 to 10 and 16 is Uppercase font. ...
- Page 43 To activate password protection, from the Settings menu use arrow keys to go to Password and press Enter. Then go to Active and select Enable to set password. Enter old password (1234567890), then enter your new password and retype to confirm. Maximum characters allowed for password is 10 including letters and numbers.
- Page 44 Czech 14SC.txt Indonesian 15SC.txt Step 2 After copy all file to USB, looking at file 00SC.txt (Index update). Open and edit of this file content to “08” (this mean Index update will become to Korean – 08SC.txt). Save and closed this file. Step 3 Insert USB flash to machine.
-
Page 45: Pc Application Introduction
Reset Reset the memory of Counter variable on message. The memory of Counter will help you save the current value of Counter event you stop print or machine is turned off. From the Settings menu, select Reset. Press Enter to erase memory of counter (printer will print from started number). -
Page 46: Waiting For Complete And Click Finish
Extract setup RAR file Right click select Open on Setup file Click Next Click Install or select other path. Waiting for complete and Click Finish. Install driver When plug your machine to computer. Your Window will search the driver for machine, but it will not able to success install driver. - Page 47 Please do as following: Extract driver. Get it from us. Open Manage function. Look at Other devices. “Thermal Inkjet Coder” is our machine. USER MANUAL V2.0 | Updated February 20, 2019...
- Page 48 Right click. Select Update Driver Software. Select Browse my computer for driver software. USER MANUAL V2.0 | Updated February 20, 2019...
- Page 49 Select Browse to locate to driver folder. Locate to folder driver. USER MANUAL V2.0 | Updated February 20, 2019...
- Page 50 Click Next to continue. Got security issue with Window. No problem, “Install this driver software anyway”! USER MANUAL V2.0 | Updated February 20, 2019...
-
Page 51: Install Driver On Windows 8, 10
Wait a moment, and here your driver installed success. Look at Device Manager, you will see Thermal InkJet Coder device appear here. Install driver on Windows 8, 10 If your PC uses Windows 8 and Windows 10, please do one next step Disable signature enforcement before you install the driver. -
Page 52: Printer Controller Interface
Printer Controller Interface Setting all printing parameters for the message before start printing. Be sure to stop the printing mode before setting the parameters. Create new message Click DESIGNING to open design template. From the designing section, select New Template. A new window pops up. Name your message at Name. - Page 53 NOTES: Be sure the objects are completely located in the template. Any parts projected out of this section will be missed print. Static text object From the Designing section, select Static Text and click on the designing section. Static Text window will pop up. Input content from your keyboard.
- Page 54 Position of the text can be aligned in 2 directions: Vertical Alignment and Horizontal Alignment. Vertical Alignment: Top, Center, and Bottom. Horizontal Alignment: Left, Center, Right. Select Barcode to create if barcode is needed. Tab Barcode will pop up. ...
- Page 55 Look at below Barcode type and Linear to set parameters according to your specific requirements for each barcode. Place your barcode within the Margin. Left Margin: align barcode from the left. Right Margin: align barcode from the right. ...
- Page 56 Barcode module width: adjust width of barcode. Barcode module height: adjust height of barcode. Display Barcode data: show/hide barcode data. When all parameters are set, go back to Static Barcode, select to confirm and apply settings. No barcode will be generated if the data input is incorrect. Set the position of the object.
- Page 57 Database Information: load database from your server. Input server’s name, Database’s name, Username and Password of your server. File Information: load database from your local file. Click Select to choose the desired file (Text, Excel, CSV or Access file). Click Connect to connect the file to the message after loading successfully.
- Page 58 NOTES: For type of Data Matrix barcode, select GS1 Compatible, and input the Application identity number for the data before each data field. USER MANUAL V2.0 | Updated February 20, 2019...
- Page 59 Shift code object From the Designing section, select Shift Code and click on the designing section. Shift Code window will pop up. The firmware supports to create up to 5 shift codes. To create each shift code with any two digits: number, letter or symbol. Select font, size and then select time to display shift code.
- Page 60 Select your desired image at File. Set Threshold Convert Properties as your requirement. Select Variable Image if need to print many images. Select images at Image Folder. USER MANUAL V2.0 | Updated February 20, 2019...
- Page 61 Choose data field at Field. Select Ok to finish. Convert logo This function is help you create logo under .hex format use for update logo to machine via USB flash. Step 1 Open Controller application. Go to Tool Convert Logo. USER MANUAL V2.0 | Updated February 20, 2019...
-
Page 62: Update Firmware Instructions
Step 2 Go to Browse to select your desired logo. Step 3 Adjust the Threshold, background color (Normal, Inverse). Step 4 Select to name your logo (STR01, STR02, STR03,…, STR20) and save it to USB flash. On machine. Insert the USB flash to machine. Go to Settings Logo Select the name of logo that you just created. -
Page 63: Prepare Usb Flash
Prepare USB flash Prepare USB flash disk less than 32GB. Format USB flash disk with file system FAT / FAT32 and allocation unit size 64 kilobytes. See photo below: Extract firmware folder (.RAR file) to ROOT folder of USB flash disk. ... -
Page 64: Update Logo
Press combine Ctrl + Shift + Alt + K to update booting logo. Update logo When update is complete, go to Settings Update logo and do the following updates: Update Logo Logo 1. Update Logo Logo 2. ...
Need help?
Do you have a question about the Smart-Jet Blue and is the answer not in the manual?
Questions and answers