Table of Contents
Advertisement
Available languages
Available languages
Advertisement
Table of Contents

Subscribe to Our Youtube Channel
Related Manuals for Hydrofarm Autopilot APCEM2


Summary of Contents for Hydrofarm Autopilot APCEM2
- Page 1 INSTRUCTIONS DIGITAL CO MONITOR APCEM2...
-
Page 2: Getting Started
In the unlikely event that your item is incorrect, incomplete, or unsatisfactory, please contact us and we will see to fixing it immediately. Feel free to contact us with any questions, comments, or concerns at Hydrofarm.com. • To ensure safety, please read this manual carefully before installation and follow the instructions herein. -
Page 3: Rear View
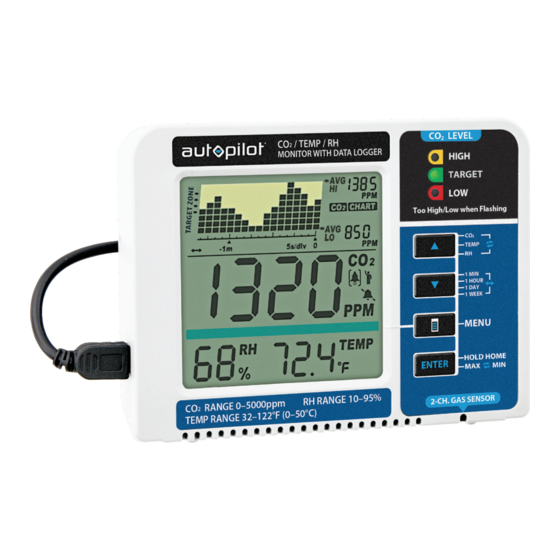
INSTRUCTIONS 3 convenient ways to power up Piggyback an External Battery (Battery not Included) REAR VIEW 1. CO Chart 8. Main Menu 9. Temperature Reading 1a. x10 multiplier for ppm reading 10. RH Reading 2. Max Reading of Chart 11. CO Reading 3. -
Page 4: Trend Chart
, Temp and RH). At startup, the unit will automatically display values for CO NOTE: Trend chart contains a maximum of 17 sets of recorded data at one time. After the chart is full the data is FIFO (first-in, first-out). www.Hydrofarm.com... -
Page 5: Led Display
INSTRUCTIONS LED DISPLAY at Plant Mode at Human Mode Note: LOW LED never turns ON in Human Mode MAIN MENU FUNCTIONS The Main Menu (8) functions can be toggled through by using MENU. If the main menu is not brought up, the green bar will remain blank, leaving the UP and DOWN buttons to toggle between parameters and Zoom Levels, respectively. - Page 6 To use any of these modes, hold ENTER for 3 seconds until an audible beep. (Return) Exits the main menu. No options will be displayed on the green bar. A different audible beep be heard in this option. www.Hydrofarm.com...
-
Page 7: Specifications
• Hydrofarm assumes no responsibility for any damage or loss suffered by the user or any third party arising through the use of this product or its malfunction. -
Page 8: Mise En Route
à régler immédiatement le problème. N’hésitez pas à nous contacter sur Hydrofarm.com en cas de question, commentaire ou problème. • Pour garantir la sécurité, veuillez lire attentivement ce manuel avant de procéder à l’installation et observez les présentes instructions. -
Page 9: Vue Arrière
MODE D’EMPLOI Orifice pour les vis Sangle de batterie Orifice de la dragonne Capteur de température/ HR (humidité Avertisseur relative) Orifice d’étalonnage (uniquement en usine) 3 façons pratiques de mettre sous tension Installation superposée de la batterie externe (Batterie non fournie) Support (replié) Port USB VUE ARRIÈRE... - Page 10 Deux indicateurs numériques sont présents dans le coin supérieur droit de l’écran : Max (2) et Min (5). Si l’échelle est modifiée, les valeurs Max et Min prendront en compte les valeurs maximales et minimales du paramètre sélectionné sur le graphique (CO , température et HR). L’unité affiche automatiquement les valeurs de CO au démarrage. www.Hydrofarm.com...
-
Page 11: Affichage Led
MODE D’EMPLOI AFFICHAGE LED Mode végétal Trop ÉLEVÉ, LED verte clignotante ÉLEVÉ, LED verte allumée CONFORME, LED verte allumée FAIBLE, LED rouge allumée Trop FAIBLE, LED verte clignotante Mode humain Trop ÉLEVÉ, LED verte clignotante ÉLEVÉ, LED verte allumée CONFORME, LED verte allumée Remarque : La LED verte n'est jamais éclairée en mode humain FONCTIONS DU MENU PRINCIPAL... - Page 12 Pour utiliser l'un de ces modes, maintenez ENTER pendant 3 secondes jusqu'au signal sonore. Quitte le menu principal. Aucune option ne sera affichée sur la barre verte. Cette option est (Retour) reconnaissable par un signal sonore différent. www.Hydrofarm.com...
-
Page 13: Clauses De Non Responsabilité
établissements sanitaires de personnes ou d'animaux, ni à une situation de survie ou toute autre circonstance d'ordre médical. • Hydrofarm n'accepte aucune responsabilité pour les dommages ou les pertes subis par l'utilisateur ou par un tiers pouvant résulter de l'utilisation de ce produit ou de son mauvais fonctionnement. -
Page 14: Características Principales
Si tiene cualquier duda, comentario o reclamación, contacte con nosotros en cualquier momento en Hydrofarm.com. • • Para poder garantizar la máxima seguridad, lea este manual detenidamente antes de la instalación del producto y siga las instrucciones indicadas en el mismo. -
Page 15: Vista Trasera
INSTRUCCIONES Orificios para los tornillos Correa para las pilas Orificio para la cuerda Sensor de temperatura/ Alarma Orificio de calibración (para uso en fábrica) 3 cómodas formas de alimentación Mediante una batería externa (Batería no incluida) Pie (doblado) VISTA TRASERA VISTA TRASERA 1. - Page 16 En la esquina superior derecha de la pantalla hay dos indicadores numéricos: Max (2) y Min (5). Como el nivel detallado varía, los valores Max y Min reflejarán los valores máximos y mínimos del gráfico para los parámetros seleccionados (CO , Temp y RH). Al iniciar, la unidad mostrará automáticamente los valores de CO www.Hydrofarm.com...
-
Page 17: Pantalla Led
INSTRUCCIONES PANTALLA LED Modo planta Demasiado ALTO, el LED verde parpadea ALTO, el LED verde permanece ENCENDIDO OBJETIVO, el LED verde permanece ENCENDIDO BAJO, el LED verde permanece ENCENDIDO TDemasiado BAJO, el LED verde parpadea Modo Human (Persona) Demasiado ALTO, el LED verde parpadea ALTO, el LED verde permanece ENCENDIDO OBJETIVO, el LED verde permanece ENCENDIDO RNota: El LED verde nunca se enciende en el... - Page 18 Para seleccionar cualquiera de los tres modos, mantenga pulsado ENTER durante 3 segundos hasta que escuche un pitido. (Return) Utilice esta opción para salir del menú principal. No se mostrará ninguna opción en la barra verde. Al seleccionar esta opción, se escuchará un pitido diferente. www.Hydrofarm.com...
-
Page 19: Medición De Temperatura
(incluidos centros veterinarios), para soporte vital o cualquier otra situación médica. • Hydrofarm no asumirá responsabilidad alguna por cualquier daño o pérdida derivada de un uso inadecuado del producto por parte del usuario o de terceros. -
Page 20: Limited Warranty
Misuse, abuse, or failure to follow instructions is not covered under this warranty. Hydrofarm will, at our discretion, repair or replace the APCEM2 covered under this warranty if it is returned to the original place of purchase. To request warranty service, please return the APCEM2, with original sales receipt and original packaging, to your place of purchase.
Need help?
Do you have a question about the Autopilot APCEM2 and is the answer not in the manual?
Questions and answers