Chiayo Coach 400 Series Operation Manual
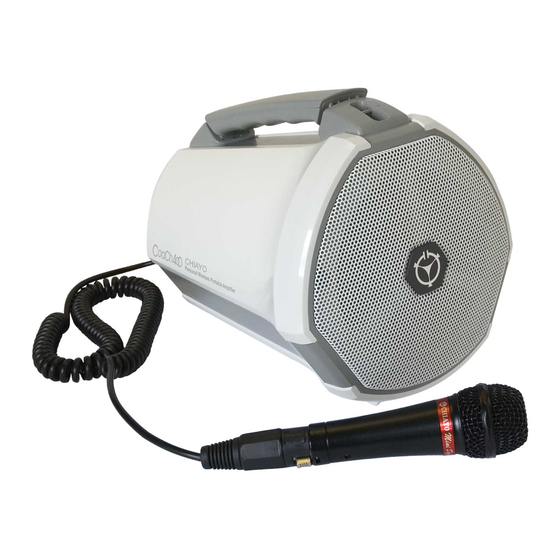
Personal wireless portable amplifier system
Hide thumbs
Also See for Coach 400 Series:
- Operating instructions manual (9 pages) ,
- Operation manual (4 pages)
Advertisement
Quick Links
ISO 9001
REGISTERED
INTERNATIONAL
ISO
14001
ISO 14001
REGISTERED
INTERNATIONAL
OHSAS
18001
OHSAS 18001
GREEN PRODUCT
TAIWAN EXCELLENCE
TAIWAN GOOD DESIGN
IC:3563A-COACH400
F C C I D : C I N S Q - 1 0 1 6
FC C ID :C INS M-1 016
Personal Wireless Portable Amplifier System
Operation manual
Advertisement

Related Manuals for Chiayo Coach 400 Series


Summary of Contents for Chiayo Coach 400 Series
-
Page 1: Operation Manual
Personal Wireless Portable Amplifier System Operation manual ISO 9001 REGISTERED INTERNATIONAL 14001 ISO 14001 REGISTERED INTERNATIONAL OHSAS 18001 OHSAS 18001 GREEN PRODUCT TAIWAN EXCELLENCE TAIWAN GOOD DESIGN IC:3563A-COACH400 F C C I D : C I N S Q - 1 0 1 6 FC C ID :C INS M-1 016... - Page 2 Please read and follow the instructions in this manual thoroughly to obtain optimum results from this unit. We also recommend that you keep this manual handy for future reference. Safety Precautions Be sure to read the instructions in this section carefully before use. Make sure to observe the instructions in this manual as the conventions of safety symbols and messages regarded as very important precautions are included.
- Page 3 To ensure a trouble-free operation, please read this manual thoroughly to fully understand its controls and functions. Configuration All versions of COACH 400 series comes equipped with the following: 1. Mini wired microphone (DM-555) 2. Shoulder strap 3. Switch mode power supply 4.
- Page 4 Recharge its inbuilt Lithium battery before first use After unpacking the unit for the first time, please recharge the unit for about 4~5 hours before operation. This is absolutely necessary as the built-in rechargeable battery might have been discharged naturally due to long shipment and storage time, even though it had been fully charged in the factory prior to shipment.
- Page 5 ISO 9001|ISO 14001|OHSAS 18001 Operating functions on the panel and the remote Operating function On the panel On the remote Play/pause Press II Record Press ● to record and II or ■ Press REC to record and II or ■ stop.
- Page 6 Handheld transmitter(Q-818) Parts and functions 1. Cartridge 2. Battery power LED 3. Power switch 4. Battery compartment 5. Color cap Battery installation & indicator This transmitter requires two AA batteries to operate. To install, remove the battery cover and slide the batteries into the battery compartment & replace the battery cover.
- Page 7 ISO 9001|ISO 14001|OHSAS 18001 Belt-pack transmitter(M-818) Parts and functions 1. Antenna 2. Battery power LED 3. Power switch 4. Mini XLR connector 5. Cover release button 6. High-impedance gain control (GT) 7. Low-impedance gain control (MT) 8. Battery compartment 9. Charging contacts Battery installation &...
- Page 8 UHF handheld transmitters(SQ-5016|SQ-1016V|SQ-1016) → SQ-5016 (UHF LCD 16-freq.) → SQ-1016V|SQ-1016 (UHF 16-freq) Transmitter parts and functions SQ-5016 SQ-1016V SQ-1016 Cartridge Battery weak/power LED Power switch Channel switch Volume control Battery compartment Bottom cap Locking button Setting button Up button Charging port Down button Battery installation &...
- Page 9 ISO 9001|ISO 14001|OHSAS 18001 Other settings (SQ-5016) 1. Channel setting Use UP○ or DOWN○ button to go to the CHANNEL|FREQUENCY page. After pressing the SET button○ for 3 seconds, the cursor will flash to allow changes to be made. Press UP or DOWN button to change the channel number. The corresponding frequency will change accordingly.
- Page 10 UHF belt-pack transmitters(SM-5016|SM-1016) Transmitter parts and functions SM-5016 SM-1016 Antenna Battery weak/audio mute indicator Audio mute switch (Lavalier microphone) Mini XLR connector Charging port Cover release button Power switch Gain control (GT, high impedance) Gain control (MT, low impedance) Setting button Up button Down button Battery compartment...
- Page 11 ISO 9001|ISO 14001|OHSAS 18001 Battery installation & indicator This belt-pack requires 2 x AA batteries to operate. To install, open the battery cover using the cover release buttons and insert the batteries into the battery compartment. Note: Batteries contain a corrosive acid that may leak and damage the belt-pack when stored for a long period.
- Page 12 CHIAYO ELECTRONICS CO.,LTD. Http://www.chiayo.com.tw|Email: sales@chiayo.com.tw Office: 30, Lane 27, Section 4, Jen-Ai Road, Taipei 10685, Taiwan|Tel: 886-2-27415741|Fax: 886-2-27525242 Factory: 88, Chung-Hsiao Street 2, Chiayi 60080, Taiwan|Tel: 886-5-2711000|Fax: 886-5-5767611 12I1350...
Need help?
Do you have a question about the Coach 400 Series and is the answer not in the manual?
Questions and answers