Advertisement
Quick Links
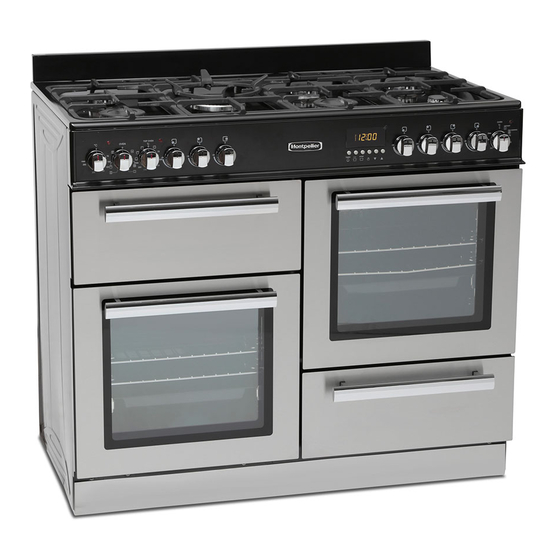
Freestanding 100cm Dual Fuel Range Cooker
RMC100DFC-K-X -
Please read these instructions carefully before attempting to install or use this appliance.
We recommend that you keep these instructions in a safe place for future reference.
THE PERFECT BALANCE OF FUNCTION AND STYLE
LAUNDRY - DISHWASHING - COOKING - COOLING
Installation and Operating Instructions
Cream, Black & Stainless Steel
Advertisement

Related Manuals for montpellier RMC100DFK


Summary of Contents for montpellier RMC100DFK
- Page 1 THE PERFECT BALANCE OF FUNCTION AND STYLE LAUNDRY - DISHWASHING - COOKING - COOLING Installation and Operating Instructions Freestanding 100cm Dual Fuel Range Cooker RMC100DFC-K-X - Cream, Black & Stainless Steel Please read these instructions carefully before attempting to install or use this appliance. We recommend that you keep these instructions in a safe place for future reference.
- Page 2 Montpellier Service. such as a Sales Receipt, showing that the appliance was purchased within the 24 months prior to the • Repairs carried out by a non-approved Montpellier date of claim. Service engineer. What is not covered under the Guarantee: YOUR GUARANTEE IS VALID ONLY IN THE UK &...
- Page 3 Description Of The Appliance This diagram is only for informative purposes about parts of the appliance. Parts may vary according to the appliance mode. Control Panel Oven Door Big Burner Middle Burner Wok Burner Small Burner Temperature Indicator Light Wire Shelves Gril Pan With Removable Handle Grill Door The RMC100 has 3 ovens in total.
-
Page 4: Table Of Contents
Contents 4 - 5 Section 1 : Safety Advice 6 - 9 Section 2: Installation 10 - 13 Section 3: Operating The Appliance 14 - 15 Section 4: Cooking Guides/Maintenance 16 - 22 Section 5: Technical & Points of Contact... -
Page 5: Section 1: Safety Advice
If you think there is a defect, • WARNING: Danger of fire: do not store items on the do not use the appliance and contact Montpellier cooking surfaces or in the oven. Service on 03333 234 473. - Page 6 Section 1: Safety Advice • IMPORTANT: Your appliance is produced in Important – Please read these instructions accordance with all applicable local and international fully before installation standards and regulations. • IMPORTANT: Make sure the cooker control knobs IMPORTANT: Maintenance and repair work must are all in the off position when not in use.
-
Page 7: Section 2: Installation
Section 2: Installation THIS COOKER MUST BE INSTALLED Installation of cooker ACCORDING TO BS 6172: 2010 BY A SUITABLY QUALIFIED GAS SAFE The appliance can be placed close to other furniture on REGISTERED INSTALLER. condition that the furniture’s height does not exceed the height of the cooker panel Make sure that there are no FAILURE TO DO THIS WILL combustible or flammable materials, such as curtains, in... - Page 8 Section 2: Installation Fixing to the wall • Before using the appliance fix it securely to the wall using the chains on the back of the cooker. This will prevent the cooker from toppling forward if excess weight is placed on the oven door. Since the chains must be attached to wall fixings suitable for your wall type, the wall fixings are not supplied with the cooker (Figure 2).
- Page 9 Section 2: Installation Importantnote: If plastic wall plugs Important note 2. ‘Plasterboard’ wall plug are supplied with your For use when attaching light loads on to product: If plastic wall plugs are supplied with your product: plasterboard heavy loads such as shelving, wall cabinets and coat racks.
- Page 10 Section 2: Installation The electrical cable (not supplied) should not be Electrical Connection routed through any area that may be affected by heat from the oven, especially the area directly IMPORTANT: Electrical connections must be behind the oven. carried out by a suitably qualified person and in accordance with all relevant local building Minimum of 32 AMP Connection on a 6 mm cable.
-
Page 11: Section 3: Operating The Appliance
Section 3: Operating The Appliance Control of the hob burners Using The Hob The knob has 3 positions: Off ( ), max (big flame symbol) Ignition Button and min (small flame symbol). After you ignite the burner in max. position you can adjust the flame length between Press and turn the control knob towards the large max. - Page 12 Section 3: Operating The Appliance After use the hob remains very hot for a prolonged Using The Hob period of time, do not touch it and do not place any object on top of the hob. When turning the hob off, turn the knob in the clockwise direction so that the knob shows “...
- Page 13 Using The Multifunction Oven - BOTTOM LEFT Turn the Oven knob clockwise and align the marker on Section 3: Operating the control knob to the required function The Appliance Select temperature via the far left hand control knob. The indicator light on the control panel will go out and the thermostat will turn the element off when the se- Using The Fan Oven - TOP RIGHT lected temperature has been reached inside the oven.
- Page 14 Cooking Functions Turn the Oven Function Control Knob clockwise to the required function. Now turn the Oven Thermostat Control Knob to the required oven temperature. Please see below for a typical example of cooking function icons. Please note, not all functions may be available on your appliance.
-
Page 15: Section 4: Cooking Guides/Maintenance
Section 3: Operating The Appliance Setting the timer (alarm) Using The Programmable Timer - Top Right Oven With this feature you can set the alarm to sound after lapsed period of time. Cancelling the timer (alarm) Buttons The Electronic Timer Functions Alarm Clock With Alarm Start Cooking... - Page 16 Section 3: Operating The Appliance Note: the default setting is the highest brightness Using The Programmable Timer (continued) level of the three. Delayed cooking program Using Conventional Oven & Grill - Top Left Turn the control knob (TOP OVEN) clockwise and align Once you have set the length of cooking time, you the marker on the knob with the required temperature.
-
Page 17: Section 5: Technical & Points Of Contact
All timings given are purely as a guide. Timings may always vary due to personal methods, size of food being prepared and the temperature of said food stuffs. We always recommend following the cooking guidelines on your meat products and packets. For additional information, please call Montpellier on 03333 234 474. Rack Food Type Temperature Cooking Time Position Small Cakes 1 to 3 180 ‐ 200°c 15‐20 mins Biscuits 3 180 ‐ 200°c 12‐15 mins Fruit Cakes 3 135‐145°c 4hrs ‐ 4hrs 45 mins Sponge Cakes 2 180 ‐ 200°c 50 mins Bread 2 or 3 190°c 20‐30 mins Rolls 3 200°c (5) 180°c (15‐20) 5 mins/15‐20 mins Beef Rib (Bone in/out) ‐ 4 ‐ 8 23‐30/39‐43 mins min per lb ‐ Allow 3 140‐150°c pounds (lb) to rest for 3‐5 mins. Beef ‐ Eye round roast ‐ 2 ‐ 3 20‐22 mins min per lb ‐ Allow to rest ... - Page 18 Gas Mark to °F & °C – Temperature Conversion ...
- Page 19 Section 4: Maintenance Removal of door glass for cleaning Cleaning WARNING! Isolate the power supply to the cooker 1 and make sure that the oven is cool. Do not clean using caustic creams, abrasive cleaning powders, thick wire wool or hard tools. Enamelled parts of the oven can be damaged if excess cleaning liquids are not immediately removed.
- Page 20 • DO NOT attempt to repair this cooker yourself. Call consumer unit Montpellier Service on 03333 234 473 or consult a qualified electrician. Problem Possible Cause Solution...
- Page 21 Technical Specifications...
- Page 22 Notes...
- Page 23 Bin, indicates that this appliance may not be treated Should your appliance develop a fault, please as household waste. Instead it shall be handed over call Montpellier Service on: 03333 234 473 to the applicable collection point for the recycling of electrical and electronic equipment.
Need help?
Do you have a question about the RMC100DFK and is the answer not in the manual?
Questions and answers