Sony Walkman MZ-R909 Operating Instructions Manual
Sony operating instructions portable minidisc recorder mz-r909
Hide thumbs
Also See for Walkman MZ-R909:
- Service manual (62 pages) ,
- Operating instructions manual (91 pages) ,
- Operating instructions manual (116 pages)

Related Manuals for Sony Walkman MZ-R909


Summary of Contents for Sony Walkman MZ-R909
- Page 1 Portable MiniDisc Recorder Operating Instructions MZ-R909 ©2001 Sony Corporation 3-234-030-12(1) “WALKMAN” is a trademark of Sony Corporation.
- Page 2 WARNING To prevent fire or shock hazard, do not expose the unit to rain or moisture. To avoid electrical shock, do not open the cabinet. Refer servicing to qualified personnel only. Do not install the appliance in a confined space, such as a bookcase or built-in cabinet.
-
Page 4: Table Of Contents
Table of contents Looking at controls ... 8 How to use the jog dial ...11 List of menus ...11 Menu functions ...11 Tables of Menus on the recorder ...13 Tables of menus on the remote control ...17 Getting started ... 19 Recording an MD right away! ... - Page 5 Various ways of playback ... 42 Searching for a specific track or a position quickly (Quick Search) ... 42 Searching for a specific track while monitoring track numbers or track names (Index Search) ... 42 Searching for a specific point while monitoring the elapsed time (Time Search) ...
- Page 6 Editing recorded tracks ... 55 Labeling recordings ...55 On the recorder ...55 On the remote control ...57 Storing phrases frequently used in labeling ...59 On the recorder ...59 On the remote control ...61 Registering tracks or groups as a new group (Group setting) ...63 To release a group setting ...64 Moving recorded tracks ...64 On the recorder ...64...
- Page 7 Power sources ... 75 Battery life ... 75 Additional information ... 76 Precautions ... 76 Troubleshooting ... 79 System limitations ... 83 Messages ... 84 Specifications ... 87 What is an MD? ... 88...
-
Page 8: Looking At Controls
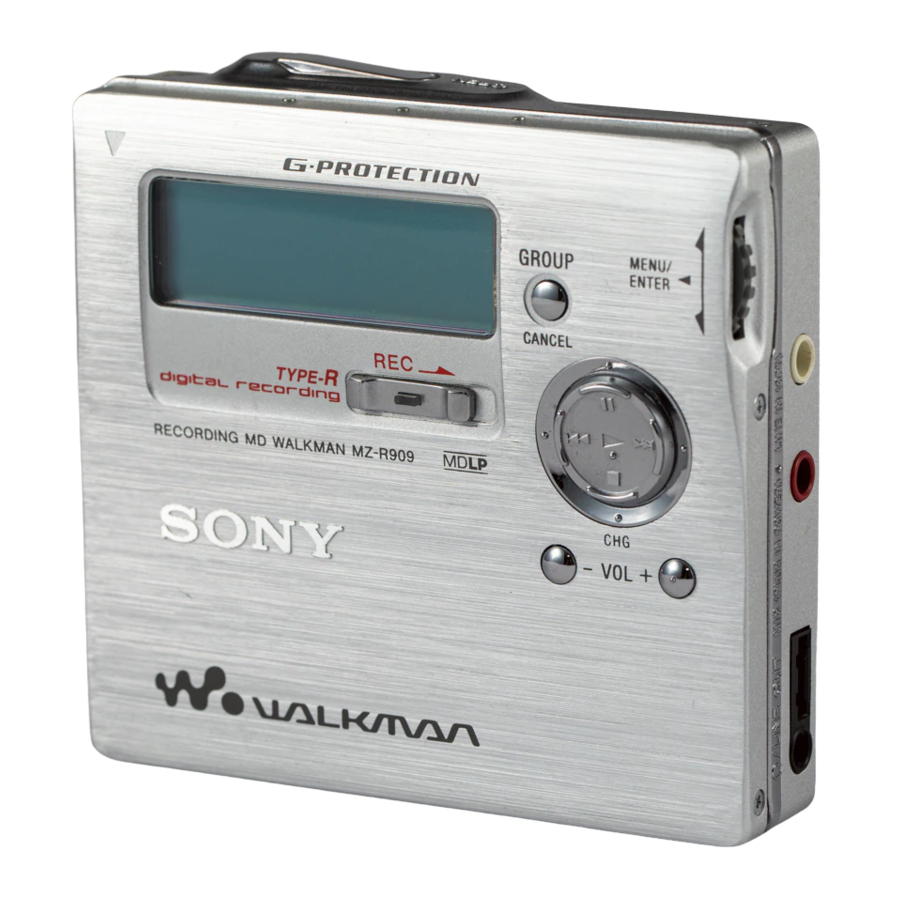
Looking at controls See pages in ( ) for more details. The recorder A Display window (11) (32) (45) (55) (70) B T MARK button (39) (56) (67) C END SEARCH button (23) (31) (60) D Battery compartment (19) E REC (record) switch (23) (28) F HOLD switch (at the rear) (20) (74) G Terminals for attaching dry battery case (20) - Page 9 The display window of the recorder A Character information display (11) (37) (45) (55) (70) Displays the disc and track names, date, error messages, track numbers, etc. B Group indication (31) (43) (57) C Timer indication (70) D Disc indication (32) (45) (55) (70) Shows that the disc is rotating for recording, playing or editing an MD.
- Page 10 The headphones/earphones with a remote control A B C DE A DISPLAY button (31) (38) (42) (53) (58) (71) B PLAYMODE button (44) (47) (58) C RPT/ENT (repeat/enter) button (47) (49) D SOUND button (49) E Clip F X (pause) button (25) (42) (58) (61) The display window of the remote control A Track number display (38) (47) (71) B Character information display (38)
-
Page 11: How To Use The Jog Dial
How to use the jog dial The jog dial on the recorder can be used to perform various operations during playback, recording, editing, and when the recorder is stopped. Push to enter Turn to select Display window while selecting the menu items Press the jog dial to display menu items in the display window on the recorder. - Page 12 Menu on the Menu on the recorder remote control REC MODE — M-TIMER M-TIMER AUDIO OUT — SOUND — — SPEED — GROUP PERSONAL PERSONAL SYNC REC — TIME MARK — MIC SENS — — SEARCH OPTION OPTION — The menu items that can be selected vary according to the on/off status of group mode or the operating status of the recorder.
-
Page 13: Tables Of Menus On The Recorder
Tables of Menus on the recorder The menus provided on the recorder for each operating status are shown on this and the following pages. Each chart shows the various menus and the menu items that can be selected at each menu level. See “Menu functions” (page 11) for details on menu operations. - Page 14 continued from the last page PERSONAL Entry? SYNC REC SYNC OFF MIC SENS SENS HIGH OPTION AVLS AVLS OFF Appears only when the recorder is played and then stopped while in group mode. Does not appear when the supplied remote control is connected to the i/LINE OUT jack. Selectable only when the group mode is turned off.
- Page 15 Menus and menu items selected while the recorder is playing EDIT :Name DISPLAY LapTime PLAY MODE Normal M-TIMER (page 70) AUDIO OUT LINE OUT SOUND (page 48) SOUND OFF PERSONAL Entry? OPTION AVLS AVLS OFF AVLS ON Appears only when the recorder is played and then stopped while in group mode. Does not appear when the supplied remote control is connected to the i/LINE OUT jack.
- Page 16 Menus and menu items selected while the recorder is recording EDIT :Name DISPLAY LapTime Rec Volume Auto REC REC MODE AUDIO OUT LINE OUT SOUND (page 48) SOUND OFF TIME MARK SYNC REC SYNC OFF MIC SENS SENS HIGH OPTION AVLS Appears only when the recorder is played and then stopped while in group mode.
-
Page 17: Tables Of Menus On The Remote Control
Tables of menus on the remote control The menus provided on the remote control for each operating status are shown on this and the following pages. Each chart shows the various menus and the menu items that can be selected at each menu level. See “Menu functions” (page 11) for details on menu operations. - Page 18 Menus and menu items selected while the recorder is playing EDIT :Name M-TIMER (page 71) SPEED (page 50) GROUP GROUP OFF PERSONAL Entry? SEARCH Index OPTION AVLS AVLS OFF Appears only when the recorder is played and then stopped while in group mode. Press DISPLAY for 2 seconds or more on the remote control to cancel a menu operation.
-
Page 19: Getting Started
Getting started Charge the rechargeable battery before using. Even if the rechargeable battery is not charged, you can use the recorder as long as the AC power adaptor is connected. Insert the rechargeable battery Charging the rechargeable battery How to assemble the battery charging stand Make sure all the parts of the battery charging stand are... - Page 20 Do not operate the recorder when you place it on the battery charging stand or during the charging. If you do so, it may cause the recorder to malfunction or prevent the battery from charging. Using the dry battery Attach the dry battery case to the recorder. Insert a LR6 (size AA) alkaline dry battery.
- Page 21 Insert an MD recording.) Press OPEN to open the lid. You can also charge the battery by connecting the supplied AC power adaptor directly to the recorder. 1 Connect the supplied AC power adaptor to DC IN 3V on the recorder, and then press x/CHG while the recorder is stopped.
-
Page 22: Recording An Md Right Away
AC power adaptor when recording. Make connections firmly and completely into the appropriate jacks.) to a wall outlet AC power adaptor to DC IN 3V (Insert the cables CD player, MD player, DVD video player, etc. to DIGITAL OUT (OPTICAL) Optical plug Optical cable... - Page 23 Specifying the recording position Jog dial While the recorder is stopped, press the jog dial, turn the dial until “OPTION” flashes in the display, and then press the dial again. Turn the jog dial until “REC-Posi” flashes in the display, and press the jog dial, Record an MD Record from the end of the current...
- Page 24 • You can make digital recording only from an optical type output. • When recording from a portable CD player, set the CD player to pause, and then do the recording procedure on the recorder. • Note the following when recording from a portable CD player: —Some portable CD players may not be...
-
Page 25: Playing An Md Right Away
Playing an MD right away! Play an MD VOL +/– Control Playback starts from the point you last stopped playing. To start playback from the beginning of the disc, press for 2 seconds or more on the recorder, or turn and hold the control towards 2 seconds or more on the remote control. - Page 26 You can turn off the beep sound (page 73). Once you open the lid, the point to start play will change to the beginning of the first track (except when the disc information is stored to the Personal Disc Memory). If the play does not start Make sure the recorder is not locked (pages 20, 74).
-
Page 27: Various Ways Of Recording
The input jack of this recorder works as both digital and analog input jacks. Connect the recorder to a CD player or a cassette recorder using either digital (optical) input or analog (line) input. To record, see “Recording an MD right away!” (page 22) to record using digital (optical) input, and “Recording with analog input (line cable required)”... -
Page 28: Recording With Analog Input (Line Cable Required)
To connect to a sound source, an optional line cable is required. When connecting the cable, make sure to insert the connectors firmly. CD player, cassette recorder, etc. (source) to LINE OUT L (white) Line cable* ∗... -
Page 29: Long-Time Recording
Long-time Recording Select each recording mode according to the recording time that you want. Stereo recording is possible at 2 times (LP2) or 4 times (LP4) the normal (SP stereo) recording time. Monaural recording at 2 times normal recording speed is also possible. MDs recorded in monaural, LP2, or LP4 mode can be played back only on MD players or recorders with... -
Page 30: Recording Tracks Using The Group Function (Group Mode Recording)
TYPE-R for ATRAC (Adaptive TRansform Acoustic Coding). What is the newly developed DSP TYPE-R for ATRAC? “TYPE-R” is a high-level Sony specification used in the Digital Signal Processor (DSP), which is heart of the MiniDisc sound. This technology gives the MiniDisc recorder twice... -
Page 31: To Activate The Group Mode
It is convenient for managing multiple CD albums recorded in MDLP (LP2 stereo/LP4 stereo) mode onto a single How is group information recorded? When recording in group mode, the group information is written to the disc name recording area. This information consists of text strings that are written as shown in the following example. -
Page 32: Recording A Track Into An Existing Group
Recording a track into an existing group While the recorder is stopped, press GROUP for 2 seconds or more. Press GROUP slightly. “ ” flashes in the display and you can select a group directly (group skip mode) (page 44). Within 5 seconds, press . -
Page 33: Recording Without Overwriting Existing Material
“SYNC” appears in the display. “SYNC” does not appear if optical cable is not connected to the recorder. Press and slide REC to the right. The recorder stands by for recording. Play the source sound. The recorder starts recording when it receives the playing sound. -
Page 34: Recording From A Microphone
To temporarily record without recording over the current contents, press END SEARCH before the start of recording. The recording will begin after the last track, even if “REC-Posi” is set to “From Here” (factory setting). The remaining recordable time on the disc will appear in the display when you press END SEARCH. -
Page 35: Adding Track Marks Automatically At Specified Intervals (Auto Time Stamp)
Adding track marks automatically at specified intervals (Auto Time Stamp) Use this feature to add track marks automatically at specified intervals when recording through the analog input connector or a microphone. Jog dial While the recorder is recording or in recording pause, press the jog dial. -
Page 36: Adjusting The Recording Level Manually (Manual Recording)
Adjusting the recording level manually (Manual recording) When you record, the sound level is adjusted automatically. If necessary, you can set the recording level manually (with the Digital REC level control) during both analog and digital recording. Jog dial While holding down X, press and slide REC to the right. -
Page 37: Checking The Remaining Time Or The Recording Position
Checking the remaining time or the recording position You can check the remaining time, track number, etc. when recording or during stop. Group-related items appear only when a track with group settings is played and then stopped. On the recorder REC indicator Jog dial Press the jog dial, turn the dial until... -
Page 38: On The Remote Control
To know the recording condition The indicator lights up or flashes according to the recording condition. Recording REC indicator condition While recording lights up flashes according to the loudness of the source while recording with a microphone (voice mirror) Recording standby flashes Less than 3 flashes slowly minutes’... -
Page 39: Setting The Clock To Stamp The Recorded Time
Setting the clock to stamp the recorded time To stamp the date and time on the MD when you record, you first need to set the clock. Once you set the clock, the recorder will include a time stamp each you record something. -
Page 40: Copying Cd Text Information While Recording (Joint Text)
CD that support CD-TEXT, and CD player that support Joint Text required By connecting the recorder to a Sony portable CD player that supports Joint Text (the CD text copying function) (D- E999, etc.), you can copy track and disc names automatically during recording. - Page 41 CDs that support CD-TEXT. • The RK-TXT1 CD text connecting cable is designed for exclusive use with this recorder and Sony portable CD player (D-E990, etc.). Do not use a connecting cable of another make to copy CD text information.
-
Page 42: Various Ways Of Playback
Various ways of playback Searching for a specific track or a position quickly (Quick Search) ./>/X Jog dial DISPLAY Control You can do two kinds of quick search. • Index search — Searching quickly while monitoring the track numbers or track names. -
Page 43: Searching For A Specific Point While Monitoring The Elapsed Time
Searching for a specific point while monitoring the elapsed time (Time Search) To do a time search, do the procedures of “Selecting the search mode” and select “Time” in step 3. On the recorder Press X while playing a disc. The playback will pause. -
Page 44: Selecting And Playing Desired Groups (Group Skip Mode)
On the remote control Insert a disc which has group settings into the recorder and play the disc. Press DISPLAY for 2 seconds or more, turn the control towards . or N> until “GROUP” flashes in the display, and then press x. Turn the control towards . -
Page 45: Changing A Play Mode
Within 5 seconds, turn the control towards . or N> to select your desired group. During playback on group mode, playback of the desired group starts with the first track in the group and stops with the last track in the group. During normal playback, playback of the selected group starts with the first track in the group and stops with the... -
Page 46: On The Remote Control
Indication A (Play mode Normal/— (All the tracks are played once.) AllRepeat/ (All the tracks are played repeatedly.) 1 Track/1 (A single track is played.) 1 Repeat/ 1 (A single track is played repeatedly.) Shuffle/SHUF (After the currently selected track finishes playing, the remaining tracks are played in random order) Shuf. - Page 47 Selecting a play mode Press PLAYMODE while the recorder is playing. Each press of the button changes the play mode indication as shown below and starts playback in the selected play mode. Display window on the remote control Play mode indication Indication (Play mode) —...
-
Page 48: To Adjust The Sound Quality (Digital Sound Preset)
To adjust the sound quality (Digital Sound Preset) You can make adjustments to the sound quality to suit your taste, and then store two sets of these adjustments. Jog dial Control Selecting the sound quality Factory settings of the Digital Sound Preset Factory settings of the Digital Sound Preset are the followings:... - Page 49 Turn the jog dial to adjust the sound level. The cursor moves. (Position: +2) ±0 The sound can be adjusted in 8 steps (–4, –3, ...±0, ...+2, +3). Press x to move the cursor from “T” to “B” (from the middle row to the bottom row in the display) and press X to move the cursor from “B”...
-
Page 50: To Change Playback Speed (Speed Control)
• The settings can be stored to the Personal Disc Memory (page 51). • Settings can also be changed while playback is momentarily paused (X). • If the recorder is not operated approximately for 5 minutes, the current setting is stored and the display automatically switches to normal play mode. -
Page 51: Storing The Settings For Individual Discs (Personal Disc Memory)
Storing the settings for individual discs (Personal Disc Memory) The recorder can store the various settings for each disc, and then retrieve them automatically whenever the disc is inserted. The following setting can be stored: • Volume • Playback mode •... -
Page 52: Checking The Remaining Time Or The Playing Position
Checking the remaining time or the playing position You can check the track name, disc name, etc. during playback. Group-related items appear only when a track with group settings is played and then stopped. On the recorder While the recorder is playing, press the jog dial, turn the dial until “DISPLAY”... -
Page 53: On The Remote Control
On the remote control DISPLAY Press DISPLAY while playing. Each time you press DISPLAY, the display changes as follows. Display window on the remote control Indication D/E Track number/Elapsed time Track number/Track name The number of tracks in the group/ Group name The number of tracks in the disc/ Disc name... - Page 54 Notes • If the “AUDIO OUT” parameter for the i/ LINE OUT jack is set to “LINE OUT”, VOL +/– or Digital Sound Preset will not function. • The “AUDIO OUT” parameter for the i/ LINE OUT jack cannot be set to “LINE OUT” when the remote control is connected.
-
Page 55: Editing Recorded Tracks
Editing recorded tracks You can edit your recordings by adding/ erasing track marks or labeling tracks and MDs. Premastered MDs cannot be edited. Notes on editing • Do not move or jog the recorder while “TOC Edit”* is flashing in the display. •... - Page 56 While the recorder is stopped, press the jog dial, turn the dial until “EDIT” flashes in the display, and then press the dial again. “ : Name” flashes in the display. Press the jog dial. The disc is ready to be labeled. Letter input area Character palette Press x to shift the cursor from the...
-
Page 57: On The Remote Control
You can store phrases that you often use in tracks (page 59). Labeling a track or a group during playback To label a track, insert a disc and play the track you want to label. To label a group, insert a disc, turn the group mode on, and play the group you want to label (page 43). - Page 58 Press DISPLAY for 2 seconds or more while the recorder is stopped. Turn the control towards . or N> until “EDIT” flashes in the display, and then press “ : Name” flashes in the display. Press The disc is ready to be labeled. Turn the control towards .
-
Page 59: Storing Phrases Frequently Used In Labeling
To label a track, press “ : Name” is flashing. To label a group, press the control towards . or N> until “GP : Name” flashes in the display, then press To label a disc, press the control towards . or N> until “... - Page 60 Storing phrases while labeling a track, group, or disc Follow steps 1 to 6 of “Labeling recordings” (page 55) to enter a phrase. After entering the phrase, press CANCEL to remove the cursor from the character palette to the letter input area, and then press END SEARCH for 2 seconds or more.
-
Page 61: On The Remote Control
Press the jog dial while the desired phrase flashes in the display. The phrase is selected and lights up in the letter input area. Press the jog dial for 2 seconds or more. The selected phrase is retrieved. Erasing phrases While the recorder is stopped, press the jog dial, turn the dial until “EDIT”... - Page 62 Searching for a phrase by displaying the stored phrase one by one Follow steps 1 and 2 “On the remote control” in “Labeling recordings” (page 57), and then turn the control towards . or N> until “ : Name”, “GP : Name”, or “...
-
Page 63: Registering Tracks Or Groups As A New Group (Group Setting)
Registering tracks or groups as a new group (Group setting) Do the following procedure to register tracks (or groups). A series of tracks (or groups) can be registered by selecting the starting and ending tracks (or groups). The tracks (or groups) must, however, be sequential. -
Page 64: To Release A Group Setting
To release a group setting Jog dial Press GROUP for 2 seconds or more. “ ” lights up in the display and the group mode turns on. Follow steps 1 and 2 of “On the recorder” in “Selecting and playing desired groups (Group skip mode)”... -
Page 65: On The Remote Control
Turn the jog dial until the destination track number flashes in the display. For the example, since track C will be moved to track “002”, turn the jog dial until “002” flashes in the display. Press the jog dial again. The track moves to the selected destination track. -
Page 66: On The Remote Control
On the remote control DISPLAY Control While the track you want to move is playing, press DISPLAY for 2 seconds or more. Turn the control towards . or N> until “GROUP” flashes in the display, and then press Turn the control towards . or N>... -
Page 67: On The Remote Control
On the remote control DISPLAY Control Press DISPLAY for 2 seconds or more. Turn the control towards . or N> until “GROUP” flashes in the display, and then press Turn the control towards . or N> until “GROUP ON” appears in the display and then press The group mode turns on. -
Page 68: Erasing A Track Mark
Erasing a track mark When you record with analog (line) input, unnecessary track marks may be recorded where recording level is low. You can erase a track mark to combine the tracks before and after the track mark. The track numbers will change as follows. -
Page 69: To Erase The Whole Disc
Turn the jog dial until “ flashes in the display, and then press the dial. “Erase OK?” appears and “PushENTER” flashes in the display. To cancel erasing, press CANCEL. Press the jog dial again. The track is erased and the next track starts to play. -
Page 70: Other Operation
Other operation Suppressing the skips of the sound (G-PROTECTION) The G-PROTECTION function was developed to provide a higher level of shock resistance than that of existing players in order to allow the recorder to be used while jogging. Note The playback sound may skip if: •... -
Page 71: On The Remote Control
On the remote control DISPLAY Control While the recorder is stopped, playing, or play-paused, press DISPLAY for 2 seconds or more. Turn the control towards . or N> until “M-TIMER” flashes in the display, and then press Turn the control towards . or N>... -
Page 72: Protecting Your Hearing (Avls)
Notes • The settings will be lost when you start recording. • The timer will begin counting down (using the factory setting) from the moment you select “ON” in step . The recorder will begin counting down again from the moment you change the elapsed time in step 6. -
Page 73: Turning Off The Beep Sound
Turning off the beep sound You can turn off the beep sound in the headphones/earphones. Jog dial DISPLAY Control On the recorder Press the jog dial, turn the dial until “OPTION” flashes in the display, and then press the dial again. Turn the jog dial until “BEEP”... -
Page 74: Locking The Controls (Hold)
Locking the controls (HOLD) To prevent the buttons from being accidentally operated when you carry the recorder, use this function. HOLD HOLD Slide HOLD in the direction of the On the recorder, slide HOLD to lock the controls of the recorder. On the remote control, slide HOLD to lock the controls of the remote control. -
Page 75: Power Sources
Measured in accordance with the JEITA (Japan Electronics and Information Technology Industries Association) standard. When using a 100% fully charged rechargeable battery. When using a Sony LR6 (SG) “STAMINA” alkaline dry battery (produced in Japan). When playing (Unit: approx.hours)(JEITA Batteries... -
Page 76: Additional Information
Additional information Precautions On safety Do not put any foreign objects in the DC IN 3V jack. On power sources • Use house current, nickel metal hydride rechargeable battery, LR6 (size AA) battery, or car battery. • For use in your house: For the supplied battery charging stand, use the AC power adaptor supplied with this recorder. -
Page 77: To Protect A Recorded Md
• To obtain the best sound quality, use a dry cloth to wipe the plugs of the headphones/ earphones or the remote control. Dirty plugs may cause sound distortion or intermittent breaks in the sound. Notes on batteries Incorrect battery usage may lead to leakage of battery fluid or bursting battery. - Page 78 Sony dealer. (If a trouble occurred when the disc was in the recorder, we recommend that the disc be left in the recorder when you consult your Sony dealer so that the cause of trouble may be better understood.)
-
Page 79: Troubleshooting
Troubleshooting Should any problem persist after you have made these checks, consult your nearest Sony dealer. Symptom Cause/Solution The recorder does • Audio sources may not be securely connected. not work or works , Disconnect the audio sources once and connect them again poorly. - Page 80 , Turn the group mode on before setting the program. Here”. , Set “REC-Posi” setting to “From End”. , When recording digitally from a portable CD player, use the AC power adaptor and disable the anti-skip function (such as ESP) on the CD player (page 24).
- Page 81 • The connected portable CD player does not supports CD-TEXT. recorded. , Connect a portable CD player (D-E999, etc.) that supports CD- TEXT (page 40). • The inserted CD does not support CD-TEXT. , Insert a CD that supports CD-TEXT.
- Page 82 Symptom Cause/Solution VOL +/– or • The “AUDIO OUT” parameter is set to “LINE OUT”. Digital Sound Preset does not function The disc cannot • The component does not support LP2 stereo or LP4 stereo. edit on other component. Momentary noise •...
-
Page 83: System Limitations
System limitations The recording system in your MiniDisc recorder is radically different from those used in cassette and DAT decks and is characterized by the limitations described below. Note, however, that these limitations are due to the inherent nature of the MD recording system itself and not to mechanical causes. -
Page 84: Messages
Messages If the following error messages flash in the display window, check the chart below. Error message Meaning/Remedy BANK FULL • The name bank is almost full and cannot store the phrase you tried BLANKDISC • An MD with no recording on it is inserted. BUSY •... - Page 85 Error message Meaning/Remedy MEM OVER • You tried to record with the recorder placed where it receives continuous vibration. , Put the recorder on a stable place, and start recording again. MENU • You pressed a key on the remote control while selecting a menu on the recorder.
- Page 86 Error message Meaning/Remedy SORRY • You tried to erase the track mark at the beginning of the first track. • You tried to erase a track mark to combine tracks the recorder • You tried to overwrite a track marks. •...
-
Page 87: Specifications
194 mV (10 kohm) Maximum output (DC) Headphones: 5 mW + 5 mW (16 ohm) Power requirements Sony AC Power Adaptor connected at the DC IN 3V jack: 120 V AC, 60 Hz (U.S.A., Canadian and Taiwan model) -
Page 88: What Is An Md
Optional accessories Optical Cable POC-151HG, POC-152HG, POC-MZ1, POC-MZ2, POC-15B, POC-15AB, POC- DA12SP Line Cable RK-G129, RK-G136 Stereo Microphones ECM-717, ECM-MS907, ECM-MS957 Stereo Headphones/earphones* MDR-EX70LP, MDR-Q33LP, MDR-A110LP CD text connecting cable RK-TXT1 Active Speakers SRS-Z500 Recordable MDs MDW-series You cannot use the following accessories with this recorder. - Page 89 How the MiniDisc got so small The 2.5-inch MiniDisc, encased in a plastic cartridge that looks like a 3.5-inch diskette (see illustration on page 88), uses a new digital audio compression technology called ATRAC (Adaptive TRansform Acoustic Coding). To store more sound in less space, ATRAC extracts and encodes only those frequency components actually audible to the human ear.
- Page 92 Sony Corporation Printed in Japan Sony Corporation Printed in Japan...